background image

Instruction Manual

MAN-004

3

www.macmedical.com

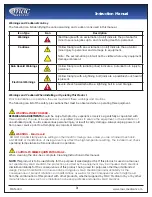
Warnings and Cautions Icon Key

The following is a list identifying the various warning and caution icons used in this manual.

Icon Type

Icon

Description

Warnings

(Red triangle with an exclamation point) indicate the potential for 

minor to severe injuries up to and including death to personnel.

Cautions

(Yellow triangle with an exclamation point) indicate the potential 

minor injury to personnel and damage to equipment. 

Note:  The exclamation point will not be visible where only equipment 

damage is present.

Burn Hazard Warnings

(Yellow triangle with radiating lines) indicate a potential burn injury to 

personnel.

Electrical Warnings

(Yellow triangle with a lightning bolt) indicate a possible shock hazard 

is present. 

Severe shock hazards shall be a lightning bolt in a red triangle.

Warnings and Cautions When Installing or Operating This Product

Prior to installation or operation, the user must read these warnings and cautions.

The following is a list of the safety precautions that must be observed when operating this equipment.  

 WARNING-INJURY HAZARD -


REPAIRS AND ADJUSTMENTS

 should be only attempted by experienced service agents fully acquainted with 

this equipment. The use of inexperienced, unqualified persons to service the equipment, or the installation of 

unauthorized parts, could cause serious personal injury, or result in costly damage. Always unplug power cord 

from power source prior to attempting any repairs or servicing.

 WARNING - Burn Hazard

 DO NOT CHANGE temperature settings on thermostatic mixing valve, unless you are a trained mechanic.  

ANY REPAIR or modification of mixing valve may affect the high temperature setting.  The installer must check 

operating temperature before sink is back in operation.       

 CAUTION-POSSIBLE EQUIPMENT DAMAGE -

When cleaning the sink - See complete Cleaning Instructions in this manual.

NOTE:

 This product is to be used strictly for the purpose it was designed for. If this product is used in a manner 

not specified by MAC Medical, the protection provided by the equipment may be impaired. MAC Medical 

disclaims all liability for the consequences of this product being used for purposes other than its intended 

design. Product modification or misuse can be dangerous. MAC Medical disclaims all liability for the 

consequences of product alterations or modifications, as well as for the consequences which might result 

from the combination of this product with other products, whether supplied by MAC Medical or by or by other 

manufacturers, unless such a combination has been specifically endorsed by MAC Medical.

Содержание SS32

Страница 1: ...nstructions and safety information in this manual before operating this product MAN 004 Rev G 02 2019 2019 MAC Medical Inc SS Series Surgical Scrub Sinks Installation Operation Maintenance Cleaning OS...

Страница 2: ...g Specifications SS32 Single Basin 9 Recommended Mounting Specifications SS64 Double Basin 10 Recommended Mounting Specifications SS96 Triple Basin 11 Connect Drain Pipe to Drain and Plumbing to Water...

Страница 3: ...with this equipment The use of inexperienced unqualified persons to service the equipment or the installation of unauthorized parts could cause serious personal injury or result in costly damage Alway...

Страница 4: ...uirements for sinks with optional infrared sensor operations a 120 Volt 60 Hz single phase 3 0 amp GFIC protected electrical outlet by others b 220 VAC 60 Hz single phase 1 5 amp c to be installed per...

Страница 5: ...tion of excessive or insufficient flow rates Switch Ratings Max Resistive Load Switch Timer Controller Maintenance Accumulation of foreign debris should periodically be removed from these switches Occ...

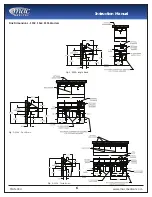
Страница 6: ...Instruction Manual MAN 004 6 www macmedical com Sink Dimensions SS32 SS64 SS96 Models Fig 2 SS32 single basin Fig 3 SS64 Dual Basin Fig 4 SS96 Triple Basin...

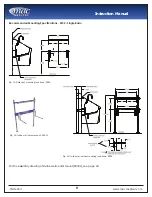
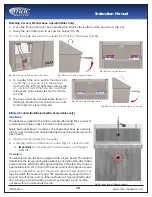
Страница 7: ...ded mounting specifications for Z brackets shown in Fig 13 SS32 Fig 16 SS64 and Fig 19 SS96 on page 9 through page 11 B IMPORTANT For wall mounted units the wall structure must be capable of supportin...

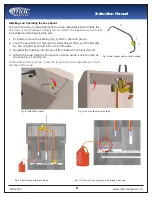
Страница 8: ...ut item 1 through the small hole at the top of the sink Fig 9 The nut item 2 should rest on top of the sink 3 Re install the bushing onto the spout from inside the cabinet Fig 10 4 Attach the soap tub...

Страница 9: ...ended Mounting Specifications SS32 Single Basin For the assembly drawing of In line wall carrier mount S0001 see page 20 Fig 13 Z bracket mounting locations SS32 Fig 14 In line wall carrier mount S000...

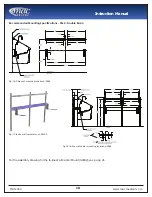
Страница 10: ...ded Mounting Specifications SS64 Double Basin For the assembly drawing for the In line Wall Carrier Mount S0002 see page 21 Fig 16 Z bracket mounting locations SS64 Fig 17 In line wall carrier mount S...

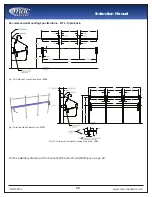
Страница 11: ...ended Mounting Specifications SS96 Triple Basin For the assembly drawing of the In Line Wall Carrier Mount S0003 see page 22 Fig 19 Z bracket mount locations SS96 Fig 20 In line wall carrier mount S00...

Страница 12: ...ection and Yearly Maintenance Periodic inspection and yearly maintenance by a licensed contractor is required Corrosive water conditions temperatures over 200 F unauthorized adjustments or repair coul...

Страница 13: ...ogged cartridge 2 Flow of water is completely cut off A Valves upstream from supply completely closed B Failure of cold water supply pressure mixing value is designed to shut off on a cold water suppl...

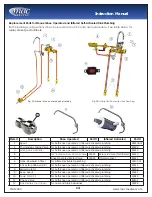
Страница 14: ...umbing S0010 4 1 2 Balance Flow Control Valve S0024 Solenoid Valve for Infrared S0013 5 Knee Operated Water Valve S0029 Infrared Sensor S0012 6 Inline Flow Switch Timer for infrared activated plumbing...

Страница 15: ...The sensors determines the range during initialization period The time after initial power until the light turns off is approximately 5 minutes The range is approximately 12 14 in front of the sensor...

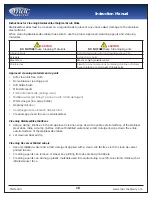
Страница 16: ...eaning pads Soft bristle brush Mild detergents Sodium Bicarbonate baking soda Distilled water pH rating 7 alone or with a mild detergent White vinegar in a spray bottle Isopropyl Alcohol Hospital grad...

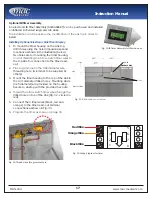
Страница 17: ...mer read out 2 Place a grommet in the 0 38 diameter wire threading hole Grommet to be supplied by others 3 Mount the timer housing to the top of the sink in the 0 31 diameter drilled holes Mounting st...

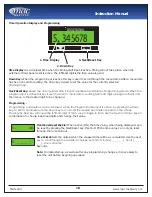
Страница 18: ...ing parameters can be accessed when the Program Enable input is active by pressing the Down key To edit a parameter use the Down key to scroll until the desired parameter appears on the screen Pressin...

Страница 19: ...ght Approximately 64 grams 2 25 ounces Rear Terminal Connections Timer Battery Replacement The unit is shipped with one CR AA size 3V Lithium battery which is pre installed To change the battery remov...

Страница 20: ...nds that the In line Wall Carrier Mount Assembly be tied into the existing wall support structure All applicable local and state building codes should be adhered to when mounting this unit 3 8 U BOLTS...

Страница 21: ...nds that the In line Wall Carrier Mount Assembly be tied into the existing wall support structure All applicable local and state building codes should be adhered to when mounting this unit SINK POST S...

Страница 22: ...ends that the In line Wall Carrier Mount Assembly be tied into the existing wall support structure All applicable local and state building codes should be adhered to when mounting this unit SINK POST...

Страница 23: ...factory It is the customer s responsibility to inspect the product for packaging damage before signing the BOL This warranty does not apply to products which have been subject to abuse misuse acciden...

Отзывы: