GB
ENGLISH | VISTUS-AD
17
17
Door opener time
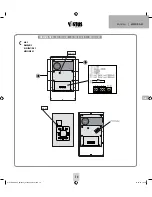
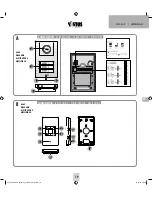
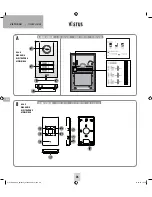
The DIP switch (Figure A, ‚Door opener time‘) is used to set how long
the door opener should be activated for. The possible settings are 1
second or 5 seconds. 5 seconds is the factory setting and works for
most standard door openers.
Switch ‘off’ corresponds to an opening time of 1 second.
Switch ‘on’ corresponds to an opening time of 5 seconds.
POSSIBLE SETTINGS ON THE INDOOR STATION
The following settings are possible on the indoor station to adjust the
system to your personal circumstances:
Ring tone volume
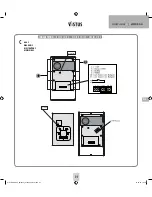
The potentiometer (Figure C ‘Bell Volume‘) is used to set the ring tone
volume on the indoor station. For full volume turn the potentiometer
carefully counter-clockwise until it stops. Turning the potentiometer
clockwise reduces the volume.
Deactivate ring tone/melody (e.g. during the night)
The ring tone/melody can be deactivated, e.g. in order to prevent
disturbance during the night. Either press the mute button on the
indoor unit once briefly. The LED below the mute button lights up red
as a reminder that the melody is deactivated. To activate the melody
again press the mute button again briefly. When the red LED goes out
the melody has been re-activated.
The optical signal (surround light on the talk and door opener button)
remains active, even then the ring tone/melody is deactivated and still
rings. The red LED flashes if the bell is rung while the mute is activated.
NOTE
: If the VTX-BELL module is used then this will also be deactivated
in the silent mode, i.e. the connected receivers will not give a
signal either.
IMPORTANT
: The indoor station needs to be activated for the
following settings (e.g. by pressing the talk button). Otherwise it is not
possible to set the talk/volume, and melody.
Speaking volume
The two side buttons (B. 12 and 13) can be used to set the speaking
volume in several steps. Button 12 is used to increase the volume and
button 13 to reduce it.
Melody selection
The next melody is played every time you press the button
(B/C.11). The last melody to be played is automatically stored.
OPERATION (as door intercom system)
1. Press the bell button.
2. The stored ring tone will play on the corresponding indoor
station(s)
3. Accept the conversation on the indoor unit by pressing briefly on
the talk button ( ).
4. If a door opener is connection then you can activate it by briefly
pressing the door opener button ( ). The bell button will light
green for the duration of the door opener as confirmation.
5. Press the talk button ( ) briefly in order to switch the system
back to standby operation.
Note
: If a floor button is connected then an unchangeable ring tone
is played when the floor button is activated. This ring tone is fixed
and is not included in the ‘normal’ tones/melodies to make it easy to
differentiate.
OPERATION (as internal house intercom)
All indoor units that are connected to the same bell button can also be
used as an internal intercom.
1. Press the internal button (B. 7) on the indoor station from
which you wish to reach another indoor station. All the connected
indoor station will ring. No image will be shown.
2. To accept the conversation on one of the other connected indoor
stations you need to briefly press the talk button there (B. 6).
3. The talk button needs to be pressed briefly on one of the two
indoor stations in order to end the conversation.
Note
: It is not possible to set different ring tones for internal and
external calls.
Technical data:
Outdoor station
Operating voltage: 15V DC
Standby power: <0.5W
Connection for door opener: ~12V DC, max. 0.9 A
Bell button illumination: automatic via CDS sensor
Indoor station
Operating voltage: 15V DC
Standby power: <0.5W
VISTUS AD-400_I-Manual_210x240_Fin13.indd 17
01.03.16 15:19
Содержание VISTUS AD-4010
Страница 9: ...DE DEUTSCH VISTUS AD 9 1 Familienhaus VISTUS AD 400_I Manual_210x240_Fin13 indd 9 01 03 16 15 19...
Страница 10: ...VISTUS AD DEUTSCH DE 10 2 Familienhaus VISTUS AD 400_I Manual_210x240_Fin13 indd 10 01 03 16 15 19...
Страница 11: ...DE DEUTSCH VISTUS AD 11 3 Familienhaus VISTUS AD 400_I Manual_210x240_Fin13 indd 11 01 03 16 15 19...
Страница 33: ...VISTUS AD 33 33 1 family house VISTUS AD 400_I Manual_210x240_Fin13 indd 33 01 03 16 15 19...
Страница 34: ...VISTUS AD 34 34 2 family house VISTUS AD 400_I Manual_210x240_Fin13 indd 34 01 03 16 15 19...
Страница 35: ...VISTUS AD 35 35 3 family house VISTUS AD 400_I Manual_210x240_Fin13 indd 35 01 03 16 15 19...


