background image


Step 6: Assemble cushion and pillow


1.

 Connect two air pipes of the back cushion as shown in Fig. 10 and Fig. 11. Be sure the two green clamps are tight  

     on 

ALL 

connection air pipes. Note total number of air pipes (2-right arm, 2-left arm, 3 seat, and 2 head) 


                                                       Fig. 10


Fig. 11


2. 

Place the backrest cushion via Velcro. First remove Velcro covers (Fig. 12) and then line up Velcro to seat cushion  

   (Fig. 13) 


Fig. 12


Fig. 13


3. 

Fix the backrest cushion on the chair via the zipper and bottom Velcro on the seat (Fig. 14)


Fig. 14                                                                      Fig. 15 


10


Back Cushion 

Содержание iRobotics 6

Страница 1: ......

Страница 2: ...ck or injury to persons 18 Do not touch or re wire the wires connected to the master box 19 Do not attempt to repair or adjust any electrical or mechanical functions on this unit Doing so will void th...

Страница 3: ...tions Do not use more than 20 minutes per session Do not place or stock this machine near damp places such as swimming pools or bathrooms Do not press by force on the massage rollers Do not stand on t...

Страница 4: ...play around chair Please be sure that no people pets or other objects are behind the chair or under the legs before reclining or lowering the leg massager Do not put your hands or head under the chai...

Страница 5: ...on device Specified cleaner can be used on the leather plastic and dried with a cloth DO NOT use a damp cloth on the electronic components which can cause shock and damage The leather covers headrest...

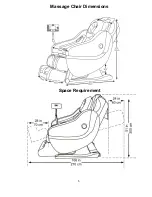
Страница 6: ...Massage Chair Dimensions Space Requirement 5...

Страница 7: ...void damaging the system we suggest at least two people to assist with assembly ATTENTION 6 Package 1 Main body seat frame casing back cushion pillow controller supporter foot massager Package 2 Left...

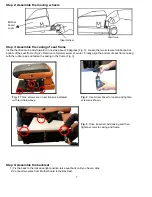
Страница 8: ...with the rubber pad and fasten the casing to the frame Fig 3 Step 4 Assemble the backrest 1 Fix the back to the locked upright position raise seat back until you hear a click 2 Connect two wires from...

Страница 9: ...lign armrest to the perfect position with chair frame and then match the couple axle between armrest and backrest Finally once aligned tighten with provided tool as shown in Fig 6 and Fig 7 8 Locked T...

Страница 10: ...Fig 8 Fig 9 4 Repeat procedures 1 2 and 3 for the armrest assembly on other side Note total number of air pipes 2 right arm 2 left arm 3 seat and 2 head Note total number of connections 1 right arm 1...

Страница 11: ...ection air pipes Note total number of air pipes 2 right arm 2 left arm 3 seat and 2 head Fig 10 Fig 11 2 Place the backrest cushion via Velcro First remove Velcro covers Fig 12 and then line up Velcro...

Страница 12: ...or on air pipes should be matched Note total number of air pipes 2 right arm 2 left arm 3 seat and 2 head 6 Match the Velcro of foot massager windshield leather and seat leather Velcro Fig 18 and plac...

Страница 13: ...please insert the headphones to the audio socket as indicated on the back panel of chair PLACEMENT There must be enough space around the chair There is a clearance of 80cm or 31 5 inches from the fro...

Страница 14: ...n The mechanism performs slow tapping and kneading along with rolling at regular intervals Deep Tissue Massage Mode This massage mode is designed to relieve severe tension in the muscle and connecting...

Страница 15: ...t feels like a massage therapist firmly moving the hand as shown in Fig D Fig A B C D Depiction of different massage modes TROUBLESHOOTING OF MASSAGE CHAIR Warning Unplug the power cord before attempt...

Страница 16: ...eplace power cord 5 Replace the fuse with exact specifications 6 Contact Technical Support of the manufacturer if it continues Sounds like tapping or humming sounds Sounds from air pump motor or other...

Страница 17: ...replaced during the effective warranty period What is covered in this Warranty a For Home Use This warranty includes part costs and labor for the first 2 years at no cost to the customer This warranty...

Страница 18: ...ithout limitation damage to property other than the product or other economic losses LURACO shall not be liable for any personal injury property or any incidental or consequential damages of any kind...

Страница 19: ...e liability towards customer for the products described herein shall be limited in accordance with the Terms and conditions of commercial sale of LURACO Technologies Right to make changes LURACO Techn...

Страница 20: ...THANK YOU FOR BUYING LURACO TECHNOLOGIES PRODUCTS LURACO TECHNOLOGIES INC 1132 107TH STREET ARLINGTON TX 76011 USA TEL 1 817 633 1080 FAX 1 817 633 1085 WWW LURACO COM...

Отзывы: