IMPORTANT SAFETY INSTRUCTIONS
When using an electrical appliance, basic precautions should always be followed, including the following:
Read all instructions before using (this appliance).
WARNING
– To reduce the risk of burns, fire, electric shock, or injury to persons:
1. The main power switch is marked with international symbols “O” and “I”. The switch in position “I” means
that system is turned on, and the switch in position “O” means that system is off.
2. An appliance should never be left unattended when plugged in. Unplug from outlet when not in use and
before putting on or taking off parts.
3. Close supervision is necessary when this appliance is used by, on, or near children, invalids, or disabled
persons. Keep children away from extended foot support (or other similar parts).
4. Use this appliance only for its intended use as described in this manual. Do not use attachments not
recommended by the manufacturer.
5. Never operate this appliance if it has a damaged cord or plug, if it is not working properly, if it has been
dropped or damaged, or dropped into water. Return the appliance to a service center for examination and
repair.
6. Keep the cord away from heated surfaces.
7. Do not use outdoors.
8. Do not operate where aerosol (spray) products are being used or where oxygen is being administered.
9. To disconnect, turn all controls to the off position, then remove plug from outlet.
10. Connect this appliance to a properly grounded outlet only. See grounding instructions.
11. Do not remove the back cushion and do not play with roller mechanism.
12. Do not remove the bottom seat and do not play with actuators.
13. Keep the cord out of heavy traffic area. To avoid fire hazard NEVER put the cord under rugs or near heat
generating devices.
14.
Always unplug the power cord from the electrical outlet immediately after use and before cleaning.
15. Always check the volume before using the headphones.
16. Do not operate any equipment with damaged parts.
17. Any other use not recommended by the manufacturer may cause electrical shock or injury to persons.
18. Do not touch or re-wire the wires connected to the master-box.
19. Do not attempt to repair or adjust any electrical or mechanical functions on this unit. Doing so will void the
warranty.
After reading this owner’s guide, if you have any questions or comments, please call +1-817-633-1080 or
contact our technical support department at [email protected] or visit our website at www.luraco.com
for more information
GROUNDING INSTRUCTIONS
This product must be grounded. If it should malfunction or breakdown, grounding provides a path of least resistance
for electric current to flow, thus reducing the risk of electric shock. This product is equipped with a cord having an
equipment-grounding conductor and a grounding plug. The plug must be plugged into an appropriate outlet that is
properly grounded in accordance with all local codes and ordinances.
DANGER
- Improper connection of the equipment-grounding conductor can result in a risk of electric shock. Check
with a qualified electrician or serviceman if you are in doubt as to whether the product is properly grounded. Do not
modify the plug provided with the product - if it does not fit the outlet; have a proper outlet installed by a qualified
electrician.
Followed by either instruction 1) or 2) below:
1. This product is for use on a nominal 120V circuit, and has a grounding plug that looks like the plug illustrated in
sketch A in the Figure pictured. A temporary adapter that looks like the adapter illustrated in sketches B and C
may be used to connect this plug to a 2-pole receptacle as shown in sketch B if a properly grounded outlet is not
available. The temporary adapter should be used only until a properly grounded outlet (sketch A) can be installed
by a qualified electrician. The green colored rigid ear, lug, or the like extending from the adapter must be
connected to a permanent ground such as a properly grounded outlet box cover. Whenever the adapter is used,
it must be held in place by a metal screw.
2. This product is for use on a nominal 120V circuit, and has a grounding plug that looks like the plug
illustrated in sketch A in the Figure below. Make sure that the product is connected to an outlet having the same
1
Содержание iRobotics 6
Страница 1: ......
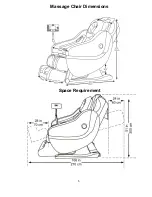
Страница 6: ...Massage Chair Dimensions Space Requirement 5...


