background image


21.09.2005 

Nr 50080012 VW Lupo 

9/9


15.) Tür vorsichtig nach 
oben schwenken, auf 
Freigängigkeit an Kot-
flügel, A-Säule und 
Motorhaube achten und 
ggf. den Öffnungswinkel 
durch Verstellen der 
Einstellschraube (1) an-
passen. 


15.) Pivot the door 
carefully up and take care 
for sufficient clearance at 
the fender, A-pillar and 
hood and if necessary 
adjust the opening angle 
by adjusting the 
adjustment screw (1). 


16.) Kotflügel wieder 
entfernen. 


16.) Remove the fender 
again. 


17.) Nach erfolgten Ein-
stellarbeiten bitte die an 
Position (A+D) vorge-
sehene Inbusschraube, 
Distanzhülse und Einniet-
mutter ein Loch bohren 
(11 mm) und zusätzlich 
die Distanzhülse auf die 
entsprechende Länge 
und Winkel  anpassen.  


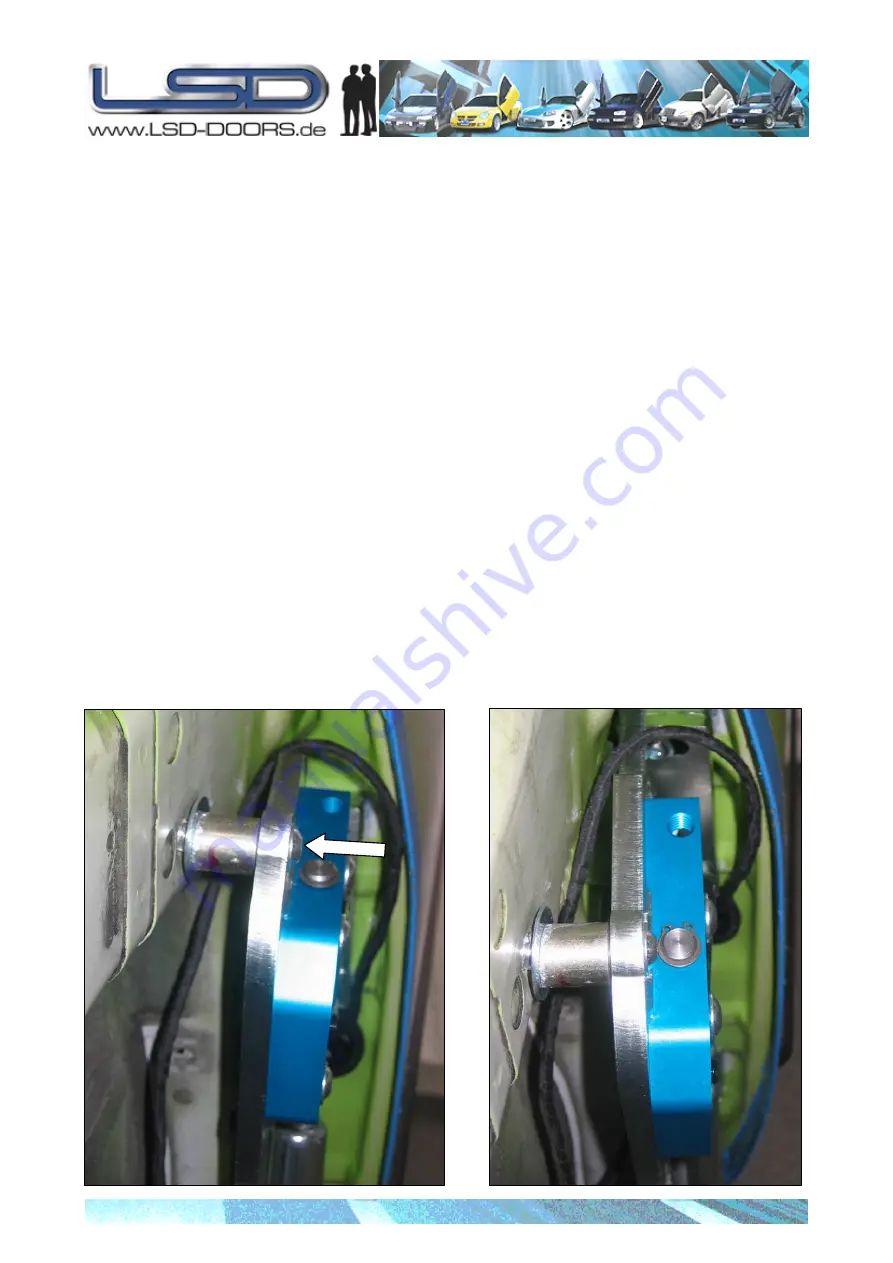
17.) After finalized 
adjustments, 

a hole of 

11mm has to be drilled at 
position (A+D) for the 
foreseen allen

bolt, 

distance bushing and 
rivet nut. In addition, the 
distance bushing has to 
be adjusted in 
accordance to the length 
and angle.  


Содержание 50080012

Страница 1: ...age Kotfl gelbearbeitung Modification of the fender see enclosure modification of the fender Tipp Zur Arbeitserleichterung 2 Person heranziehen Tip Advise A second person makes the work much easier Hi...

Страница 2: ...spalt ma e in L ngsrichtung Schwenkarm Einstellschraube 1 T renanschlag nach au en 2x Inbusschraube M8x30 B 3x Sicherungsring Kabelbinder 6x klein A B A 2x Sperrzahnmutter M8 4x Sperrzahnschraube M8x3...

Страница 3: ...tion mount with horizontal door gab adjuster Swing arm Adjustment screw 1 outward motion door 2x Allen bolt M8x30 B 3x Security ring Cable ties 6x small A B A 2x Serrated bolt M8 4x Serrated lock nut...

Страница 4: ...n den Befestigungspunkten der originalen T r scharniere an der Karosserie montieren Hierzu bitte Schrauben A und B verwenden An den markierten Schrauben werden zu s tzlich die mitgelieferten Sperrzahn...

Страница 5: ...verwenden um die Frontseite der T r in die richtige Position zu f hren 4 Fix the door to the car therefore door has to be closed completely TIP ADVISE Use the screw 2 as a point to guide the front of...

Страница 6: ...chziehen 8 After the adjustment work all screws have to be retightened 9 Nun den D mpfer am Befestigungspunkt des Schwenkarms einh ngen und mit dem beigelegten Sicherungsring mit Hilfe einer Spitzzang...

Страница 7: ...ins T rschloss einrasten 11 Close the door again and let the door lock in place 12 T r wieder vorsichtig ffnen und falls erforder lich durch die Einstell schraube 1 den ff nungswinkel und somit die Be...

Страница 8: ...They need to be adjusted that the LSD swing arm has slight tension at pivoting please lubricate the outward motion door stabilizer with grease from time to time 13 Kabel verlegen und mit Kabelbinder a...

Страница 9: ...angle by adjusting the adjustment screw 1 16 Kotfl gel wieder entfernen 16 Remove the fender again 17 Nach erfolgten Ein stellarbeiten bitte die an Position A D vorge sehene Inbusschraube Distanzh lse...

Страница 10: ...eugt ren m ssen bei jedem Fahrtbeginn korrekt ge schlossen sein Fahren mit ge ffneten T ren ist verboten All vehicle doors must be securely closed before setting vehicle into motion Operating a vehicl...

Страница 11: ...fl chen sind vorher zu reinigen und m ssen staub und fettfrei sein Die Ab dichtung ist sorgf ltig durchzuf hren Die Dichtheit zum Fahrzeu ginnenraum bzw zur T r ist sicherzustellen In case any chassis...

Страница 12: ...el baums entfernen Remove the insulation from the wire harness Kabelverl ngerung Empfehlung Kabel immer 1 1m verl ngern Extending the wire harness Recommend Extend the cable always 43 30 inch 1 1 m Bs...

Страница 13: ...ch wire off the wire harness separately at various lengths This will ensure a reduced size when completed Nun jedes einzelne Kabel des T r kabelbaums mit den mitge lieferten Kabeln L t Schrumpf verbin...

Страница 14: ...older shrink connectors from outside to inside Heat up the solder shrink con nectors until the tin solder inside the connector is becoming liquid and sur rounding the core ends completely Please avoid...

Страница 15: ...rangegangen Schritte nun mit allen Kabeln wiederholen Please repeat the earlier steps to all wires Bei Verl ngerungen am CAN Datenbus ist besonderst auf die Schirmung und Verdrillung zu achten When wo...

Страница 16: ...rten Gewebeband ummantelt werden The shrinkable connectors can now be wrapped with the sup plied waterproof insulation tape Am Schluss dann den kompletten Kabelbaum mit Hilfe des Gewebebandes wieder u...

Страница 17: ...upo 1 1 Kotfl gelbearbeitung Modification of the fender Vorher Before Ausschnitt Cut out Nachher After Max 5 mm entlang dieser Kante stehen lassen Let max 5 mm 0 2 inch along this edge 75 mm 3 0 inch...

Страница 18: ...linkerbearbeitung Modifying the turn signal Folgende Schritte sind Empfehlungen und f r beide Blinker zu wiederholen Steps below are to be used as a reference Please repeat for both turn signals Abbil...

Страница 19: ...kerbearbeitung Modifying the turn signal 2 Blinkerkabel direkt an die Gl hlampe anschlie en und mit Klebeband ummanteln Connect the bulb directly with the cable and wrap it with isolation tape Blinker...

Страница 20: ...htenberg 06 02 2006 Seite Page 3 Allgemeine Blinkerbearbeitung Modifying the turn signal Kabeldurchf hrung zur Fixierung benutzen und mit Klebeband ummanteln Fixing the lamp with the grommet as see in...

Отзывы: