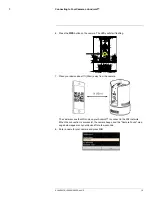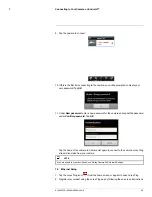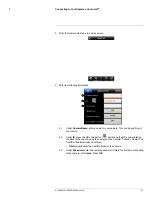
background image

Connecting to Your Camera on iPhone®

5

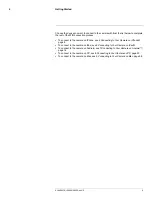
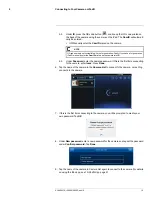
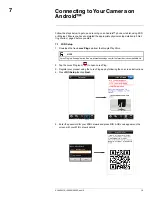
2. Download the free

Lorex Ping

app from the App Store.

NOTE

Lorex Ping is a free application, but it requires a valid iTunes account to download. See www.lorex-
technology.com for the latest device compatibility list.

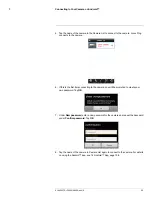
3. Tap the Lorex Ping icon (

) from the home screen to open Lorex Ping.

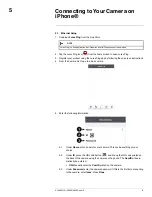
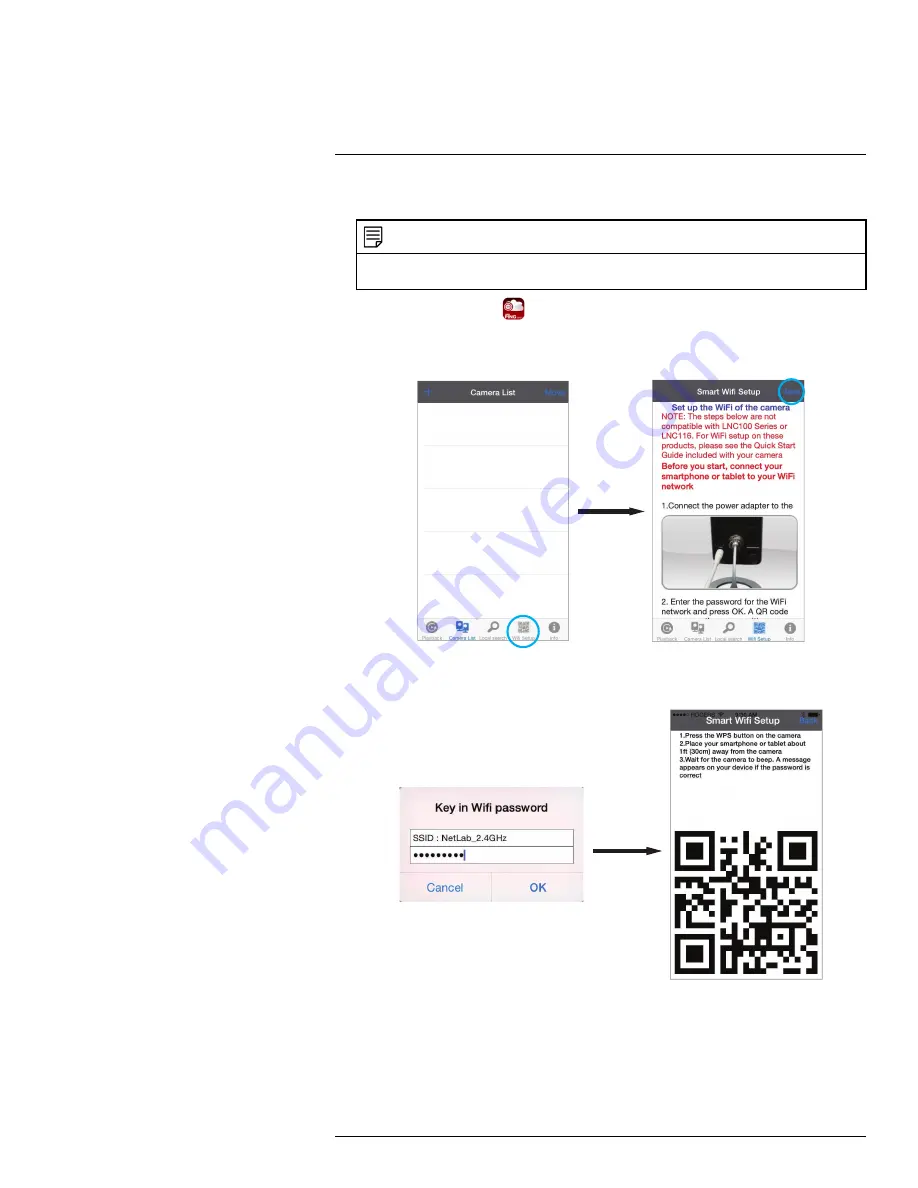
4. Register your product using the Lorex Ping app by following the on-screen instructions.
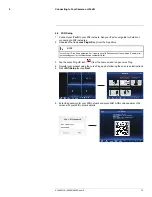
5. Press

Wifi Setup

then tap

Next

.

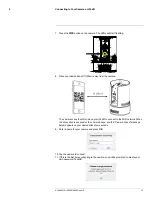
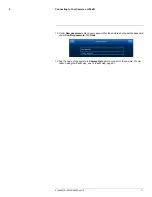
6. Enter the password for your WiFi network and press

OK

. A QR code appears on the

screen with your WiFi network details.

#LX400072; r.28402/28402; en-US

10

Содержание LNC254 series

Страница 1: ...USER S GUIDE LNC254 Series ...

Страница 2: ......

Страница 3: ...USER S GUIDE LNC254 Series LX400072 r 28402 28402 en US iii ...

Страница 4: ... TO QUALIFIED SERVICE PERSONNEL The lightning flash with arrowhead symbol within an equilateral triangle is intended to alert the user to the presence of uninsulated dangerous voltage within the product s enclosure that may be of sufficient magnitude to constitute a risk of electric shock The exclamation point within an equilateral triangle is intended to alert the user to the presence of importan...

Страница 5: ... for PC 33 10 1 System Requirements 33 10 2 L View for PC Interface 33 10 2 1 Pan Tilt Zoom PTZ Controls 35 10 2 2 Display Sub Menu 36 10 2 3 All Camera Action 36 10 3 Camera List Managing Cameras 37 10 3 1 Adding Cameras to Camera List 37 10 3 2 Saving Camera Passwords 38 10 3 3 Patrol Settings Interface 39 10 3 4 Setting a Patrol Route for Your Camera 40 10 3 5 Deleting Cameras 40 10 3 6 Configu...

Страница 6: ...Tab Configure Status LED s and Motion Detection Sensitivity 64 11 9 4 Camera Info Tab 65 11 9 5 Configuring Night Mode Settings 65 12 iPhone App 67 12 1 Live Viewing with Lorex Ping for iPhone 67 12 1 1 Controlling Your Camera with Your Touchscreen 67 12 1 2 Using 2 Way Audio Intercom 68 12 1 3 Taking Snapshots 68 12 1 4 Recording Video to iPhone 68 12 2 Playing Back Video Recorded on iPhone 68 12...

Страница 7: ...era Wired Network Settings 99 13 4 9 Editing Camera WiFi Network Settings 100 13 4 10 Enabling Email Notifications 101 13 4 11 Enabling Speaker Alarms 102 13 4 12 Configuring microSD Recording 103 13 4 13 Configuring the Camera Recording and Alarm Schedule 104 13 4 14 Configuring the Camera Date and Time 105 13 4 15 Rebooting the Camera 106 13 5 Using Local Search to Add Cameras 107 14 Android App...

Страница 8: ...ure Overview 126 15 2 Network 126 15 2 1 Wired Network DHCP or Fixed IP 126 15 2 2 WiFi Security Configuring WiFi settings 127 15 3 Video 128 15 3 1 Video Settings 128 15 3 2 Mobile Video 130 15 3 3 Night Mode 130 15 4 Schedule 131 15 4 1 Email FTP Alarm Settings Configuring Email Alarms 131 15 4 2 Speaker Alarm Configuring Audio Alarms 132 15 4 3 SD Card Configuring microSD Recording 133 15 4 4 S...

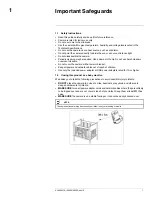
Страница 9: ... with a towel or blanket Keep all power and network cables out of reach of children Use only the included power adapter or USB power adapters rated for 1A or higher 1 2 If using this product as a baby monitor We advise you to take the following precautions to avoid possible injury to infants DO NOT place the camera too close to cribs bassinets play yards and other safe sleep environments for infan...

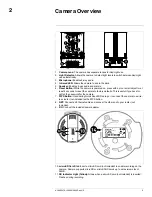
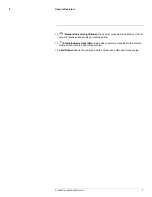
Страница 10: ...to factory defaults This is useful if you have for gotten the password for the camera 7 WPS Button Used during Quick Scan WiFi setup or to connect the camera to a wire less router not included with a WPS button 8 NET Connect an Ethernet cable and connect the other end to your router not included 9 DC Connect the included power adapter 10 microSD Card Slot Insert a microSD card not included to enab...

Страница 11: ...et or WiFi network Flashes when sending or receiving data 13 Status Indicator Light Red Glows when camera is connected to the Internet Flashes when there is a connection problem 14 CamID Label Shows the camera s CamID number and a QR code for easy setup LX400072 r 28402 28402 en US 3 ...

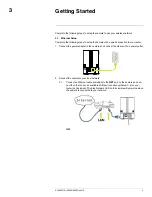
Страница 12: ...he power adapter to the camera and connect the other end to a power outlet 2 Connect the camera to your local network 2 1 Connect an Ethernet cable included to the NET port on the camera and con nect the other end to an available LAN port usually numbered 1 4 on your router not included The blue Network LED on the camera will glow blue when the camera is connected to your network OR LX400072 r 284...

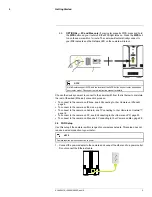
Страница 13: ...e rest of the wired Ethernet connection process To connect to the camera on iPhone see 5 Connecting to Your Camera on iPhone page 8 To connect to the camera on iPad see page To connect to the camera on Android see 7 Connecting to Your Camera on Android page 18 To connect to the camera on PC see 8 Connecting to Your Camera on PC page 23 To connect to the camera on Mac see 9 Connecting to Your Camer...

Страница 14: ...Connecting to Your Camera on iPhone page 8 To connect to the camera on iPad see 6 Connecting to Your Camera on iPad To connect to the camera on Android see 7 Connecting to Your Camera on Android page 18 To connect to the camera on PC see 8 Connecting to Your Camera on PC page 23 To connect to the camera on Mac see 9 Connecting to Your Camera on Mac page 28 LX400072 r 28402 28402 en US 6 ...

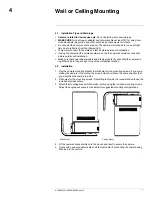
Страница 15: ...et cable if connecting the camera us ing Ethernet are long enough to reach the installation location 4 2 Installation 1 Use the camera mounting bracket to mark holes for the mounting screws If you are in stalling the camera in the ceiling the screw holes should face the same direction that you would like the camera to point 2 Drill holes for the mounting screws If installing in drywall it is recom...

Страница 16: ...tructions 4 From the Camera List tap to add a camera 5 Enter the following information 5 1 Under Name enter a name for your camera This can be anything of your choice 5 2 Under ID press the QR code button and line up the QR code printed on the back of the camera using the camera on the phone The CamID will auto matically be entered OR Manually enter the CamID printed on the camera 5 3 Under Passwo...

Страница 17: ...OK 8 Under New password enter a new password for the camera and repeat the password under Confirm password Tap OK 9 Tap the camera again to connect to the camera Lorex Ping streams live video from your camera NOTE If you are unable to scan the QR code see Editing Camera WiFi Network Settings 5 2 WiFi Setup 1 Connect your iPhone to your WiFi network See your iPhone s user guide for details on conne...

Страница 18: ... technology com for the latest device compatibility list 3 Tap the Lorex Ping icon from the home screen to open Lorex Ping 4 Register your product using the Lorex Ping app by following the on screen instructions 5 Press Wifi Setup then tap Next 6 Enter the password for your WiFi network and press OK A QR code appears on the screen with your WiFi network details LX400072 r 28402 28402 en US 10 ...

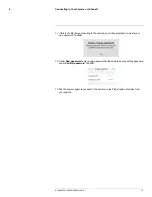
Страница 19: ...30cm away from the camera The camera scans the QR code on your iPhone to connect to the WiFi network When the connection is successful the camera beeps and the Camera Found mes sage below appears on your device after a few seconds 9 Enter a name for your camera and press OK 10 Tap the camera to connect LX400072 r 28402 28402 en US 11 ...

Страница 20: ...ou will be prompted to create your own password Tap OK 12 Under New password enter a new password for the camera and repeat the password under Confirm password Tap OK 13 Tap the camera again to connect to the camera Lorex Ping streams live video from your camera LX400072 r 28402 28402 en US 12 ...

Страница 21: ...TE Lorex Ping HD is a free application but it requires a valid iTunes account to download See www lor extechnology com for the latest device compatibility list 2 Tap the Lorex Ping icon from the home screen to open Lorex Ping 3 Register your product using the Lorex Ping app by following the on screen instructions 4 From the Camera List tap to add a camera 5 Enter the following information 5 1 Unde...

Страница 22: ...3 Under Password enter the camera password If this is the first time connecting to the camera enter lorex Press Done 6 Tap the name of the camera in the Camera List to connect to the camera Lorex Ping connects to the camera 7 If this is the first time connecting to the camera you will be prompted to create your own password Tap OK 8 Under New password enter a new password for the camera and repeat...

Страница 23: ...but it requires a valid iTunes account to download See www lor extechnology com for the latest device compatibility list 3 Tap the Lorex Ping HD icon from the home screen to open Lorex Ping 4 Register your product using the Lorex Ping app by following the on screen instructions 5 Press Wifi Setup then tap Next 6 Enter the password for your WiFi network and press OK A QR code appears on the screen ...

Страница 24: ... on your iPad to connect to the WiFi network When the connection is successful the camera beeps and the Camera Found message below appears on your device after a few seconds 9 Enter a name for your camera and press OK 10 Tap the camera to connect 11 If this is the first time connecting to the camera you will be prompted to create your own password Tap OK LX400072 r 28402 28402 en US 16 ...

Страница 25: ... enter a new password for the camera and repeat the password under Confirm password Tap Done 13 Tap the name of the camera in Camera List again to connect to the camera For de tails on using the iPad app see 13 iPad App page 91 LX400072 r 28402 28402 en US 17 ...

Страница 26: ... the free Lorex Ping app from the Google Play Store NOTE Lorex Ping is a free application See www lorextechnology com for the latest device compatibility list 2 Tap the Lorex Ping icon to open Lorex Ping 3 Register your product using the Lorex Ping app by following the on screen instructions 4 Press Wifi Setup then tap Next 5 Enter the password for your WiFi network and press OK A QR code appears ...

Страница 27: ...vice about 1ft 30cm away from the camera The camera scans the QR code on your Android to connect to the WiFi network When the connection is successful the camera beeps and the Camera Found mes sage below appears on your device after a few seconds 8 Enter a name for your camera and press OK LX400072 r 28402 28402 en US 19 ...

Страница 28: ...word under Confirm password Tap OK Tap the name of the camera in Camera List again to connect to the camera Lorex Ping streams live video from your camera NOTE If you are unable to scan the QR code see Editing Camera WiFi Network Settings 7 2 Ethernet Setup 1 Tap the Lorex Ping icon from the home screen or app list to open Lorex Ping 2 Register your product using the Lorex Ping app by following th...

Страница 29: ...our choice 4 2 Under ID press the QR code button and line up the QR code printed on the back of the camera using the camera on the Android phone or tablet The CamID will automatically be entered OR Manually enter the CamID printed on the camera 4 3 Under Password enter the camera password If this is the first time connecting to the camera enter lorex Press OK LX400072 r 28402 28402 en US 21 ...

Страница 30: ... time connecting to the camera you will be prompted to create your own password Tap OK 7 Under New password enter a new password for the camera and repeat the password under Confirm password Tap OK 8 Tap the name of the camera in Camera List again to connect to the camera For details on using the Android app see 14 Android App page 108 LX400072 r 28402 28402 en US 22 ...

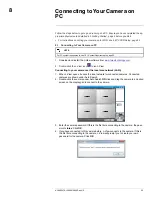
Страница 31: ... View icon to run L View Connecting to your camera over the local area network LAN 1 When L View opens it scans the local network for connected cameras Connected cameras are shown under Auto Search 2 Double click the camera under Auto Search OR click and drag the camera to a desired screen on the display grid to connect to the camera 3 Enter the camera password If this is the first time connecting...

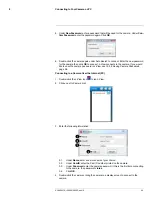
Страница 32: ... L View see 10 3 2 Saving Camera Passwords page 38 Connecting to a Camera Over the Internet PC 1 Double click the L View icon to run L View 2 Click next to Camera List 3 Enter the following information 3 1 Under Name enter a camera name of your choice 3 2 Under CamID enter the Cam ID number printed on the camera 3 3 Under Password enter the camera password If this is the first time connecting to t...

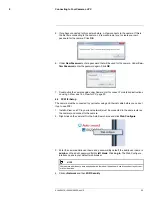
Страница 33: ...Setup The camera must be connected to your router using an Ethernet cable before you can set it up to use WiFi 1 Install L View on a PC in your local network must be connected to the same router as the camera and connect to the camera 2 Right click on the camera ID in the Auto Search area and click Web Configure 3 Enter the camera admin user name and password By default the admin user name is admi...

Страница 34: ...Connecting to Your Camera on PC 8 5 Click WiFi Scan and select your WiFi network from the list 6 Under WPA PSK Key or WEP Key enter the WiFi password Click Save Apply LX400072 r 28402 28402 en US 26 ...

Страница 35: ...hen successful Status will say Test Success If unsuccessful double check your wireless password and make sure your camera is close enough to the wireless router to get a good signal 9 Remove the Ethernet cable from the camera wait 60 seconds and then reconnect to your camera in L View LX400072 r 28402 28402 en US 27 ...

Страница 36: ... system requirements see 11 1 System Requirements page 53 1 Download the L View software from www lorextechnology com 2 Extract the installer file and double click it to run 3 Click and drag the L View icon to Applications to install Connecting to your Camera on the Local Network Mac NOTE Your computer must be on the same network as the camera to perform the steps below 1 Open L View from your App...

Страница 37: ...ble click the camera ID Enter the new password and click OK L View connects to your camera and streams live video Connecting to your Camera over the Internet Mac 1 Click beside Camera List and then click the New camera tab 2 Enter the following information Under Name enter a name for your camera of your choice Under ID enter the CamID number printed on the label on the back of your camera Under Pa...

Страница 38: ...t to multiple cameras click to select a display area The area becomes highlighted Then dou ble click the camera to open it in the selected area 9 2 Mac WiFi Setup The camera must be connected to your router using an Ethernet cable before you can set it up to use WiFi 1 Install L View on a Mac in your local network must be connected to the same router as the camera and connect to the camera 2 Click...

Страница 39: ... Web Configure interface opens in your default web browser NOTE Your camera admin user name and password differs from the password used to connect to your cam era to view video 5 Click on Network and then WiFi Security 6 Click WiFi Scan and select your WiFi network from the list 7 Under WPA PSK Key or WEP Key enter the WiFi password Click Save Apply LX400072 r 28402 28402 en US 31 ...

Страница 40: ...hen successful Status will say Test Success If unsuccessful double check your wireless password and make sure your camera is close enough to the wireless router to get a good signal 10 Remove the Ethernet cable from the camera wait 60 seconds and then reconnect to your camera in L View LX400072 r 28402 28402 en US 32 ...

Страница 41: ...onnect ing to Your Camera on PC page 23 NOTE For Mac software instructions see 11 L View for Mac page 53 10 1 System Requirements Description Minimum System Requirements CPU 2 0 GHz dual core recommended Memory 2GB Operating System Windows XP SP 2 and higher Windows 7 Basic Home Premium Ultimate Windows 8 Hard Drive Minimum 5 10 GB free for recordings and snapshots 10 2 L View for PC Interface LX4...

Страница 42: ...rding For details see 10 4 Recording to Your PC s Hard Drive page 41 3 Time and Date Show the current time and date on the computer Note that the cam era time and date may differ For instructions on setting the time and date on the cam era see 15 5 3 Date Time page 137 4 Minimize Restore 5 Maximize Revert to Window 6 Exit 7 Camera List Shows list of saved cameras Available cameras are in blue Came...

Страница 43: ... View See 10 8 Configuring L View page 49 L Play Click to open L Play to view video files saved on your computer hard drive See 10 6 Playing Back Recordings on the microSD card with L View page 44 Language Selector Click to select the language for L View 12 All Camera Action Click to perform an action on all cameras 13 Split Screen Selectors Click to select single camera view or to select 4 camera...

Страница 44: ... Display sub menu opens when you right click on a camera s display area It contains additional camera controls The Display sub menu contains the following controls Full window Open the camera in single camera view Auto reconnect L View will attempt to reconnect to the camera if it becomes disconnected Stop Disconnect from the camera Pause Pause the video Click again to resume the video Motion reco...

Страница 45: ... List is used to save connection information for your cameras so you don t have to re enter the ID or password each time you connect The Camera List also allows you to configure certain camera settings Cameras connected to the Internet or local network are shown in blue in the camera list Cameras not connected are shown in red If your camera is red check the network connection NOTE Cameras may app...

Страница 46: ...e Camera List Right click on your camera to open the Camera List sub menu See below for instructions 10 3 2 Saving Camera Passwords You can use the Camera List sub menu to save the camera s password in L View so you don t have to enter the password to connect to the camera NOTE To change the camera s password see 15 3 1 Video Settings page 128 LX400072 r 28402 28402 en US 38 ...

Страница 47: ...n 1 Checkbox Enable disable the patrol point as part of your patrol route 2 Go to Move your camera to the patrol point 3 Set Save your camera s current position as a patrol point 4 Save patrol points Save your changes to patrol points 5 Stay time sec The number of seconds your camera stays in each patrol point before moving to the next 6 Speed The rate your camera to moves between patrol points 1 ...

Страница 48: ...mum five patrol points 5 In the Stay time field enter the number of seconds you want your camera to stay on each patrol point before moving to the next 6 Click on the Speed dropdown menu and select choose how quickly your camera should move between patrol points 1 slowest to 3 fastest 7 Click Save patrol points to save your patrol route settings Your camera will now follow your patrol route when y...

Страница 49: ...ing to smart phones and tablets or Disabled to disable audio streaming to smartphones and tablets 6 Click Update to apply changes to your camera Enter the admin user name default admin and password default left blank for the camera and click OK 7 The camera will disconnect when the setting is changed Double click the camera in Camera List to reconnect 10 4 Recording to Your PC s Hard Drive You can...

Страница 50: ...e the Recorded Files area to find the day you would like to playback from Click next to a year to expand recordings for the year Click next to a month to expand recordings for that month Click a day to select it LX400072 r 28402 28402 en US 42 ...

Страница 51: ... View for PC 10 5 Click the ID of the camera you would like to playback video from and then click Play 6 Use the on screen controls to control playback 6 1 Minimize window LX400072 r 28402 28402 en US 43 ...

Страница 52: ... Slow down playback 6 20 Stop 6 21 Pause 6 22 Play 6 23 Seek to different time 6 24 Change language 6 25 Change settings 10 6 Playing Back Recordings on the microSD card with L View You can use L View to playback recorded video on the camera s microSD card required not included For instructions on setting up recording on the microSD card see 15 4 3 SD Card Configuring microSD Recording page 133 To...

Страница 53: ...le the recording is still playing right click in the display area and select Stop then right click again and select Play 10 7 Configuring Camera Video Settings The Video Settings menu allows you to adjust the quality of the camera video To open the Video Settings menu Click on the top of the display area for the camera you would like to configure NOTE The camera will disconnect after making change...

Страница 54: ... camera to maintain a higher frame rate when available bandwidth is low Frame rate Manually select the frame rate between 30fps highest and 1fps low est 30fps is real time video meaning that movement in the image will appear smooth with no choppiness 3 Under Preference select your quality preference when bandwidth increases or decreases Select Video Motion to have the camera maintain the frame rat...

Страница 55: ...ency of your indoor lighting Under Video Flip select Video Flip to flip the camera image vertically and horizontally or select Normal for normal orientation 4 Under Brightness select the brightness of the image between 10 highest and 1 lowest 5 Under Low Light Sensitivity set the camera s sensitivity in low light environments be tween Very High highest High and Normal lowest 6 Check Enable time di...

Страница 56: ...nd password default left blank and click OK The camera will disconnect Wait about 15 seconds and then double click the camera in Camera List or Auto Search to reconnect to the camera To configure motion detection sensitivity 1 Under Motion Detection Sensitivity select the motion detection sensitivity between 1 High and 10 Low If Motion Detection Sensitivity is set to 1 motion detection will be tri...

Страница 57: ...s you the folder where snapshots and video files are saved It allows you to open or change the Snapshot Recording folder To open the Snapshot folder Click Open To change the Snapshot folder 1 Click Change 2 Select a new Snapshot folder and click OK to save changes 10 8 2 Startup Options The Startup options menu allows you to configure startup options for L View LX400072 r 28402 28402 en US 49 ...

Страница 58: ...d connect to all the previously open cameras when L View opens 3 Click OK to save changes 10 8 3 Fixed IP Access The Fixed IP Access menu is for advanced users only It must be used if you have as signed your camera a fixed IP address on your router To configure your camera to use a fixed IP address 1 Check Connect to IP camera with fixed IP address to enable cameras to use fixed IP addresses 2 Cli...

Страница 59: ... To enable a password for L View 1 Select Enable 2 Under User Name and Password enter the desired user name and password that must be used when you open L View 3 Click OK to save changes The next time you exit L View and re open it it will ask you for a password to log in 10 8 5 Image Ratio The Image Ratio menu allows you to configure L View to preserve the original aspect ratio of the video or to...

Страница 60: ... OK L View will check online for software updates when it opens If an update is available follow the on screen instructions to install the update NOTE L View will also check for camera updates when a new firmware is available If a new camera firm ware is available click OK and enter the admin user name default admin and password default left blank Then wait for the upgrade to complete Do not unplu...

Страница 61: ...ded Memory 2GB Operating System OS X 10 6 8 Snow Leopard Intel Processors only Hard Drive Minimum 5 10 GB free for recordings 11 2 L View for Mac Interface 1 Window Controls Click to exit or minimize L View 2 Camera List Shows cameras that have been saved in L View Double click cameras to connect to them NOTE To connect to multiple cameras click to select a display area The selected area is highli...

Страница 62: ...o Your Mac s Hard Drive page 57 Snapshot Click to take a snapshot from the camera To view snapshots click and select Snapshot folder Microphone On Click to enable audio from the selected camera Adjust vol ume with the Volume Slider Folder Click to open the recording folder or snapshot folder for this camera 9 Display Area Shows video from your camera Double click to view the camera in full screen ...

Страница 63: ...Z controls 11 4 Camera List Managing Cameras The Camera List is used to save connection information for your cameras so you don t have to re enter the ID or password each time you connect It also allows you to configure certain camera settings see 11 9 Using Camera List to Modify Camera Settings page 59 11 4 1 Adding Cameras to Camera List If the camera is on the same network as the computer click...

Страница 64: ...a List Click in Camera List then click beside the camera you would like to delete Click OK to confirm 11 5 Patrol Settings Interface Open your camera s patrol settings by clicking Patrol from the L View home screen 1 Checkbox Enable disable the patrol point as part of your patrol route 2 Go to Move your camera to the patrol point 3 Set Save your camera s current position as a patrol point LX400072...

Страница 65: ...eps 2 and 3 for each point you want to include in your patrol route up to a maximum five patrol points 5 In the Stay time field enter the number of seconds you want your camera to stay on each patrol point before moving to the next 6 Click on the Speed dropdown menu and select choose how quickly your camera should move between patrol points 1 slowest to 3 fastest 7 Click Save patrol points to save...

Страница 66: ...shown using yyyymmdd format e g 20121016 is October 16 2012 Video timestamps are shown using hhmmss format e g 103045 is 10 30 45am 4 Use the on screen playback controls 4 1 Select playback mode Local or SD Card 4 2 Return to live video 4 3 Search 4 4 Full screen 4 5 Stop 4 6 Pause LX400072 r 28402 28402 en US 58 ...

Страница 67: ... then click SD Card 2 Enter the password for the camera and click OK L View searches for recordings on the microSD card 3 Click the arrow beside a date to view video recorded on that date Double click the file you would like to play back NOTE Video timestamps are shown using hhmmss format e g 103045 is 10 30 45am 4 To return to live video click 11 9 Using Camera List to Modify Camera Settings You ...

Страница 68: ...ings 1 Right click on the camera in Camera List and select Video settings Select the Qual ity tab 2 Click Update to save changes Enter the camera admin user name default admin and password default left blank and click OK Click OK to close the settings window NOTE The camera may reboot after settings are changed Wait about 15 seconds and then double click the camera in Camera List or Auto Search to...

Страница 69: ...r than 3Mbps select 3Mbps 4 Check Auto Enabled to have the camera automatically adjust the resolution and frame rate based on bandwidth If you set the resolution to adjust automatically go straight to step 6 Or un check it to manually configure the resolution step 4 and frame rate step 5 LX400072 r 28402 28402 en US 61 ...

Страница 70: ...her frame rate when available bandwidth is low 6 Frame rate Manually select the frame rate between 30fps highest and 1fps low est 30fps is real time video meaning that movement in the image will appear smooth with no choppiness 7 Check Microphone to enable audio recording 11 9 2 Video Tab Configure General Video Settings The Video tab allows you to configure general video settings such as color an...

Страница 71: ...in low light environments be tween Very High highest High and Normal lowest 8 Under Place select Outdoor if the area with the camera is brightly lit Select Indoor if you notice strip lines in the image or if the picture is too dark on the Outdoor video set ting Select Indoor Sunlight if the picture is too bright on the Indoor setting If you select Indoor or Indoor Sunlight select 60Hz or 50Hz to a...

Страница 72: ...a Overview page 2 or page Always turn off LED s are turned off at all times Turn off after connected LED s turn on when the camera is powered on and turn off once a network connection is made 3 Click Update to save changes Enter the camera admin user name default admin and password default left blank and click OK Click OK to exit the settings window NOTE The camera may reboot after settings are ch...

Страница 73: ... shows system information about the camera To access the camera info tab Click beside the camera you want to edit in Camera List and select Video setting Then select the Camera Info tab 11 9 5 Configuring Night Mode Settings Configure when the camera uses day or night mode When day mode is on the camera sees in color When night mode is on the camera sees in black and white and the Infrared LED tur...

Страница 74: ...cond set of drop down menus to select when the camera will return to day mode Manual Manually select day mode or night mode If using this option under Man ual select Day for day mode or Night for night mode 3 Click Update to apply changes to your camera Enter the admin user name default admin and password default left blank for the camera and click OK Click OK to exit the settings window NOTE The ...

Страница 75: ...ecord video to phone memory press again to stop recording 4 Save snapshot of the camera to your phone 5 Turn on the audio stream from the camera s microphone 6 Play a siren on the camera 7 Activate 2 way audio Intercom using the phone microphone 12 1 1 Controlling Your Camera with Your Touchscreen In the live view you can move your camera simply by swiping your Android phone s touchscreen Swipe ri...

Страница 76: ...an view snapshots us ing the Camera app or save photos to your computer by connecting your iPhone to your computer using a USB cable 12 1 4 Recording Video to iPhone You can manually record video from your camera directly to your iPhone s built in memory To record video to your iPhone s memory 1 While viewing tap to start recording 2 Tap again to stop recording To view the recorded video see below...

Страница 77: ...p the desired video file to start playback 4 Use the on screen video controls to control playback Tap Stop to return to the file list 12 3 Playing Back Video Recorded on microSD on iPhone You can playback video recorded on the camera microSD card not included on your iPhone For details on setting up microSD recording see 12 5 12 Configuring microSD Recording page 84 To play back video recorded on ...

Страница 78: ...rdings on microSD You can delete video recorded on the camera microSD card not included using your iPhone For details on setting up microSD recording see 12 5 12 Configuring microSD Recording page 84 To delete video recordings 1 Tap Camera List Then tap for the camera with recordings you want to delete 2 Tap SD card playback The camera scans the microSD card for recorded video files and shows a li...

Страница 79: ...You will be prompted to confirm the deletion Tap OK 5 Tap Done 12 4 Using Playback 1 From the Camera List tap Playback NOTE If you are still connected to the camera tap Disconnect to return to the Camera List Disconnect only appears when holding the phone in portrait mode LX400072 r 28402 28402 en US 71 ...

Страница 80: ...file list 12 5 Using Camera List to Edit Camera Settings You can use the Camera List to adjust the connections settings or other settings for your camera To access Camera Settings 1 Tap Camera List Then tap next to the camera you would like to edit 2 For certain menus you will need to enter the camera admin user name and password before you may change settings By default the admin user name is adm...

Страница 81: ...c icon update select ON to have the camera icon automatically up date every time you connect to the camera or select OFF to keep the icon as is 4 Under Save admin password select ON to have Lorex Ping save the admin user name and password the next time you enter it or OFF to require the admin user name and password whenever settings changes are made 5 Under Streaming type select Mobile to configur...

Страница 82: ... then tap Delete to confirm 3 Tap Done 12 5 3 Editing Motion Sound Notification Settings Push Notifications Push Notifications can send a notification straight to your iPhone when motion or sound is detected by the camera Push Alarm Notifications go directly to the notifications area on your device LX400072 r 28402 28402 en US 74 ...

Страница 83: ...r Sound select ON to enable Push Alarm Notifications when sound is detected by the camera or OFF to disable Under Sound sensitivity select a sensitivity for Sound Push Alarm Notifications between 1 lowest and 10 highest and press OK 6 Tap Update to save your settings 12 5 4 Editing Camera Mobile Streaming Settings Configure the camera image quality settings for streaming to mobile devices i e smar...

Страница 84: ... step 6 5 Under Resolution select the resolution that will be used when connecting to the cam era using a smart phone or tablet 320x240 480x360 640x400 1024x768 or 1280x800 6 Under Frame rate select the frame rate that will be used when connecting to the cam era using a smart phone or tablet between 30fps highest and 1fps lowest 7 Under Microphone select OFF to turn off audio streaming to your mob...

Страница 85: ...cy of your indoor lighting Tap Video to return to Video settings 4 6 Preference Select whether you would like the camera to reduce the image quality or the frame rate when bandwidth increases or decreases Select Video Motion to have the camera maintain the frame rate and reduce image quality when bandwidth is insufficient Select Image Quality to have the camera main tain image quality and reduce f...

Страница 86: ...ork connection is made 4 Tap Control to return to the Control menu 5 Under Motion Sensitivity select the motion detection sensitivity between 1 High and 10 Low If Motion Detection Sensitivity is set to 1 motion detection will be trig gered if a moving object is larger than 1 of the video area If it is set to 10 a moving object must be larger than 10 of the video area to trigger motion detection Ta...

Страница 87: ...iPhone App 12 2 Tap Video Settings Then tap Night mode control LX400072 r 28402 28402 en US 79 ...

Страница 88: ...to set the Start time when night mode begins each day and End time when night mode ends each day then tap OK Manual Manually select day mode or night mode If using this option select Day for day mode or Night for night mode 4 Tap Update to save your changes 12 5 8 Editing Camera Wired Network Settings Configure the camera IP address when connected using Ethernet Select DHCP or Fixed IP To edit cam...

Страница 89: ...e your IP Address Subnet mask Default gateway DNS1 and DNS2 5 Tap Update to save your settings 12 5 9 Editing Camera WiFi Network Settings Configure WiFi network settings for the camera To edit camera WiFi settings 1 In Camera List tap next to the camera you would like to edit 2 Tap Camera Settings 3 Tap Network then WiFi Network 4 Slide WiFi to ON to enable WiFi on the camera and scan for availab...

Страница 90: ... will be on or flashing 8 Press Camera Settings then Camera List to exit the edit camera screen 9 Tap the camera in the Camera List to connect If you cannot connect check to make sure you have entered the correct wireless password and that the camera is in signal range of your wireless router 12 5 10 Enabling Email Notifications Configure email alarms The camera can be set up to send email alerts ...

Страница 91: ...ct must be larger than 10 of the video area to trigger motion detection Tap Email alarm to return to the Email Alarm menu 6 Check the following trigger options for email alarms Motion Use Video motion detection to trigger email alarms Video motion detection looks for movement in the image to determine if there is motion This means that there may be false alarms caused by changes in lighting trees ...

Страница 92: ... Motion Use Video motion detection to trigger audio alarms Video motion detection looks for movement in the image to determine if there is motion This means that there may be false alarms caused by changes in lighting trees moving in the wind etc Schedule Create speaker alarms based on the settings set in the Scheduling menu Disable Disable speaker alarms 5 Under Alarm Loop Times select the number...

Страница 93: ...hone you must use Schedule recording Then create a schedule in the Scheduling menu with Motion trigger selected 7 Under When disk space full check Overwrite to set the camera to overwrite the old est recordings when the microSD card is full or select Stop recording to set the cam era to stop recording when the microSD card is full 8 Tap Update to save your settings 12 5 13 Configuring the Camera R...

Страница 94: ...Add Schedule 6 Under Email Alarm check Motion trigger to send an email alarm based on video motion 7 Under Speaker Alarm check Motion trigger to create a speaker alarm based on vid eo motion LX400072 r 28402 28402 en US 86 ...

Страница 95: ...hen tap Start and End and use the sliders to configure the exact date and time when you would like the schedule to start and end Tap OK Every week Create a weekly recording schedule Tap and check the days you would like the schedule to apply to Tap Start and End and use the sliders to config ure the start and end time for the schedule Tap OK Every day Create a daily recording schedule Tap then tap...

Страница 96: ... Date and Time Configure the camera date and time The camera syncs with an Internet NTP time server to automatically provide the correct time once you have configured your time zone and daylight savings time settings To set the camera date and time 1 In Camera List tap next to the camera you would like to edit 2 Tap Camera Settings 3 Tap Admin then Date Time 4 Tap Time Zone LX400072 r 28402 28402 ...

Страница 97: ... Update to save your changes Tap OK The camera will reboot to apply the new time zone 12 5 15 Rebooting the Camera 1 In Camera List tap next to the camera you would like to edit 2 Tap Camera Settings 3 Tap Admin then Reboot 4 Tap OK to confirm 12 6 Using Local Search to Add Cameras You can use the Local Search Menu to automatically add the ID s for cameras on your lo cal network To add cameras usi...

Страница 98: ... Add camera screen comes on with the camera ID al ready entered 4 Enter a Name of your choice and enter the camera Password If you have not con nected to your camera before the password is lorex 5 Tap Done The camera is now added to camera list Tap the camera name in Camera List to connect to the camera LX400072 r 28402 28402 en US 90 ...

Страница 99: ... Record to iPad 4 Snapshot 5 Activate 2 way audio speaker required 6 Perform action to all cameras 7 View selected camera in single channel view 8 4 camera view 9 6 camera view 10 Full screen 11 Mute audio 12 Adjust volume 13 1 1 Using 2 Way Audio Intercom 1 While viewing touch to activate 2 way audio intercom using the phone microphone 2 Tap again to deactivate 2 way audio LX400072 r 28402 28402 ...

Страница 100: ...iPad s built in memory To record video to your iPad s memory 1 While viewing tap to start recording 2 Tap again to stop recording To view the recorded video see below 13 2 Playing Back Video Recorded to iPad After using the record button to record video to your iPad you can playback video on iPad To playback video recorded to iPad 1 Tap the Playback button then tap iPad 2 Select the camera you wou...

Страница 101: ...it 5 Tap the Camera List button to exit playback 13 4 Using Camera List to Edit Camera Settings You can use the Camera List to adjust the connections settings or other settings for your camera To access Camera Settings 1 Tap Camera List Then tap next to the camera you would like to edit 2 For certain menus you will need to enter the camera admin user name and password before you may change setting...

Страница 102: ... camera or select OFF to keep the icon as is 4 Under Save admin password select ON to have Lorex Ping save the admin user name and password the next time you enter it or OFF to require the admin user name and password whenever settings changes are made 5 Tap Done to save changes 13 4 2 Deleting Cameras from Camera List 1 In Camera List tap Move 2 Tap next to the camera you would like to delete the...

Страница 103: ... certain menus you will need to enter the camera admin user name and password before you may change settings By default the admin user name is admin and the password is left blank 3 Under Motion select ON to enable Push Alarm Notifications when motion is detected using video motion detection or OFF to disable 4 Under Sound select ON to enable Push Alarm Notifications when sound is detected by the ...

Страница 104: ...you choose to select resolution and frame rate automatically go straight to step 7 Or select OFF to manually select the resolu tion step 5 and frame rate step 6 5 Under Resolution select the resolution that will be used when connecting to the cam era using a smart phone or tablet 320x240 480x360 640x400 or 1024x768 Tap Done to confirm 6 Under Frame rate select the frame rate that will be used when...

Страница 105: ...amera for the fre quency of your indoor lighting Tap Done to return to Video settings 4 6 Preference Select whether you would like the camera to reduce the image quality or the frame rate when bandwidth increases or decreases Select Video Motion to have the camera maintain the frame rate and reduce image quality when bandwidth is insufficient Select Image Quality to have the camera main tain image...

Страница 106: ...s LED select one of the following Normal LED s will function as normal For details on LED functions see 2 Camera Overview page 2 or page Always turn off LED s are turned off at all times Turn off after network connected LED s turn on when the camera is powered on and turn off once a network connection is made 4 Tap Done to return to the Control menu 5 Under Motion Sensitivity select the motion det...

Страница 107: ...t in the room Schedule Camera will switch between day mode and night mode at scheduled times each day If using this option tap under Schedule time of night mode use the sliders to set the Start time when night mode begins each day and End time when night mode ends each day then tap Done Manual Manually select day mode or night mode If using this option select Day for day mode or Night for night mo...

Страница 108: ...dress Subnet mask Default gateway DNS1 and DNS2 5 Tap Update to save your settings 13 4 9 Editing Camera WiFi Network Settings Configure WiFi network settings for the camera To edit camera WiFi settings 1 In Camera List tap next to the camera you would like to edit 2 Tap Camera Settings 3 Tap Network then WiFi Network 4 Slide WiFi to ON to enable WiFi on the camera and scan for available networks ...

Страница 109: ...n signal range of your wireless router 13 4 10 Enabling Email Notifications Configure email alarms The camera can be set up to send email alerts when motion is de tected Email alarms include a jpg attachment To enable email notifications 1 In Camera List tap next to the camera 2 Tap Camera Settings 3 Tap Schedule then Email Alarm 4 Under Email trigger select ON to enable email notifications or OFF...

Страница 110: ...13 4 11 Enabling Speaker Alarms Configure the siren The siren can be set up to go off when the camera detects motion This is helpful if you want to scare off intruders To configure speaker alarms 1 In Camera List tap next to the camera you would like to edit 2 Tap Camera Settings 3 Tap Schedule then Speaker Alarm 4 Under Speaker Alarm Trigger check the triggers that will cause speaker alarms Motio...

Страница 111: ...era Settings 4 Tap Schedule then SD Card 5 Under Recording select ON to enable microSD recording or OFF to disable 6 Check one of the following recording options Always Recording Camera will record continuously at all times Schedule Recording Camera will record according to settings set in the recording schedule NOTE To enable Motion detection recording using iPad you must use Schedule recording T...

Страница 112: ...era List tap next to the camera you would like to edit 3 Tap Camera Settings 4 Tap Schedule then Scheduling 5 Tap Add Schedule 6 Under Email Alarm check Motion trigger to send an email alarm based on video motion 7 Under Speaker Alarm check Motion trigger to activate the siren based on video motion 8 Under SD card record check Continuous for the camera to record to microSD con tinuously during the...

Страница 113: ...he Start and End using the sliders to configure the exact date and time when you would like the schedule to start and end Tap Done 10 Tap Done to save the schedule Tap Update to save your settings To delete a Schedule 1 From the Scheduling menu left swipe the schedule you would like to delete from left to right 2 Tap Delete 3 Tap Update to save your changes 13 4 14 Configuring the Camera Date and ...

Страница 114: ...nd End Time use the sliders to configure the start and end time for Daylight Savings Time and then tap Done 6 Tap Update to save your changes Tap OK The camera will reboot to apply the new time zone 13 4 15 Rebooting the Camera 1 In Camera List tap next to the camera you would like to edit 2 Tap Camera Settings 3 Tap Login then Reboot 4 Tap OK to confirm LX400072 r 28402 28402 en US 106 ...

Страница 115: ...meras on your local network Tap Search to re scan 3 Tap a camera from the list The Add camera screen comes on with the camera ID al ready entered 4 Enter a Name of your choice and enter the camera Password If you have not con nected to your camera before the password is lorex 5 Tap Done The camera is now added to camera list Tap the Camera List button and then tap the camera name in Camera List to...

Страница 116: ...pshot of the camera on your phone 5 Turn on the audio stream from the camera s microphone 6 Play an audio alarm on the camera 7 Activate 2 way audio Intercom using the phone microphone 14 1 1 Controlling Your Camera with Your Touchscreen In the live view you can move your camera simply by swiping your Android phone s touchscreen Swipe right to make your camera pan left and swipe left to make your ...

Страница 117: ... memory on your Android device To record video to your Android device 1 Press the record button to begin recording 2 Press the record button again to stop recording To view the recorded video see below 14 2 Playing Back Video Recorded to your Android Device After using the record button to manually record video to your Android device you can use Lorex Ping to play it back To playback video recorde...

Страница 118: ...on your An droid phone or tablet For details on setting up microSD recording see 14 4 12 Enabling microSD Recording page 121 To play back video recorded on the camera microSD card 1 Tap Camera List Then tap next to the camera you want to view recordings for 2 Tap SD card playback 3 The camera scans for available video files Files are shown in a list according to the date they were recorded LX40007...

Страница 119: ...ing your An droid phone or tablet For details on setting up microSD recording see 14 4 12 Enabling microSD Recording page 121 To delete video recordings 1 Tap Camera List Then tap next to the camera with recordings you want to delete 2 Tap SD card playback The camera scans the microSD card for recorded video files and shows a list of days with recorded video 3 Tap Edit LX400072 r 28402 28402 en US...

Страница 120: ...a List to adjust the connection or other settings for your camera To access Camera Settings Tap Camera List Then tap next to the camera you would like to edit The Camera List Settings Menu appears NOTE For certain menus you will need to enter the camera admin user name and password before you may change settings By default the admin user name is admin and the password is left blank LX400072 r 2840...

Страница 121: ...in Account select ON to save the admin user name and password so you do not have to enter it when making setting changes Or select OFF to not save the admin user name and password The admin user name and password will be saved the next time you enter it to make a setting change 6 Tap OK to save changes 14 4 2 Deleting Cameras from Camera List 1 In Camera List tap next to the camera you would like ...

Страница 122: ... 5 Under Resolution select the resolution that will be used when connecting to the cam era using a smart phone or tablet 320x240 480x360 640x400 1024x768 or 1280x800 6 Under Frame rate select the frame rate that will be used when connecting to the cam era using a smart phone or tablet between 30fps highest and 1fps lowest 7 Under Microphone tap to select OFF to turn off audio streaming to your mob...

Страница 123: ...ter Quality to have the camera maintain frame rate and increase quality when bandwidth is sufficient Select Best Quality to have the camera maintain the frame rate and increase quality to the maximum speed of the connection 3 7 Time Display on Video Tap to select ON to enable time stamps on video or OFF to disable time stamps 3 8 Video flip Tap to select Video Flip to flip the camera image vertica...

Страница 124: ...gger motion detection 5 Tap Video Settings when finished making changes then tap Update to save your settings 14 4 6 Configuring Night Mode Settings Configure when the camera uses day or night mode When day mode is on the camera sees in color When night mode is on the camera sees in black and white and the Infrared LED turns on to enable night vision To configure Day Night mode 1 In Camera List ta...

Страница 125: ...night mode ends each day then tap OK Manual Manually select day mode or night mode If using this option select Day for day mode or Night for night mode 4 Tap Update to save your changes 14 4 7 Enabling Motion Sound Push Alarm Notifications Push Alarm Notifications can be set up to create a notification straight to your Android device when motion or sound is detected by the camera Push Alarm Notifi...

Страница 126: ...dress when connected using Ethernet Select DHCP or Fixed IP To edit camera wired network settings 1 In Camera List tap next to the camera you would like to edit 2 Tap Camera Settings 3 Tap Network then Wired Network 4 Select DHCP recommended to allow the camera to automatically obtain an IP ad dress from the router or Static to use fixed IP address settings If you select Static configure your IP A...

Страница 127: ...era List to exit the edit camera screen 9 Tap the camera in the Camera List to connect If you cannot connect check to make sure you have entered the correct wireless password and that the camera is in signal range of your wireless router 14 4 10 Enabling Email Notifications Configure email alarms The camera can be set up to send email alerts when motion is de tected Email alarms include a jpg atta...

Страница 128: ...rver to send Email messages click SMTP Settings enter your SMTP server information and tap OK 14 4 11 Enabling Speaker Alarms Configure the siren The siren can be set up to go off when the camera detects motion This is helpful if you want to scare off intruders To configure speaker alarms 1 In Camera List tap next to the camera you would like to edit 2 Tap Camera Settings 3 Tap Schedule then Speak...

Страница 129: ...ecord according to settings set in the recording schedule NOTE To enable Motion detection recording using Android you must use Schedule recording Then create a schedule in the Scheduling menu with Motion trigger 7 Under When disk space full select Circular recording to set the camera to over write the oldest recordings when the microSD card is full or select Stop recording to set the camera to sto...

Страница 130: ...d time Create a one time schedule for example if you are going on vacation and would like to record all the time Tap Start and End and use the sliders to con figure the exact date and time when you would like the schedule to start and end Tap OK Every week Create a weekly recording schedule Tap and check the days you would like the schedule to apply to Tap Start and End and use the sliders to conf...

Страница 131: ...ime Configure the camera date and time The camera syncs with an Internet NTP time server to automatically provide the correct time once you have configured your time zone and daylight savings time settings To set the camera date and time 1 In Camera List tap next to the camera you would like to edit 2 Tap Camera Settings 3 Tap Admin then Date Time 4 Tap Time Zone 5 Use the slider to select your ti...

Страница 132: ...5 Using Local Search to Add Cameras You can use the Local Search Menu to automatically add the ID s for cameras on your lo cal network To add cameras using local search 1 Tap the Local Search button 2 Lorex Ping automatically scans for cameras on your local network Tap Search to re scan 3 Tap a camera from the list The Add camera screen comes on with the camera ID al ready entered 4 Enter a Camera...

Страница 133: ...nfigure NOTE Your computer must be on the same network as the camera to use Web Configure You may change camera settings over the Internet using the iPhone iPad or Android apps 2 Enter the camera admin user name and password By default the admin user name is admin and the admin password field is left blank Click Log in The Web Configure interface opens in your default web browser NOTE Your camera ...

Страница 134: ... Configure recording settings and schedules Configure email and audio alarms 5 Admin Configure the camera date and time passwords and LED s Restart the cam era Perform system upgrades 6 Language Select the language for the Web Configure interface 15 2 Network Configure networking settings for WiFi or Ethernet connection 15 2 1 Wired Network DHCP or Fixed IP Configure the camera IP address when con...

Страница 135: ...camera will use Make sure it is available on your network Subnet mask Enter the Subnet Mask Default Gateway Enter the Default Gateway address Obtain DNS server address automatically Select to have the camera automati cally select a DNS server Use the following DNS server address Select and then manually enter DNS server information 3 Click Save Apply 15 2 2 WiFi Security Configuring WiFi settings ...

Страница 136: ...a fixed IP address for the camera when connected over WiFi click IP address configure the settings as needed and click Save Apply To test configured WiFi settings click WiFi test 15 3 Video Configure camera video and streaming settings 15 3 1 Video Settings Adjust the video quality settings Set the password to access camera video through L View or apps To set the camera password for accessing vide...

Страница 137: ... camera maintain frame rate and increase quality when bandwidth is suf ficient Select Best Quality to have the camera maintain the frame rate and in crease quality to the maximum speed of the connection Brightness Manually adjust the brightness of the image between 10 highest and 1 lowest Sharpness Manually adjust the sharpness of the image between 10 highest and 1 lowest Low Light Sensitivity Set...

Страница 138: ...se the following values to manually select the resolution and frame rate 3 Under Resolution select the resolution that will be used when connecting to the cam era using a smartphone or tablet 320x240 480x360 640x400 or 1024x768 4 Under Frame rate select the frame rate that will be used when connecting to the cam era using a smart phone or tablet between 30fps highest and 1fps lowest 5 Select Enabl...

Страница 139: ...will switch to night mode and the second set of drop down menus to select when the camera will return to day mode Manual night mode control Manually select day mode or night mode If using this option under Mode select Day for day mode or Night for night mode 2 Click Save Apply to apply your settings to the camera 15 4 Schedule Configure recording to microSD card configure email or speaker alarms a...

Страница 140: ... 10 Low If Motion Detection Sensitivity is set to 1 motion detection will be triggered if a moving object is larger than 1 of the video area If it is set to 10 a moving object must be larger than 10 of the video area to trigger motion detection 3 Under Trigger Interval enter the minimum time in seconds the camera will wait in between email alarms If this Interval is set too low you may receive a l...

Страница 141: ... of times the alarm will repeat 3 Click Use Default Alarm Audio if you want the camera to play the default alarm audio when an alarm trigger occurs 4 Click Use Recorded Alarm Audio if you want the camera to play your own recorded alarm audio when an alarm trigger occurs 5 Click Start Audio Record to record up to 30 seconds of audio with the camera s built in speaker for use as alarm audio NOTE If ...

Страница 142: ...ording Record according to the settings set in the Schedule Standby Do not record 3 Under When disk space full select Overwrite for the camera to record over the old est recordings when the microSD card is full or select Stop recording for the camera to stop recording when the microSD card is full 4 Click Save Apply 15 4 4 Scheduling Configuring Recording and Alarm Schedules Configure schedules fo...

Страница 143: ...ing to configure the times that will be used for this schedule Every week Create a weekly recording schedule Check the days you would like the schedule to apply to Under During time enter the start time for the schedule on the left and the end time for the schedule on the right Every day Create a daily recording schedule Under During time enter the start time for the schedule on the left and the e...

Страница 144: ... field is left blank when logging in Repeat the password under Password confirm 3 Click Save Apply to apply the settings to the camera Restart the camera by discon necting and reconnecting the power adapter or pressing the Reboot button see 15 5 5 Reboot page 140 To configure the Web access port For added security you may change the camera s web access port Please note that if you change the web a...

Страница 145: ...to spot at night To configure the LED s 1 Select one of the following Normal LED display LED s will function as normal For details on LED functions see 2 Camera Overview page 2 or page Turn off LED display always LED s are turned off at all times Turn off LED display after network connected LED s turn on when the camera is powered on and turn off once a network connection is made 2 Click Save Appl...

Страница 146: ...t Savings Time Configure the Start Time and End Time for Daylight Savings Time if needed 3 Click Save Apply to apply settings to the camera 15 5 4 Upgrade Upgrade the camera firmware When firmware upgrades are released they will be avail able as a free download from www lorextechnology com NOTE Your computer must be on the same network as the camera to upgrade the firmware To upgrade the camera fi...

Страница 147: ...Search and click Web configure Mac users Open L View and click to access Auto Search Click be side the camera ID you want to configure 3 Type the camera admin user name default admin and password default left blank and click Ok to log into the camera 4 Click Admin then click Upgrade LX400072 r 28402 28402 en US 139 ...

Страница 148: ...to complete Do not disconnect the power or network cable during the firmware upgrade The camera will reboot once firm ware upgrade is complete 15 5 5 Reboot Restart the camera from your Internet browser This is useful if you need to restart the camera to apply settings changes or if the camera encounters an error To restart the camera 1 Press the reboot button LX400072 r 28402 28402 en US 140 ...

Страница 149: ... in microphone for audio monitoring Half duplex two way audio Video management software mobile applications L View software for viewing and recording up to 4 cameras PC Mac Lorex Ping app for viewing cameras on mobile iOS Android Security Web management username password protection Video display ID password protection WiFi WEP and WPA WPA2 security mode Users Up to 20 simultaneous users depends on...

Страница 150: ...rself Contact customer service for assistance 17 1 Disposal of the Device At the end of the product lifecycle you should not dispose of this product with normal household waste but take the product to a collection point for the recycling of electrical and electronic equipment The symbol on the product User s Guide and or box indicates this Some of the product materials can be re used if you take t...

Страница 151: ... 20cm 7 87in from nearby persons Industry Canada statement This device complies with RSS 210 of the Industry Canada Rules Operation is subject to the following two conditions 1 This device may not cause harmful interference and 2 this device must accept any interference received including interference that may cause undesired operation Ce dispositif est conforme à la norme CNR 210 d Industrie Cana...

Страница 152: ...lephones or other wireless devices Password required to change settings different than password created Changing settings requires the admin user name and password for the camera This is a different password than the one used to connect to the camera for video streaming By default the admin user name is admin and the password is left blank Forgot password for camera Press and hold the Reset button...

Страница 153: ......
Страница 154: ...gistered trademarks or trademarks of Lorex Corporation and or its subsidiaries All other trademarks trade names or company names referenced herein are used for identification only and are the property of their respective owners Legal disclaimer As our product is subject to continuous improvement Lorex Corporation subsidiaries reserve the right to modify product design specifications prices without...

Отзывы: