background image

GB - 11

PREP

AR

A

T

IO

N

CONNECTIONS

USING 

THE FE

A

T

URE

S

USING 

THE 

D

V

D

FE

A

T

URE

S

TR

OUBLESHOO

TING

SPECIFIC

A

T

IO

N

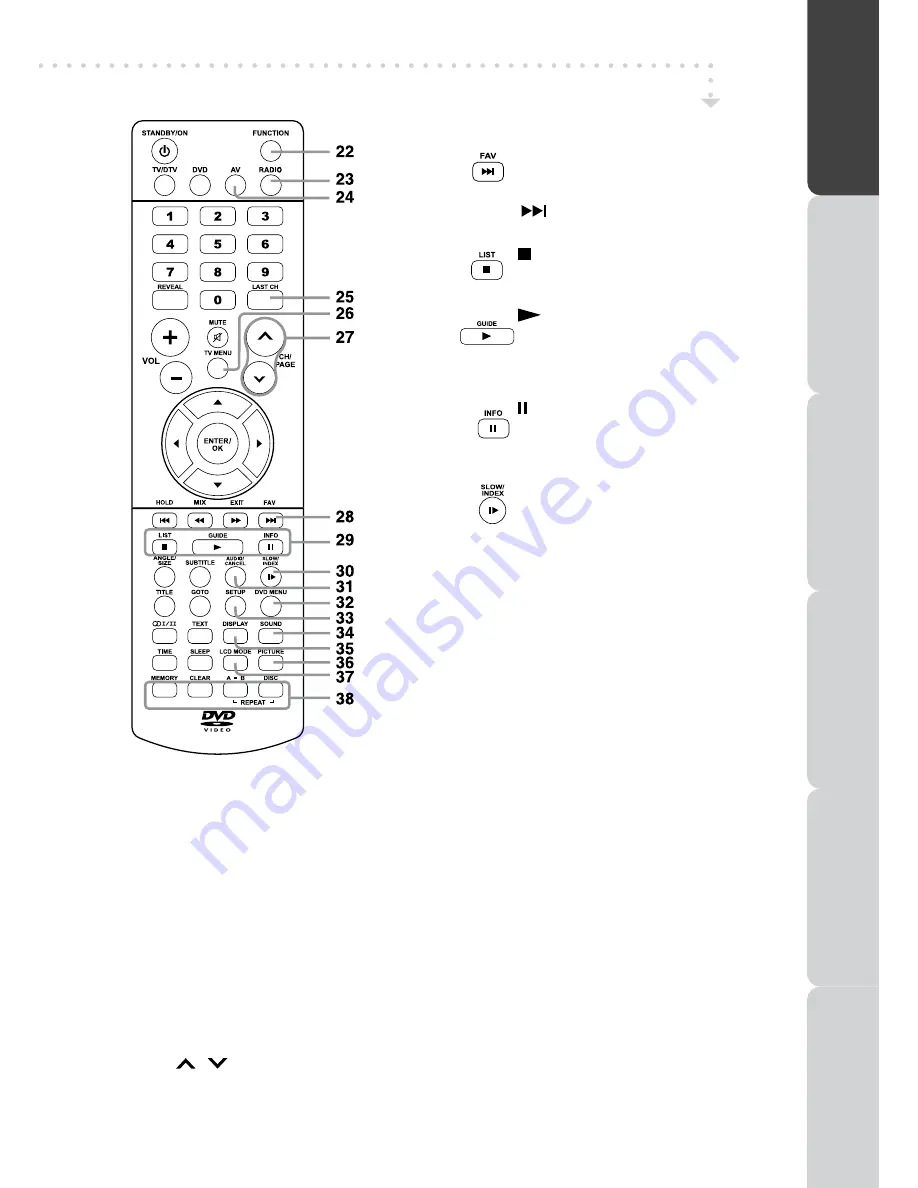
REMOTE CONTROL

22) FUNCTION button


Press to switch between DTV, TV, AV1, AV2/SCART, 
YUV/SCART, DVD or HDMI.

23) RADIO button


Press to select digital radio programmes. Press again to 
exit to normal DTV programmes mode.

24) AV button


Press to select source connected to AV1, AV2/SCART, 
YUV/SCART or HDMI.

25) LAST CH button


Press to switch repeatedly between the last two channels 
displayed.

26)  TV MENU button


Press to display the on-screen TV menu.

27)  CH/PAGE 

 / 

 buttons


-  Press to change the TV/DTV channels.


-  Press to go forward or backward the page of Teletext 

screen in TV mode.


-  Press to go forward or backward the page of Programme 

Edit & Favourite in TV/DTV mode.

28) 

FAV

   : Press  to  display  the  Favourites 

programme in TV/DTV mode. (You 
should  setup  your  favourite  TV/
DTV  channels  in  Programme  Edit 
menu.


   : Press to select next title, chapter or 

track on a disc.

29)


: Press to stop playing a disc.


LIST

   : Press to display the channel list in 

TV/DTV mode.


: Press to start and resume playback 

of a disc.


GUIDE

 : Press  to  display  the  Electronic 

Programme  Guide  (EPG)  in  DTV 
mode.


: Press to pause playback and single 

frame advance.


INFO

   : Press  to  display  the  channel 

information in DTV mode.

30) 

SLOW

  : Press  to  play  a  DVD  in  slow-

motion.


INDEX

  : Press to select the page number of 

the index from Teletext.

31) AUDIO button


Press to select audio soundtracks of a DVD or change 
the output mode of a CD.


CANCEL button


Press to cancel the Teletext menu.

32) DVD MENU button


Press  to  enter  the  main  menu  of  the  disc  you  are 
watching.

33) SETUP button


Press to enter and exit the SETUP menu of the DVD 
player.

34) SOUND button


Press to select from preset sound settings (Standard, 
Music, Theatre, Voice, Personal) to match the type of 
show you are watching.

35) DISPLAY button


Press to change disc status information displayed on the 
screen.

36) PICTURE button


Press to select from preset screen display settings to 
match  the  type  of  show  you  are  watching  (Standard, 
Movie, Dynamic, Soft, Personal).

37) LCD MODE button


Press to set the size of LCD display.

38) RED/GREEN/YELLOW/BLUE button


Press to select the relevant page quickly from Teletext.

Содержание L19DVDB19

Страница 1: ...GB 1 INSTRUCTION MANUAL 19 22 Wide HD Ready LCD TV with Hybrid Tuner DVD Player L19DVDB19 L19DVDW19 L19DVDP19 L22DVDB19 L22DVDW19 L22DVDP19...

Страница 2: ...supply before connecting disconnecting other devices or moving the unit Unplug the unit from the mains socket during a lightning storm Mains Cable Make sure the unit or unit stand is not resting on t...

Страница 3: ...rating and maintenance servicing instructions in the manual accompanying the appliance Service To reduce the risk of electric shock do not remove screws The unit does not contain any user serviceable...

Страница 4: ...gramme Guide EPG for DTV 18 Audio Language for DTV 18 Picture Menu 19 Sound Menu 19 Time Menu 20 Setup Menu 20 Lock Menu 21 Teletext 22 USING THE DVD FEATURES 23 30 Customising the DVD function settin...

Страница 5: ...you dispose of it please do so according to any local regulations LCD TV with TV Base Remote Control AAA batteries x 2 LINEOUT Cable Instruction Manual Quick Start Guide SCART Adaptor 1 1 Unpacking Op...

Страница 6: ...atch or damage the LCD display comes into contact with it Do NOT exert pressure on the front of the unit at any time because the screen could crack 1 Disconnect all cables or cords connected to the un...

Страница 7: ...damage including fire Do not mix old and new batteries Do not mix ALKALINE standard CARBON ZINC or rechargeable NICKEL CADMIUM batteries Corrosion oxidation battery leakage and any other gradually aci...

Страница 8: ...TV FRONT VIEW BACK VIEW 1 Speakers 2 Remote Sensor Do not block this sensor or the remote control will not work Standby Indicator Indicates whether the unit is ON or in STANDBY OFF mode Light On The u...

Страница 9: ...ss to display the on screen TV menu 16 FUNCTION button Select DTV TV AV1 AV2 SCART YUV SCART DVD or HDMI 17 CH buttons Press to change the TV channels and highlight selections Up Down on the menu scre...

Страница 10: ...amera angles are recorded on a DVD SIZE button Press to set the letters size of teletext on the screen 12 SUBTITLE button Press to select one of the subtitle languages programmed on a DVD DTV 13 TITLE...

Страница 11: ...lay the channel list in TV DTV mode Press to start and resume playback of a disc GUIDE Press to display the Electronic Programme Guide EPG in DTV mode Press to pause playback and single frame advance...

Страница 12: ...wer input the mains plug of unit shall be disconnected from the mains The mains plug is used as the disconnecting device It should remain readily accessible and should not be obstructed during use CON...

Страница 13: ...TIONS Connecting TO deviceS WITH SCART Devices with RGB output must be connected to the SCART input Connects the SCART from the device to the corresponding SCART on this unit SCART cable not included...

Страница 14: ...able not included as shown Make sure you connect the YUV Scart adaptor to this unit then connect component video cable and audio cable from the other device COMPONENT VIDEO OUT and AUDIO OUT to this u...

Страница 15: ...loss Earphones Headphones 1 8 3 5mm diameter plug Connecting HDMI HDMI High Definition Multimedia Interface supports both video and audio on a single digital connection for use with DVD players DTV se...

Страница 16: ...UNIT ON FOR THE FIRST TIME The first time you turn the unit on it will go straight into Auto scan mode Simply follow the screen prompts as below to tune in the channels 1 Use the button to select the...

Страница 17: ...ogramme Edit All channels stored are listed in the Programme Edit menu you can edit the channels by the following steps CI Information Display CAM and Smart card information select the language if ava...

Страница 18: ...u Note Guide information display may be different according to the DTV programmes Use the or button to select an audio language or audio format if available press the or button to select soud track be...

Страница 19: ...colour of the picture Sharpness Adjust the sharpness level to improve detail in the picture Tint only for AV mode with NTSC signal Adjust the tint of the picture Toward purple Toward green Colour Tem...

Страница 20: ...button to select the SETUP 3 Use the or button to select the options Language Audio Language Subtitle Language Restore Setting adjust them by using the or button 4 Press the TV MENU button to return t...

Страница 21: ...Lock System is designed to prevent accidentally retuning the TV and losing channels When the Lock System is ON a valid password is required if the TV is to be retuned Change Password If you change the...

Страница 22: ...e TV programme Press the MIX button again to return to the text page Page search whilst watching TV In Text mode press the CANCEL button Enter the page number you want using the Numeric buttons The to...

Страница 23: ...c menus consistent with the disc s initial language setting Language Setup Enter Select OSD Language Audio Subtitle DVD Menu CUSTOMISING THE DVD FUNCTION SETTINGS TV Type Pan Scan When wide screen vid...

Страница 24: ...h a password function The contents allowed by parental lock level and the way a DVD is controlled may vary from disc to disc For example if the disc allows you could lockout violent scenes unsuitable...

Страница 25: ...rupt playback and press the PLAY button to resume playback Press the ANGLE button on the remote control to rotate the picture orientation by 90 PAUSING PLAYBACK STILL MODE Press the PAUSE button To re...

Страница 26: ...is recorded the language does not change About two seconds later playback continues with the new subtitle you selected The number of languages recorded differs depending on the disc If no button is p...

Страница 27: ...or button to highlight a chapter track then press the corresponding number button s for the chapter track you want 3 Press the ENTER OK button to confirm Playback starts from the selected chapter tra...

Страница 28: ...on the screen The current track is played repeatedly 2 Repeating an entire disc While the disc is playing press the REPEAT DISC button blue button until the indicator displays on the screen The entir...

Страница 29: ...be shown as right 2 Press the button to highlight the Title Press the or button to choose the desired title Press the button again to highlight the Chapter Press the or button to choose the desired Ch...

Страница 30: ...leaning fluid or other chemicals Do not use compressed air to remove dust Handling Discs Do not touch the playback side of the disc Do not attach paper or tape to disc Cleaning Discs Fingerprints and...

Страница 31: ...Vertical bas or picture shaking Check for local interference such as an electrical appliance or power tool Poor reception on some channels Station or cable channel may be experiencing problems tune to...

Страница 32: ...ng on my digital picture In most cases blocking is caused by a reception problem either the signal is too weak or there is some kind of interference Talk to your retailer or contact your local aerial...

Страница 33: ...9 TFT LCD Brightness 250 250 250 250 Contrast Ratio VIDEO AUDIO L R SCART HDMI IN DVD VIDEO OUT EARPHONE TV AERIAL TERMINAL COMMON INTERFACE SLOT 1 1 1 1 1 1 1 1 1 1 1 1 1 1 1 1 1 1 1 1 1 1 1 1 1 1 1...

Страница 34: ...ady Logo is a trademark of EICTA All trademarks are the property of their respective owners and all rights are acknowledged Note If you require a replacement for any of the items listed below please q...

Отзывы: