background image

14

SECTION 3.4

3.4 Deleting an Access Code (Continued)

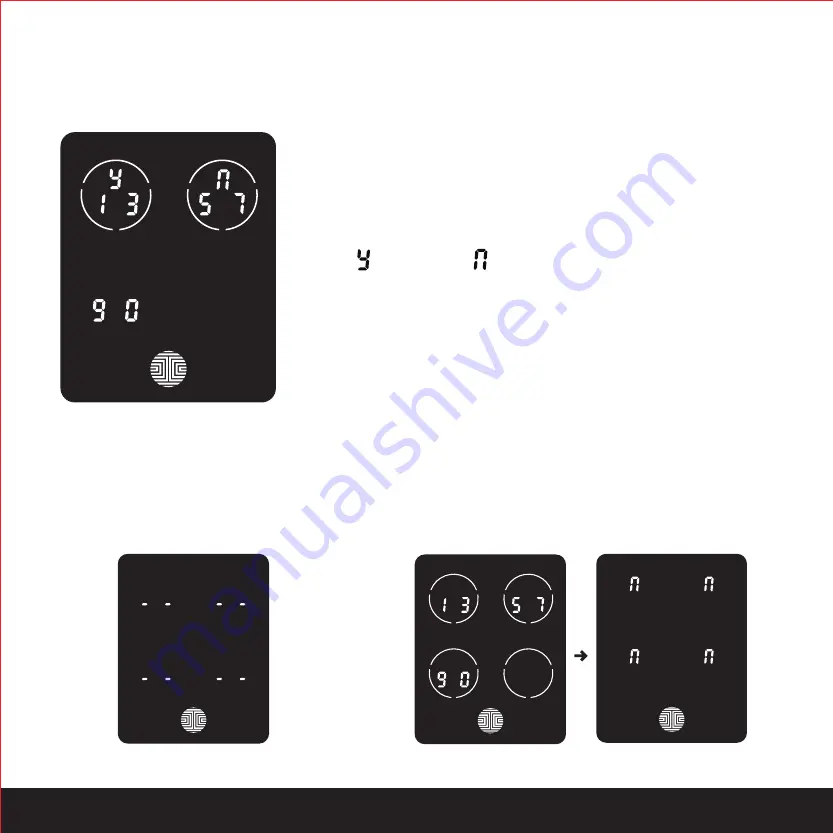
Once you have selected the Access Code you want to delete, 

Lockly will ask you to confirm deletion by showing you the Access 

Code you are deleting, in this example,1 3 5 7 9 0.

Press       to delete, or         to cancel. 

There are two incidents where your Access Code cannot be deleted.

NOTE

Only one Active Access Code

No Access Codes Set

There are no Access Codes set.  The 

factory default Access Code cannot 

be deleted.

There is only one (1) Access Code saved in the smart 

lock.  At least one code must be registered.  Please 

add another Access Code before attempting to delete 

the existing code.

Содержание LUX Compact

Страница 1: ...USER MANUAL LUX COMPACT MORTISE EDITION ...

Страница 2: ...ions 8 1 Safety Precautions 1 2 3 4 5 6 5 7 8 9 10 11 13 15 16 19 21 22 23 24 25 26 27 28 29 32 30 33 34 35 2 1 Product Overview Outside 2 2 Product Overview Inside 2 3 Understanding Your New Lock 2 4 Reset Button 2 5 Keypad Display Switch 2 6 Rebooting Your Lock 2 7 Low Battery 2 8 Changing The Battery 4 1 Locking Unlocking with Codes 4 2 Locking Unlocking using Fingerprint 4 3 Locking Unlocking ...

Страница 3: ...ere in the world and securely control who comes and goes You can also control your Lockly smart lock using your voice with Amazon Alexa or Google Assistant Complete Privacy The exterior displayed keypad can be locked and switched off using the simple ON OFF toggle from the inside panel The owner can prevent others trying to input the passcode from the outside and entering the home Offline Access C...

Страница 4: ...Product Overview Outside 2 SECTION 2 1 Key Hole Cover 9V Battery Backup Socket Key Hole Touchscreen Keypad Buttons Bluetooth icon Power Status Lock Status icon OK Button Bluetooth light Handle Reboot Button ...

Страница 5: ...Handle Reset Button Program Button Battery Cover Battery Compartment 4 x AA Alkaline Batteries Included Keypad Display Switch Low Battery Indicator Battery Cover Screw SECTION 2 2 3 2 2 Product Overview Inside ...

Страница 6: ... adding Access Codes deleting Access Codes adding and deleting fingerprints adding and deleting RFID cards and also how to configure your OAC Offline Access CodeTM For any questions you can always visit https lockly com help for assistance Don t forget that Lockly Lux Compact works best with our iOS and Android app Please download the app by visiting the link below Scan or visit Lockly com app 4 S...

Страница 7: ...low to see which Reset Process applies for you Once the smart lock has been reset all the data previously stored will be deleted 2 5 Keypad Display Switch The exterior keypad screen can be locked and turned off by using the ON OFF switch at the back panel interior of the smart lock When it is switched off people who are outside cannot enter any access codes to unlock the door Reset Button If Paire...

Страница 8: ...eboot the lock Your Lockly will beep once after reboot Only reboot when necessary To reboot find the reboot button located on the bottom of the exterior side of Lockly lock The reboot button is located in the middle of the two 9V battery backup sockets You will need something small such as a paperclip to press the reboot button Insert the paper clip and press down firmly and let go Your screen sho...

Страница 9: ...ion Indicator Solution Low Battery Battery Icon on the display keypad will light up to indicate low battery Replace batteries immediately to avoid battery failure Lockly Lux Compact can still operate up to 300 cycles in low battery condition When there is no display and sounds and screen is non functional Replace batteries immediately Supplied physical backup keys can be used to unlock the door Al...

Страница 10: ... 4 new AA alkaline batteries as shown Be sure to unscrew the screw located on the top of the cover first by unscrewing counter clockwise before sliding the cover up Make sure the batteries are oriented correctly by matching the orientation displayed Replacing the batteries do not reset stored Access Codes To see a list of recommended brands please visit http Lockly com battery Whenever batteries a...

Страница 11: ...Keypad There are a total of five 5 buttons on the keypad as shown in the example image to the left The numbers in each button may differ than what is shown on your device than what is displayed here To enter your required digit just simply press the circle where your number is shown You do not need to press the actual number as anywhere within the circle will suffice The button on the bottom is th...

Страница 12: ... mode Note Program button will be disabled once synced to a smart phone Configure all settings via synced smart phone Access Codes previously added by Programming mode will be cleared To end Programming Mode press the Program button anytime Programming Mode will automatically exit if the keypad is inactive for more than thirty 30 seconds After entering Programming Mode you should see the screen as...

Страница 13: ...er your new 6 8 digit Access Code and press when you are finished You will then re enter the code to confirm your new Access Code Remember just touch the digit you need within the circle around each 3 numbers There is no need to touch the exact location of the number For example based on the example image to the left if you need 1 you can touch the upper left button or the lower right button For 6...

Страница 14: ...new code displayed here In this example we chose 654321 Press to Confirm or to cancel To exit or cancel you can always press or If the two 2 Access Codes you entered does not match an error message will appear on the screen As shown to the left Press OK to return to the Programming Screen and try again See Section 3 3 OK Button ...

Страница 15: ...Pd to delete an Access Code OK Button Example Only Active Access Codes will then be displayed on the screen in sequence from left to right top to bottom In the example shown on the left the Access Code displayed is 1 3 5 7 9 0 Rotate through different Access Codes shown by touching any number on the screen If you find the Access Code you want to delete simply hold the OK button for 2 seconds Conti...

Страница 16: ...ple 1 3 5 7 9 0 Press to delete or to cancel There are two incidents where your Access Code cannot be deleted NOTE Only one Active Access Code No Access Codes Set There are no Access Codes set The factory default Access Code cannot be deleted There is only one 1 Access Code saved in the smart lock At least one code must be registered Please add another Access Code before attempting to delete the e...

Страница 17: ...nce from left to right top to bottom In the example shown on the left the Access Code displayed is 1 3 5 7 9 0 Rotate through the different Access Codes by touching any number on the screen To exit Check Access Code screen simply press the OK button If there are no Access Codes registered in your smart lock Check Access Code mode will be invalid The default Access Code will not be shown on the dis...

Страница 18: ...r fingers before registration to make sure the finger you want to register will be acceptable by our system Otherwise use an alternative finger to ensure successful registration The following examples show which types of fingerprint patterns will be acceptable It is highly recommended to enroll at least one finger from each hand in case the hand you are using is unavailable such as in instances li...

Страница 19: ... side of Lockly Once you re in Fingerprint Registration Mode you will see two numbers displayed on keypad The top number is your Fingerprint Registration number in this example to the left 1 The bottom number will always start with a 6 You must successfully scan your fingerprint six 6 times for it to properly register Every time you scan your fingerprint the number on the bottom will change starti...

Страница 20: ...your finger and repeat the process slowly until the digit 6 shown on the screen becomes 1 If you have successfully scanned and registered your fingerprint you will hear a long beep and the Blue tooth icon will flash green PASS will show on the keypad and press OK to exit If you did not successfully register your fingerprint FAIL will show on the keypad If FAIL is displayed press OK to return to th...

Страница 21: ... sensor equipped in your smart lock is loaded with powerful fingerprint algorithms to extract quality features from fingers even in poor conditions Placing your finger on the sensor correctly helps consistency in fingerprint recognition The following directions and tips will guide you on how to scan an optimal fingerprint image ...

Страница 22: ...20 SECTION 3 7 3 7 Fingerprint Scanning Directions Continued Top View Side View OK OK Correct Incorrect ...

Страница 23: ... 12 and under are not recommended to use fingerprint access due to the constant changes of their fingers during growth Elderly with fading fingerprints may have difficulty in recognition If your finger has a cut scar or cracked skin due to dryness try another finger Troubleshooting Fingerprints In case of poor fingerprint conditions If wet wipe excess moisure from finger before scanning If dry moi...

Страница 24: ...ingerprint numbers will be displayed on the screen Tap number to rotate to the next regis tered fingerprint When you have found the fingerprint ID you want to delete press and hold the OK button for 3 seconds to delete Example shown 02 You will then see a confirmation page displaying and with the fingerprint number you are deleting displayed in the lower left Select Y to delete or N to cancel Alte...

Страница 25: ...n your iOS or Android device From the main menu drop down located on the upper left of the screen select Add a New Device then select Secure Link Wi Fi Hub Follow the in app instructions to set up your Secure Link Hu To activate voice commands you will need Amazon Alexa or Google Assistant Make sure you enable the Lockly Action for Google Assistant or the Amazon Alexa Skill before you can configur...

Страница 26: ...version and the PIN Genie version Rec ommended Press and hold the OK Button for 3 seconds to toggle back and forth between the two keypads Sample display shown only Lock your Lockly by pressing the OK Button or by brushing your hand across the screen anytime when the door is closed The smart lock will also auto lock after unlocking based on your set auto lock settings keypads Hold OK 3 sec PIN Gen...

Страница 27: ...u will hear a beep sound and a Green LED will light up on the fingerprint scanner You can then push down the handle and open the door If you see a Red LED it means your fingerprint is not recognized You must wait until the red LED is off to try again For best fingerprint scanning practices see Section 3 7 OK Button Locking Unlocking To lock your smart lock press the OK Button anytime or brush your...

Страница 28: ...e Lockly iOS or Android app installed in order to lock and unlock with smartphone and connect with voice assistants like Alexa or Google Assistant Please download the app by visiting the link below or search Lockly from the correct app store Scan or visit Lockly com app ...

Страница 29: ...Key Exterior View To unlock your lock using the physical key included open the key cover on the handle by turning the cover to reveal the keyhole Insert your key and turn clockwise or counter clockwise to lock or unlock the door SECTION 4 5 ...

Страница 30: ... your customized timing through the Lockly app The deadbolt throw is connected to the door handle To UNLOCK pull the handle downwards and push door to open This action is necessary to open your door whenever you access by keypad fingerprint smartphone App or RFID card To LOCK from the inside or outside pull the handle upwards Ensure your deadbolt throw is always locked following this action SECTIO...

Страница 31: ... perform voice commands You can ask your questions such as door status or request for your door to be locked or unlocked Hey Google unlock my Back Door Hey Google is my Back Door locked Hey Google lock my Back Door Hey Google is my Back Door unlocked Alexa unlock my Front Door Alexa is my Front Door locked Hi Alexa lock my Front Door Alexa is my Front Door unlocked Unlock requests will require add...

Страница 32: ...ll see a 10 on the screen notifying the number of minutes that the keypad is disabled for After 10 minutes you may attempt to enter the correct Access Code to unlock the door After the second incorrect attempt to unlock the lock with the wrong Access Code Lockly will disable the keypad for 20 minutes displaying a 20 on the screen After the third wrong attempt to unlock the door with the correct Ac...

Страница 33: ... not downloaded the app to use with your smart lock you won t be able to use this option to disable Safe Mode While in Safe Mode the keypad will not be lit up when you are using your Physical Key Option 3 Physical Key There is a pair of keys included with your new lock You may use the keys to manually unlock the door To learn how to use your physical keys see Section 4 4 To reactive the screen use...

Страница 34: ... then issue an Offline Access CodeTM within the app Go to Access and choose Add a New User then select Offline Access CodeTM OAC and follow on screen instructions to generate your Offline Access CodeTM Understanding Offline Access CodeTM OAC OAC are issued to the guest by asking them to enter 4 12 digit number after a double click on the Your Lockly randomly generates the Offline Access CodeTM whi...

Страница 35: ...ad by using a 9V battery against the bottom of the exterior side of the smart lock Please see Section 2 6 for more info Physical Keys Even though you have your fingerprints registered and Access Codes stored it s always best practice to carry your physical keys with you at all times in case for any reason your lock falls into Safe Mode Activation Code You may find an Activation Code Card with an A...

Страница 36: ...Use the application of soap with a damp lukewarm cloth Air dry or wipe dry with a soft microfiber cloth to avoid scratches Don t use abrasives high alkaline cleaners or gasoline to clean your lock Don t apply cleaning detergent directly in sunlight or at high temperatures Don t leave cleaning detergent on the display keypad for long periods of time wash immediately Don t use scrapers squeegees or ...

Страница 37: ...eep your Access Codes safe Restrict access to the back panel of your smart lock and check your settings regularly to ensure Access Codes have not been changed without your knowledge Always dispose of used batteries according to your local laws DO NOT BURN Please read all instructions carefully Remind all Lockly users of the safety precautions Unauthorized changes and modifications may void your pr...

Страница 38: ...ce to radio or television reception which can be determined by turning the equipment off and on the user is encouraged to try to correct the interference by one or more of the following measures Reorient or relocate the receiving antenna Increase the separation between the equipment and receiver Connect the equipment into an outlet on a circuit different from that to which the receiver is connecte...

Страница 39: ...ation Sciences et Développement économique Canada applicables aux appareils radio exempts de licence L exploitation est autorisée aux deux conditions suivantes 1 L appareil ne doit pas produire de brouillage 2 L appareil doit accepter tout brouillage radioélectrique subi même si le brouillage est susceptible d en compromettre le fonctionnement WARNING This product contains DEHP and other chemicals...

Страница 40: ...which is a peep proof and hidden camera proof algorithm software Lockly makes your life easier and safer For digital versions and instructional videos please visit the following link Lockly Smart Lock Secure Lockly Smart Lock Secure Plus Lockly Smart Lock Secure Pro U S Patent No 9 665 706 Other Patents Pending With All Rights Reserved http lockly com help ...

Страница 41: ......

Отзывы: