background image


Wireless N300 Home Router 

70 

Appendix 3 FAQs 

This  section  provides  solutions  to  problems  that  may  occur  during 
installation  and  operation  of  the  device.  Read  the  following  if  you  are 
running  into  problems.  If  your  problem  is  not  covered  here,  please  feel 
free to go to www.link1.com.br to find a solution or email your problems to: 
[email protected].  We  will  be  more  than  happy  to  help  you  out  as 
soon as possible. 
 

Q1

:  I  entered  the  device’s  LAN  IP  address  in  the  web  browser  but 

cannot access the utility. What should I do? 
A1: a

.Check whether device is functioning correctly. The SYS LED should 

blink a few seconds after device is powered up. If it does not light up, then 
some internal faults may have occurred. 

b

.Verify physical connectivity by checking whether a corresponding 

port’s  link  LED  lights  up.  If  not,  try  a  different  cable.  Note  that  an 
illuminated light does NOT ALWAYS indicate successful connectivity. 

c

.  Run  the  "ping  192.168.0.1"  command.  If  you  get  replies  from 

192.168.0.1, open your browser and verify that Proxy server is disabled. 
In case that ping fails, press and hold the "RESET" button on your device 
for  7  seconds  to  restore  factory  default  settings,  and  then  run 
"ping192.168.0.1" again. 

d

.  Contact  our technical  support  for  help if  the  problem  still  exists 

after you tried all the above. 


Q2: What should I do if I forget the login password to my device? 
A2:

 Reset your device by pressing the Reset button for over 7 seconds. 

Note: All settings will be deleted and restored to factory defaults once you 
pressed the Reset button. 
 

Q3: My computer shows an IP address conflict error after having 

connected to the device. What should I do? 

A3: a.

Check if there are other DHCP servers present in your LAN. If there 

are other DHCP servers except your router, disable them immediately. 

b.

The default IP address of the device is 192.168.0.1; make sure 

this address is not used by another PC or device. In case that two 
computers or devices share the same IP addresses, change either to 
a different address. 

Содержание L1-RW332

Страница 1: ...Wireless N300 Home Router...

Страница 2: ...y Co Ltd If you would like to know more about our product information please visit our website at www link1 com br Pictures images and product specifications herein are for references only To improve...

Страница 3: ...r 3 Advanced Settings 16 1 Advanced 16 1 1 Status 16 1 2 Internet Connection Setup 16 1 3 MAC Clone 22 1 4 WAN Speed 22 1 5 LAN Settings 23 1 6 DNS Settings 23 1 7 DHCP Server 24 1 8 DHCP Client List...

Страница 4: ...Reboot 56 6 2 Restore to Factory Default Settings 56 6 3 Backup Restore 57 6 4 Syslog 58 6 5 Remote Web Management 59 6 6 Time 59 6 7 Login Password 60 6 8 Firmware Upgrade 61 Appendix 1 Glossary 62...

Страница 5: ...ate replacement 2 LEDs and Ports This part describes this device s hardware features The topics include 1 Wireless Router s front and back panels 2 LED designations Front Panel L1 RW332 L1 RW131 Front...

Страница 6: ...to the Internet 1 2 3 Usually for connecting computers switches etc WPS RST When you press this button for 7 seconds files set by the router will be deleted and restored to default factory for 1 seco...

Страница 7: ...by your ISP please select PPPoE If your ISP provides all the needed information IP address subnet mask gateway address and DNS address es please select Static IP If you can access Internet as soon as...

Страница 8: ...our PC using an Ethernet cable 3 Connect the Ethernet cable from Internet side to the WAN port on the device If it is connected to the telephone line please link the telephone line to the MODEM and co...

Страница 9: ...sword field on the appearing login window and then click OK 3 Connect to Device Wirelessly Having finished above settings you can search the device s wireless network SSID from your wireless devices n...

Страница 10: ...Wireless N300 Home Router 10 2 Click Network and Internet 3 Click Network and Sharing Center...

Страница 11: ...Wireless N300 Home Router 11 4 Click Change adapter settings 5 Select a desired wireless connection and click Connect Disconnect...

Страница 12: ...Wireless N300 Home Router 12 6 Select the wireless network you wish to connect and click Connect 7 Enter the security key and click OK...

Страница 13: ...er 13 8 You can access Internet via the device when Connected appears next to the wireless network name you selected Windows XP Operation 2 If you are using Windows XP OS do as follows 1 Click Start a...

Страница 14: ...Wireless N300 Home Router 14 2 Click Network Connections 3 Right click Wireless Network Connection and then select View Available Wireless Networks...

Страница 15: ...me Router 15 4 Select the desired wireless network click Connect enter the security key and then click OK 5 You can access Internet via the device when Connected appears next to the wireless network n...

Страница 16: ...a glance the operating status of the device 1 2 Internet Connection Setup PPPoE Select PPPoE Point to Point Protocol over Ethernet if you used to connect to the Internet using a broadband connection...

Страница 17: ...ed IP address subnet mask gateway address and DNS address es in corresponding fields 1 Click Advanced 2 Click Internet Connection Setup 3 Internet Connection Type Select Static IP 4 IP Address Enter t...

Страница 18: ...ission Unit DO NOT change it from the factory default of 1500 unless instructed by your ISP You may need to change it for optimal performance with some specific websites or application software that c...

Страница 19: ...hat cannot be opened or enabled in this case try 1450 1400 etc 6 Address Mode Select Dynamic if you don t get any IP info from your ISP otherwise select Static Consult your ISP if you are not clear 7...

Страница 20: ...rformance with some specific websites or application software that cannot be opened or enabled in this case try 1450 1400 etc f Address Mode Select Dynamic if you don t get any IP info from your ISP o...

Страница 21: ...your ISP 4 MTU Maximum Transmission Unit DO NOT change it from the factory default value unless necessary 5 Service Name Description of PPPoE connection Leave blank unless otherwise required 6 Server...

Страница 22: ...network device to the router 1 MAC Address Configure device s WAN MAC address 2 Clone MAC Address Click to copy your PC s MAC address to the device as a new WAN MAC address 3 Restore Default MAC Rese...

Страница 23: ...eable 2 IP Address Device s LAN IP address The default is 192 168 0 1 You can change it according to your need 3 Subnet Mask Device s LAN subnet mask 255 255 255 0 by default 4 OK Click to save your s...

Страница 24: ...automatic configuration protocol used on IP networks If you enable the built in DHCP server on the device it will automatically configure the TCP IP settings for all your LAN computers including IP ad...

Страница 25: ...ion list 4 OK Click to save your settings Note If the IP address you have reserved for your PC is currently used by another client then you will not be able to obtain a new IP address from the device...

Страница 26: ...lick to save your settings 2 2 Wireless Security Wireless Security Setup This section allows you to secure your wireless network and block unauthorized accesses and malicious packet sniffing To encryp...

Страница 27: ...d Setup makes it easy for home users who know little of wireless security to establish a home network as well as to add new devices to an existing network without entering long passphrases or configur...

Страница 28: ...r then within 2 minutes enable WPS PIN on the client device Note 1 With WPS successfully enabled the WPS LED on the router keeps blinking for about 2 minutes and during this time you can enable WPS on...

Страница 29: ...u want to generate a random wireless key via WPS click Reset OOB and then follow WPS setup instructions above Note 1 To use the WPS security the wireless client must be also WPS capable 2 Before you p...

Страница 30: ...less N300 Home Router 30 2 Click Open Scan select the AP you wish to connect such as Link_One_000248 and click OK 3 View and note down the wireless security settings security mode cipher type security...

Страница 31: ...Wireless N300 Home Router 31 4 Click Close Scan and OK 5 Save the settings and the router will reboot automatically...

Страница 32: ...displays Connected Note 1 When the settings finished remember to enter Internet Connection Setup to set up Internet connection 2 Verify that the SSID channel and security mode on the page match those...

Страница 33: ...ns and the root AP for greater wireless range Steps are shown as below 1 Click Wireless Wireless Extender select Universal Repeater in the extender mode and click Open Scan 2 Click Open Scan select th...

Страница 34: ...Wireless N300 Home Router 34 4 Click Close Scan and OK 5 Save the settings and the router will restart automatically...

Страница 35: ...s you select must support WDS For example As seen in the figure above PC1 and PC2 access Internet via a wireless connection to Router 1 While PC3 and PC4 are too far to directly connect to Router 1 fo...

Страница 36: ...ess N300 Home Router 36 wireless basic settings 3 Click Wireless Wireless Security to check Router 1 s wireless security settings 4 Verify that DHCP server is enabled on Router 1 Click Advanced DHCP S...

Страница 37: ...et on the same net segment as Router 1 As shown below Router 1 LAN IP 192 168 0 1 Subnet Mask 255 255 255 0 Router 2 LAN IP 192 168 0 10 Subnet Mask 255 255 255 0 Then do as follows 1 Configure Router...

Страница 38: ...h those of the added wireless network If not manually correct them 5 Close Scan and click OK to save your settings 6 Go to Wireless Security page and set the wireless security settings exactly as they...

Страница 39: ...the Scan option as mentioned above and click OK to finish your settings 2 4 Wireless Access Control The Access Control feature allows you to specify a list of devices to Permit or Forbid a connection...

Страница 40: ...e able to connect to your wireless network all other wireless devices will be forbidden Example To forbid the PC at the MAC address of C8 3A 35 65 82 E6 from connecting to your wireless network do as...

Страница 41: ...less connection rate 3 Bandwidth Control 3 1 Bandwidth Control Use this section to manage bandwidth allocation to devices on your LAN If there are multiple PCs behind your router competing for limited...

Страница 42: ...hen disabled corresponding entry will not take effect though existing in fact 6 Add to List Click to add current rule to the rule list 7 OK Click to activate your settings For example If you are shari...

Страница 43: ...cted to the device 4 Uplink Rate Displays the upload speed KByte s of a corresponding PC 5 Downlink Rate Displays the download speed KByte s of a corresponding PC 6 Sent Message Displays the number of...

Страница 44: ...ing and other specialized Internet applications When you enable port forwarding the communication requests from the Internet to your router s WAN port will be forwarded to the specified LAN IP address...

Страница 45: ...P server xxx xxx xxx xxx is the router s WAN IP address Assuming it is 172 16 102 89 and then your friends need to enter ftp 172 16 102 89 21 in their browsers For example You want to share some large...

Страница 46: ...such as 8080 otherwise the virtual server feature may not take effect 4 2 DMZ Host The DMZ De Militarized Zone function disables the firewall on the router for one device for a special purpose service...

Страница 47: ...eric IP address allocated by Internet Service Provider ISP to connect to Internet the address may either be stable static or may change from one session on the Internet to the next dynamic However a n...

Страница 48: ...ettings Note This feature is usually used together with virtual server and is disabled by default Configure necessary settings on port forwarding interface and enter the information provided by your D...

Страница 49: ...not recommended to use this setting unless you are familiar with static routing In most cases dynamic routing is recommended because this feature allows the router to detect the physical changes of t...

Страница 50: ...Routing Table This page displays the device core routing table which lists destination IP subnet mask gateway hop count and interface The principal task for a router is to look for an optimal transfer...

Страница 51: ...ter the domain name you wish to filter out say youtube 6 Time Specify a time period for a current rule to take effect If the field is set to 0 00 0 00 the rule will be applied 24hrs day 7 Day s Select...

Страница 52: ...domain names 5 2 MAC Filter This section allows you to set the times specific clients can or cannot access the Internet via the devices MAC Addresses Forbid Only Specify a list of devices to Forbid ac...

Страница 53: ...ctivate your settings For Example To allow a PC at the MAC address of 00 E4 A5 44 35 69 to access Internet from Monday to Friday a Filter Mode Select Permit Only b Access Policy Select an access polic...

Страница 54: ...rule say 80 Start IP End IP Enter the same IP address say 110 or 2 different IP addresses say 110 and 120 in both boxes to specify a single PC or a range of PCs for the current rule to apply to Port S...

Страница 55: ...ly describe the current rule say 123 4 Start IP Enter 100 5 End IP Enter 120 6 Port Enter 1 65535 to forbid all Internet services and applications 7 Type or Protocol Select Both 8 Time Select 0 for al...

Страница 56: ...gs Click the Restore to Factory Default button to reset device to factory default settings You need to reconfigure the device for Internet access as well as many other settings including wireless sett...

Страница 57: ...rted to your device in case that the device is restored to factory default settings To do so follow below instructions 1 Click the Backup button and specify a directory to save settings on your local...

Страница 58: ...00 Home Router 58 Click the Restore button to reset your device to previous settings 6 4 Syslog Here you can view the history of the device s actions After 150 entries the earliest logs will clear aut...

Страница 59: ...OK Click to activate your settings Note 1 To access the device via port 8080 enter http x x x x 8080 where x x x x represents the device s Internet IP address and 8080 is the remote admin port Assumi...

Страница 60: ...all the time and date info shall be set correctly first either manually or automatically 6 7 Login Password This section allows you to change login password for accessing device s Web based interface...

Страница 61: ...rmware to update your device 1 Browse Click to locate and select the firmware 2 Upgrade or Update Click to update firmware Device will restart automatically when update completes Note 1 Before you upg...

Страница 62: ...a particular 802 11 wireless LAN It is the name of a specific wireless network To let your wireless network adapter roam among different APs you must set all APs SSID to the same name WPA WPA2 The WPA...

Страница 63: ...sed authentication the supplicant provides credentials such as user name password or digital certificate to the authenticator and the authenticator forwards the credentials to the authentication serve...

Страница 64: ...pt wireless clients at the same time unlike traditional bridging WDS may be incompatible between different products even occasionally from the same vendor since it is not certified by the Wi Fi Allian...

Страница 65: ...rewall controls the traffic between the DMZ servers and the internal network clients Any services such as Web servers Mail servers FTP servers and VoIP servers etc that are being provided to users on...

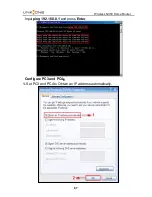
Страница 66: ...Wireless N300 Home Router 66 Appendix 2 Verify the WDS Connection Configure PC2 Click Start Run on PC3 input cmd on the appearing window and then click OK...

Страница 67: ...Wireless N300 Home Router 67 Input ping 192 168 0 1 and press Enter Configure PC3 and PC4 1 Set PC3 and PC4 to Obtain an IP address automatically...

Страница 68: ...Wireless N300 Home Router 68 2 When the two PCs get IP addresses try below steps to verify the WDS connection Click Start Run on PC3 input cmd on the appearing window and then click OK...

Страница 69: ...implemented WDS Note 1 WDS feature can only be implemented between 2 WDS capable wireless devices Plus SSID channel security settings and security key must be exactly the same on both such devices 2...

Страница 70: ...l connectivity c Run the ping 192 168 0 1 command If you get replies from 192 168 0 1 open your browser and verify that Proxy server is disabled In case that ping fails press and hold the RESET button...

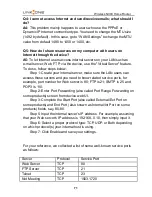
Страница 71: ...s and you need to know related service ports for example port number for Web server is 80 FTP is 21 SMTP is 25 and POP3 is 110 Step 2 Enter Port Forwarding also called Port Range Forwarding on some pr...

Страница 72: ...er 72 MSN Messenger TCP UDP File Send 6891 6900 TCP Voice 1863 6901 TCP Voice 1863 5190 UDP PPTP VPN TCP 1723 Iphone5 0 TCP 22555 SMTP TCP 25 POP3 TCP 110 If you still have some problems please contac...

Страница 73: ...u must remove them accordingly your PC otherwise you may not be able to wirelessly connect to the device Below describes how to do remove a wireless network from your PC If you are using Windows XP do...

Страница 74: ...me Router 74 3 Click Wireless Networks select the item under Preferred networks and then click the Remove button If you are using Windows 7 do as follows 1 Right click Network from your desktop and se...

Страница 75: ...Wireless N300 Home Router 75 2 Select Manage Wireless Networks 3 Click the wireless connection and select Remove network...

Страница 76: ...d in accordance with the instructions may cause harmful interference to radio communications However there is no guarantee that interference will not occur in a particular installation If this equipme...

Страница 77: ...This equipment should be installed and operated with minimum distance 20cm between the radiator your body Note 1 The manufacturer is not responsible for any radio or TV interference caused by unauthor...

Отзывы: