31
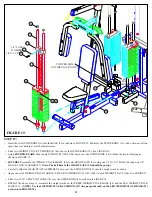
FIGURE 39
IMPORTANT!
Make sure the cables are running
in the grooves of all pulleys.
•
SECURELY
assemble one 4-1/2” PULLEY (48) to the horizontal bracket on the LEG FRAME (34) using one 3/8 X 2” BOLT (89), one
3/8” WASHER (80), one 2-7/8” CABLE CLIP (67), and one 3/8” LOCK NUT (82) as shown in FIGURE 39.
(NOTE: Before tightening,
make sure CABLE CLIP (67) is positioned as shown in FIGURE 39.)
•
SECURELY
assemble one 4-1/2” PULLEY (48) to the vertical bracket on the LEG FRAME (34) using one 3/8 X 2” BOLT (89), two
3/8” WASHERS (80), and one 3/8” LOCK NUT (82) as shown in FIGURE 39.
STEP 39:
• Route the LEG CABLE (43) through the vertical and horizontal brackets on the LEG FRAME (34) as shown in FIGURE 39.
3/8 X 2” 89
43 LEG CABLE
80
82
48
34
67
80
•
SECURELY
assemble one 3/8 X 2” BOLT (89), two 3/8” WASHERS (80), and one 3/8” LOCK NUT (82) to the vertical bracket as shown in
FIGURE 39.
(Make sure CABLE is running over 3/8 X 2” RETAINING BOLT.)


