Theory of Operation
73
9.1.4 Emergency Transfer
To ensure that power remains connected to the load, the STS2/PDU automatically performs an emer-
gency transfer from one input source to the other when an outage occurs on the existing source.
The automatic transfer takes place if the other source’s voltage is within acceptable limits and regard-
less of the phase difference between the two sources.
Emergency transfers occur with a loss of power on the output of less than 4 ms.
Emergency transfers from the alternate source to the preferred source are not affected by the Auto
Retransfer Enabled/Disabled or Retransfer Delay user settings.
9.1.5 Load Current Transfer Inhibit
The STS2/PDU senses the load current. If the load current exceeds the preset level deemed to repre-
sent a load inrush or fault condition, the unit’s logic disables manual and automatic transfers, even if
the selected source’s input voltage is outside the acceptable limits. This event triggers an I-Peak
alarm. If so configured, the Load Current Transfer Inhibit is automatically reset after the current and
voltage return to within normal parameters. This reset provides continued protection against a
source failure. The Load Current Transfer Inhibit also can be programmed to require a manual reset.
See
Step 14
in
Source Setpoints on page 101
for details.
9.1.6 SCR Failure
The STS2/PDU continuously monitors the status of the SCR switching devices for proper operation.
In the event of a shorted SCR on the input source powering the load, the STS2/PDU automatically
triggers an alarm and trips open the other source isolation breaker. In the event of a shorted SCR on
the other input source, the STS2/PDU automatically triggers an alarm and trips open the other
source isolation breaker.
In the event of an open SCR, the switch automatically triggers an alarm and transfers the load to the
other source. All open and shorted SCR alarm conditions are latched and require the system to be
repaired and reset to restore normal operation.
9.1.7 On/Off Sequence
The STS2/PDU contains no master On/Off push button control. When connected to the input sources,
the unit’s logic power comes on automatically. The touch screen display is active as long as at least
one input source is energized and the Control Power Disconnect (located inside the static switch) is
closed.
9.2
Detailed Component Description
9.2.1 Controls
Operator Interface
The STS2/PDU Color Graphical Display unit contains a touch screen color LCD to provide the opera-
tor interface to control and configure the operation of the unit and quickly diagnose problems. A pass-
word and an optional keylock, if installed, are provided for security.
Hardware
• The STS2/PDU operator interface in the Color Graphical Display unit is designed to provide all of
the information required to configure and monitor the unit’s operation.
• The control logic performs automatic operations with minimal operator interface.
• Each STS2/PDU unit is equipped with a color LCD touch screen.
• The STS2/PDU can have optional communication ports installed. See
6.0 - Options
and
12.0 -
Communication Interfaces
for more information on communication options.
• The RS-232 interface is used for configuration and status and event log monitoring.
Содержание PDUTM
Страница 1: ...POWER DISTRIBUTION STS2 PDU INSTALLATION OPERATION MAINTENANCE MANUAL 250A 800A Three Phase 60 Hz ...
Страница 25: ...Installation Drawings 17 7 0 INSTALLATION DRAWINGS Figure 7 Outline drawing 250A STS2 PDU ...
Страница 26: ...Installation Drawings 18 Figure 8 Outline drawing 250A STS2 PDU with right side I Line distribution ...
Страница 27: ...Installation Drawings 19 Figure 9 Outline drawing 250A STS2 PDU with right side inline distribution ...
Страница 28: ...Installation Drawings 20 Figure 10 Outline drawing 250A STS2 PDU with left side I Line distribution ...
Страница 29: ...Installation Drawings 21 Figure 11 Outline drawing 250A STS2 PDU with left side Inline distribution ...
Страница 30: ...Installation Drawings 22 Figure 12 Outline drawing 400 600A STS2 PDU with right side inline distribution ...
Страница 32: ...Installation Drawings 24 Figure 14 Outline drawing 400 600A STS2 PDU with left side inline distribution ...
Страница 35: ...Installation Drawings 27 Figure 17 Outline drawing 800A STS2 PDU with right side inline distribution ...
Страница 37: ...Installation Drawings 29 Figure 19 Outline drawing 800A STS2 PDU with left side inline distribution ...
Страница 38: ...Installation Drawings 30 Figure 20 Outline drawing 250A STS2 PDU with key lockout switch option ...
Страница 41: ...Installation Drawings 33 Figure 23 Electrical field connections 250A STS2 PDU input output with CB8 ...
Страница 42: ...Installation Drawings 34 Figure 24 Electrical field connections 250A STS2 PDU input with CB3 ...
Страница 43: ...Installation Drawings 35 Figure 25 Electrical field connections 250A STS2 PDU input with CB3 CB3A ...
Страница 44: ...Installation Drawings 36 Figure 26 Electrical field connections 400 600A STS2 PDU input with CB3 ...
Страница 45: ...Installation Drawings 37 Figure 27 Electrical field connections 400 600A STS2 PDU input with CB3 and CB3A ...
Страница 46: ...Installation Drawings 38 Figure 28 Electrical field connections 800A STS2 PDU input with CB3 ...
Страница 47: ...Installation Drawings 39 Figure 29 Electrical field connections 800A STS2 PDU input with CB3 and CB3A ...
Страница 48: ...Installation Drawings 40 Figure 30 Electrical field connections 250A STS2 PDU output with inline panelboards ...
Страница 50: ...Installation Drawings 42 Figure 32 Electrical field connections STS2 PDU output with I Line panelboard ...
Страница 53: ...Installation Drawings 45 Figure 35 Electrical field connections 800A STS2 PDU with right side output breaker ...
Страница 54: ...Installation Drawings 46 Figure 36 Electrical field connections 8600A STS2 PDU with left side output breaker ...
Страница 55: ...Installation Drawings 47 Figure 37 Electrical field connections 800A STS2 PDU interconnect wiring ...
Страница 57: ...Installation Drawings 49 Figure 39 Electrical field connections 800A STS2 PDU interconnect wiring STS section ...
Страница 63: ...Installation Drawings 55 Figure 45 Control wiring 800A STS2 PDU left side distribution ...
Страница 64: ...Installation Drawings 56 Figure 46 Control wiring 800A STS2 PDU right side distribution ...
Страница 65: ...Installation Drawings 57 Figure 47 Control connection location 250A STS2 PDU ...
Страница 66: ...Installation Drawings 58 Figure 48 Control connection location 400 800A STS2 PDU ...
Страница 67: ...Installation Drawings 59 Figure 49 Control location drawing conduit box top entry 400 600A STS2 PDU ...
Страница 68: ...Installation Drawings 60 Figure 50 Control wiring for the programmable relay board option ...
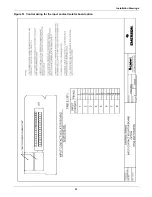
Страница 69: ...Installation Drawings 61 Figure 51 Control wiring for the input contact isolator board option ...
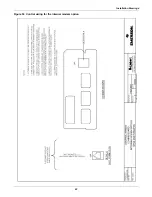
Страница 70: ...Installation Drawings 62 Figure 52 Control wiring for comms board ...
Страница 71: ...Installation Drawings 63 Figure 53 Control wiring for the internal modem option ...
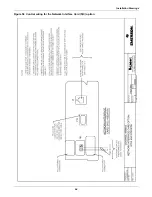
Страница 72: ...Installation Drawings 64 Figure 54 Control wiring for the Network Interface Card NIC option ...
Страница 73: ...Installation Drawings 65 Figure 55 Control wiring for the RS 232 Port ...
Страница 74: ...Installation Drawings 66 Figure 56 Control wiring for remote source selection option ...
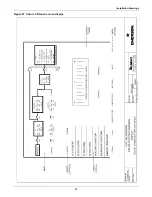
Страница 75: ...Installation Drawings 67 Figure 57 Color LCD touch screen display ...
Страница 155: ......


