background image

Connecting

20

C

onnecting

2

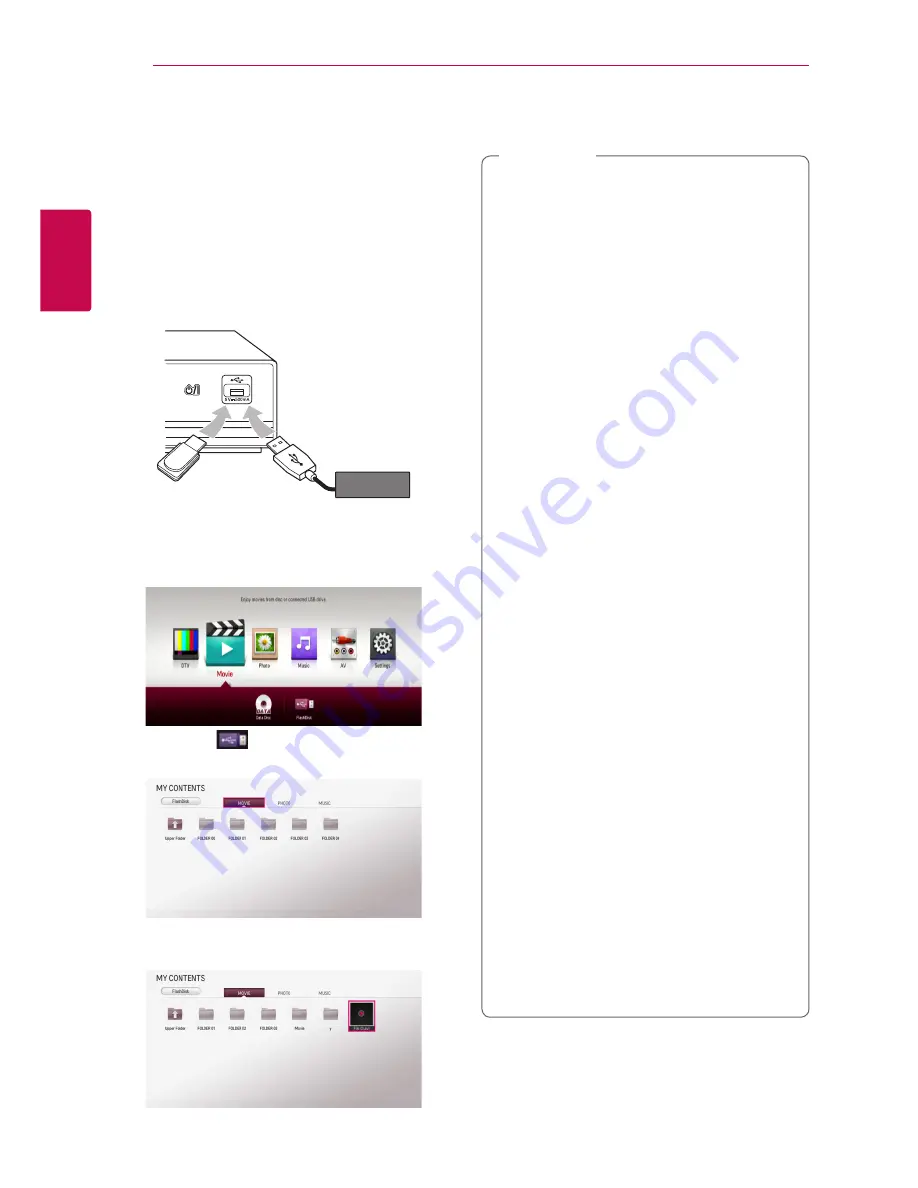
USB device connection

This unit can play movie, music and photo files 
contained on a USB device.

Playback content in the USB 

device

1.


Insert a USB device into the USB port until it fits 
into place.

or

External HDD

Front of the unit

USB flash memory

2.


Press HOME


(

n

).

3.


Select [Movie], [Photo] or [Music] using 

a/d

and press ENTER (

b

).

4.


Select the [ 

 (USB) ] option using 

w/s/

a/d

, and press ENTER (

b

).

5.


Select a file using 

w/s/a/d

, and press 

(PLAY) or ENTER (

b

) to play the file.

6.


Withdraw the USB device carefully after exiting 
the USB mode.


y

The external USB HDD for recording has to 
be formatted in NTFS. 


y

Please use the Internal HDD or USB flash 
memory/external HDD formatted in either 
FAT16/FAT32 or NTFS when accessing files 
(audio, photo, video).


y

This unit can support up to 4 partitions of 
the USB device.


y

Do not extract the USB device during 
operation (play, recording, etc.). 


y

A USB device which requires additional 
programme installation when you 
have connected it to a computer, is not 
supported.


y

USB device: USB device that supports 
USB1.1 and USB2.0.


y

This unit can play Movie, Music and Photo 
files in USB. For details of operations on each 
file, refer to relevant pages. (pages 44 - 47)


y

Regular back up is recommended to prevent 
data loss.


y

If you use a USB extension cable, HUB or 
USB multi card reader, the USB device may 
not be recognized.


y

Some USB devices may not work with this 
unit.


y

Digital camera and mobile phone are not 
supported.


y

The USB Port on this unit cannot be 
connected to a PC. The unit cannot be used 
as a storage device.


y

Unformatted media cannot be used. Please 
format before using.


y

If USB HDD cannot be recognized, try 
another different USB cable.


y

Some USB cables may not supply enough 
current for normal USB operation.


y

Files over 4GB are supported with NTFS 
format.


,

Note

Содержание RH731C

Страница 1: ...OWNER S MANUAL HDD DVD RECORDER RH735T www lg com Please read this manual carefully before operating your set and retain it for future reference ENGLISH ...

Страница 2: ......

Страница 3: ...r the manufacturer s instruction has been adhered to CAUTION This product employs a Laser System To ensure proper use of this product please read this owner s manual carefully and retain it for future reference Shall the unit require maintenance contact an authorized service centre Use of controls adjustments or the performance of procedures other than those specified herein may result in hazardou...

Страница 4: ...ed by a legal exception or consented to by the rights owner y y This product incorporates copyright protection technology that is protected by U S patents and other intellectual property rights Use of this copyright protection technology must be authorized by Rovi Corporation and is intended for home and other limited viewing uses only unless otherwise authorized by Rovi Corporation Reverse engine...

Страница 5: ...ve all signals output from the player y y If you have a PAL colour system TV you will see just distorted images when using discs or video contents recorded in NTSC y y The multi system colour TV changes the colour system automatically according to input signals In case that the colour system is not changed automatically turn it off and then on to see normal images on screen y y Even if the disc re...

Страница 6: ...Auto Set Up 22 Home Menu Overview 22 Basic button operations 22 Settings 22 Adjust the Setup Settings 23 Settings for Digital TV 23 Scanning programmes automatically Auto Tuning 23 Scanning programmes manually Manual Tuning 24 Editing Programme List Channel Edit 24 Lock System 25 Setting the antenna power 25 Setting the Timeshift 26 PICTURE Menu 27 SOUND Menu 28 DTV Menu 28 LOCK Menu 29 OPTION Men...

Страница 7: ...operations for photo content 48 Advanced Playback 48 Repeat Playback 48 Viewing content information 48 Last Scene Memory 49 On Screen display 49 Displaying content information on screen 49 Playing from selected time 50 Selecting a subtitle language 50 Watching from a different angle 50 Using the Recording title Copy 5 Troubleshooting 52 Troubleshooting 52 General 52 Resetting the unit 53 Playback ...

Страница 8: ... and finalized only Audio CD 12 cm t Audio CD CD R RW 12 cm 8 cm y u i y y CD R RW discs that contain Video Audio or Photo files y y ISO 9660 JOLIET UDF and UDF Bridge format HDD REC Titles recorded via this unit Note Indicates special notes and operating features Caution Indicates cautions for preventing possible damages from abuse About the 7 symbol display 7 may appear on your TV display during...

Страница 9: ...rmission should always be sought from the copyright owner Note Compatibility Notes y y Viewing high definition content and up converting standard DVD content may require a HDMI capable input or HDCP capable DVI input on your display device y y Some DVD discs may restrict the use of some operation commands or features y y You can use a USB device that is used to store some disc related information ...

Страница 10: ... the unit But it is not a problem y y Recordable DVD is used only for Recorded Title Copy Please look at Page 50 Using the Recording title Copy y y Recorded Title is copied as TS Format File to Recordable DVD So Disc copied on this unit may not played on other player or recorder Note File compatibility Overall Available File extensions jpg jpeg png avi divx mpg mpeg mkv mp4 ts mp3 wma m4a y y The ...

Страница 11: ...Qpel Quarter pixel y y HD movie files that need high performance playback could react slowly y y The total playback time indicated on the screen may not be correct for ts files Note MUSIC Sampling frequency between 8 48 kHz WMA within 32 kHz 48 kHz MP3 Bit rate between 32 320 kbps MP3 and between 8 320 kbps WMA The total playback time indicated on the screen may not be correct for VBR files Note P...

Страница 12: ...file Z STOP Stops playback z PLAY Starts playback M PAUSE Pauses playback TIME SHIFT Activates pause live TV playback timeshift for a live TV programme c HOME n Displays or exits the Home Menu INFO MENU m Displays or exits On Screen Display Direction buttons Selects an option in the menu ENTER b Acknowledges menu selection BACK 1 Exits the menu or returns to the previous screen EXIT Exits a menu o...

Страница 13: ...ose e T Play Pause f I Stop g 1 I Power h USB Port a ANTENNA IN b HDMI OUT TO TV c OPTICAL DIGITAL AUDIO OUT d VIDEO IN 2CH AUDIO IN Left Right Connect the audio video output of an external source e AC IN connector Connect the supplied power cord f ANTENNA OUT TO TV g VIDEO OUT h 2CH AUDIO OUT Left Right ...

Страница 14: ...er is connected directly to the TV Tune the TV to the correct video input channel y y Do not connect the unit s AUDIO OUT jack to the phono in jack record player of your audio system y y Do not connect your unit via your VCR The image could be distorted by the copy protection system Note Antenna connection to your TV and this unit Connect one end of the RF cable to ANTENNA OUT TO TV jack on the un...

Страница 15: ...y result in malfunctions To solve the problem turn off the player and then turn it on again y y When the HDMI connection with HDCP is not verified TV screen is changed to black screen In this case check the HDMI connection or disconnect the HDMI cable y y If there is noise or lines on the screen please check the HDMI cable length is generally limited to 4 5m Note Additional Information for HDMI y ...

Страница 16: ...Setting The player provides several output resolutions for HDMI OUT jacks You can change the resolution using Setting menu 1 Press HOME n 2 Use a d to select the Setting and press ENTER b The Setting menu appears 3 Use w s to select PICTURE option then press d or ENTER b to move to the second level 4 Use w s to select the Resolution option then press ENTER b to move to the third level 5 Use w s to...

Страница 17: ...eed a multi channel Audio Video Receiver that supports one or more of the audio formats supported by your unit Check the receiver manual and the logos on the front of the receiver PCM Stereo Dolby Digital Dolby Digital Plus and or DTS Connecting to an Amplifier via HDMI Output Connect the unit s HDMI OUT jack to the corresponding in jack on your amplifier using a HDMI cable You will need to activa...

Страница 18: ... will need to activate the unit s digital output See SOUND Menu on page 27 Amplifier Receiver OPTICAL Optical Cable Rear of this unit Amplifier Receiver Connecting to an Amplifier via 2 Channel Audio Output Connect the Left and Right 2CH AUDIO OUT jacks on the unit to the audio left and right in jacks on your amplifier receiver or stereo system using audio cables Amplifier Receiver Rear of this un...

Страница 19: ...o Connections to Recorder Connect the input jacks VIDEO IN 2 CH AUDIO IN on the unit to the video audio out jacks on your accessory component using video audio cables R L VIDEO OUT AUDIO OUT Rear of this unit Video Audio Cable Jack panel of Accessory Component VCR Camcorder etc ...

Страница 20: ...ce y y Do not extract the USB device during operation play recording etc y y A USB device which requires additional programme installation when you have connected it to a computer is not supported y y USB device USB device that supports USB1 1 and USB2 0 y y This unit can play Movie Music and Photo files in USB For details of operations on each file refer to relevant pages pages 44 47 y y Regular ...

Страница 21: ...TER b Step 3 Time Zone Setting Use w s to select a region s time zone and press ENTER b Step 4 Password Setting Input the new password using numerical buttons Enter it again to verify Step 5 Auto Tuning 1 While the Start option is selected and press ENTER b to begin the channel search The recorder automatically searches for and saves the programmes If you select Stop the Auto Tunning function will...

Страница 22: ...ys audio contents AV You can watch video from external input mode When you use the recording mode you can t enter the AV mode Setting Adjusts the system settings Settings Adjust the Setup Settings You can change the settings of the player in the Setting menu 1 Press HOME n 2 Use a d to select Setting and press ENTER b The PICTURE menu appears 3 Use w s to select the first setup option and press EN...

Страница 23: ...rogrammes If the Lock System option is set to On this function is available when you enter the password correctly see page 24 Note Scanning programmes manually Manual Tuning Scans digital TV or radio programmes and adds the detected programmes to the programme list 1 Display Setting menu 2 Use w s to select DTV and press ENTER b 3 Use w s to select Manual Tuning and press ENTER b to display the Ma...

Страница 24: ... want Press yellow Y coloured button and then change the channel number by using w s a d and press ENTER b FAV Set as Favourite You can display favourite channel list using the FAV button and switch into other favourite channel on the channel list see page 32 Lock System Allows you to set up specific programs and ratings through blocking schemes Also allows you to activate or disable all of the lo...

Страница 25: ...an supply power through ANTENNA IN jack 1 Display Setting menu 2 Use w s to select DTV and press ENTER b 3 Use w s a d to select Antenna 5V and press ENTER b 4 Use w s to select On and press ENTER b to supply antenna power The Antenna 5V option must be set to Off when your indoor antenna is supplied the power from the mains If you set the Antenna 5V option to On for the indoor antenna which is sup...

Страница 26: ...n of the HDMI video signal Refer to page 16 for details about the resolution setting Auto If the HDMI OUT jack is connected to TVs providing display information EDID this automatically selects the resolution best suited to the connected TV 1080p Outputs 1080 lines of progressive video 1080i Outputs 1080 lines of interlaced video 720p Outputs 720 lines of progressive video 576p Outputs 576 lines of...

Страница 27: ...dling 192 kHz signals 96 kHz Select this if your A V Receiver or Amplifier is not capable of handling 192 kHz signals When this choice is made this unit automatically converts any 192 kHz signals to 96 kHz so your system can decode them 48 kHz Select this if your A V Receiver or Amplifier is not capable of handling 192 kHz and 96 kHz signal When this choice is made this unit automatically converts...

Страница 28: ... y Additionally default Rec List storage is also applied by this menu option Note LOCK Menu To access any features in the LOCK settings you must enter the 4 digit security code you have created If you have not entered a password yet you are prompted to do so Enter a 4 digit password twice and press ENTER b to create a new password Set Password You can create or change the password New Enter a 4 di...

Страница 29: ...splay and press ENTER b Disc Menu Disc Audio Disc Subtitle Select the language you prefer for the audio track disc audio subtitles and the disc menu Original Refers to the original language in which the disc was recorded Other Press ENTER b to select another language Use number buttons then press ENTER b to enter the corresponding 4 digit number according to the language code list on page 57 Off D...

Страница 30: ...OD Register Displays the registration code of your player DivX Deregister Deactivate your player and display the deactivation code All the downloaded videos from DivX VOD with this player s registration code can only be played back on this unit Note Auto Off The screen saver appears when you leave the player in Stop mode for about five minutes If you set this option to On the unit automatically tu...

Страница 31: ... the disc may be damaged y y Disc formatted on vista live mode is not supported Caution Finalize DVD R DVD R DL DVD R Only Finalized the recordings in place so that the disc can be played on a regular unit or computer equipped with a suitable DVD ROM drive Once you have finalized a DVD R and DVD R disc you cannot edit or record anything else on that disc Caution 1 Select Finalize option then press...

Страница 32: ...g DTV press CH LIST 2 Use s w to select a desired programme and press ENTER b If you press green G coloured button repeatedly the unit sort the programmes into channel number ABC FTA CAS or CAS FTA 3 Press BACK 1 to exit from the channel list Setting favourite programmes This option allows you to set the favourite channel 1 While watching DTV press CH LIST 2 Press red R coloured button to display ...

Страница 33: ... option is not available while recording y y While playing the recording title You can select the audio language by pressing Q MENU button Note Selecting Skip Off On Set the channel to the skipped channel The skipped channel number will dim The channel cannot be selected using the CH W S button during normal TV viewing 1 While watching DTV press Q MENU 2 Use a d to select the Skip Off On option 3 ...

Страница 34: ...ventional digital programs Use the Program Guide to find programs easily and conveniently and to view schedule and descriptive program information for the programs To Display the Program Guide Press the GUIDE button on your remote control To Exit the Program Guide Press the BACK 1 button to return to the last program you tuned to To navigate through programs on the Guides Use a d s w on your remot...

Страница 35: ... DTV in realtime Timeshift cannot be saved as a recorded title When recording and copying or record deleting the record timeshift function is will be stopped Note Using the timeshift function automatically If you set the timeshift option to Auto live TV broadcast will automatically be recorded to the HDD without pressing the TIME SHIFT button The timeshift will start automatically when the Digital...

Страница 36: ...rogrammes You can watch another channel while recording a channel or record up to two different programmes simultaneously in the built in HDD and playback the recorded programmes Dual Programme Recording You can record two Digital TV programme at the same time 1 Use CH W S to select a programme you want to record 2 Press REC X to start recording 3 Use CH W S to select another programme you want to...

Страница 37: ...3 Use a d repeatedly to select Once Daily Mon Fri Sat Sun or Manual and press s If you want to select the day manually select Manual then press s and press ENTER b Select the desired day using a d s w and press ENTER b The timer recording can be set from 2 minutes after the current time Note 4 Enter the necessary information for your timer recording s a d left right Move the cursor left right s w ...

Страница 38: ...manually select Manual then press s and press ENTER b Select the desired day using a d s w and press ENTER b 7 Select Next and press ENTER b 8 Use a d s w to select a programme to record and press ENTER b programme shows icon 9 Select Complete and press ENTER b to save the programme 10 Press BACK 1 to return to the TV viewing 11 Press TIMER REC and press the bule B coloured button Check whether th...

Страница 39: ...ER b 4 Use s w to select Delete and press ENTER b 5 Select Yes and press ENTER b to delete selected schedules selected recording Select No and press ENTER b to cancel Modify a timer recording You can modify a pre scheduled timer recording before the timer recording actually starts 1 While watching TV press TIMER REC 2 Press the bule B coloured button 3 Use s w to select programme field and press E...

Страница 40: ... title consequently Note Recording from Video Audio Input You can record from an external composite such as a camcorder connected to any of the unit s external inputs 1 Make sure that the component you want to record from is connected properly to the unit See page 19 2 Select the recording location using Default Recording Device option on the Setting menu page 28 3 While watching TV press INPUT or...

Страница 41: ...ny factors Note To stop playback Press Z STOP during playback To pause playback Press M PAUSE during playback Press d PLAY to resume playback To scan forward or backward Press c or v to play fast forward or fast reverse during playback You can change the various playback speeds by pressing c or v repeatedly To slow down the playing speed While the playback is paused press v to play at slow motion ...

Страница 42: ... play section Resume playback is disabled on the disk menu section Note Playing the recorded titles REC 1 While watching TV press REC LIST to display the options menu or use a d s w to select Recorded TV on the HOME menu and press ENTER b 2 Use a d s w to select recording title If you want to view previous or next page press PAGE W S 3 Press z PLAY to play the recorded title y y NEW text is displa...

Страница 43: ...board menu To enter a letter with an accent mark Inserts a space at the cursor position Deletes the previous character at the cursor position a A Change the keyboard menu settings to capital letters small letters or symbols 5 Enter a new name using virtual keyboard and press ENTER b while OK is selected If you rename a title in DISC it will take long time Note Deleting a recorded titles REC You ca...

Страница 44: ...th CPRM data by DVD RECORDER This unit cannot support these kinds of discs What is CPRM CPRM is a copy protection system with scramble system only allowing the recording of copy once broadcast programs CPRM stands for Content Protection for Recordable Media Note Playing a file on Linked Devies This unit can play video audio and photo files contained in the USB device 1 Insert a USB device into the...

Страница 45: ...t Enlarges the picture d Option Sets options for viewing photo see page 46 e List Stops playback and returns to the list To control music playback Controls play and sets options while listening to a music a Progress bar Selects the desired point and plays b Playback control Refer to the basic operation for audio and advanced playback see pages 46 48 c List Returns to the list When you move the pro...

Страница 46: ...e Photo view screen To stop a slide show Press Slide Show Z on the Photo view screen To skip to the next previous photo While viewing a photo in full screen press a or d on the remote control to go to the previous or next photo Options while viewing a photo You can use various options during viewing a photo in full screen 1 While viewing a photo in full screen press INFO MENU m to display the opti...

Страница 47: ...check and adjust a subtitle information of the video file on playing 1 While viewing a video Movie in full screen press INFO MENU m to display the option menu 2 Select an Option using a d s w and press ENTER b 3 Select Set Video Play and press ENTER c d e f b a g h i a Repeat All the files will be played back repeatedly b Audio Language Selected audio or channel c Subtitle Language Select subtitle...

Страница 48: ...ay not work on some disc or title Note Viewing content information MOVIE The unit can display the content information on the list 1 Select a file using a d s w 2 Press INFO MENU m to display the option menu The file information appears on option menu The information displayed on the screen may not be correct compared to the actual content information Note Last Scene Memory DVD This unit memorizes ...

Страница 49: ...rom selected time DVD AVCHD 1 Press INFO MENU m during playback The time search box shows the elapsed playing time 2 Select the Time option and then input the required start time in hours minutes and seconds from left to right For example to find a scene at 2 hours 10 minutes and 20 seconds enter 21020 Press a d to skip the playback 60 seconds forward or backward 3 Press ENTER b to start playback ...

Страница 50: ... camera angle during playback 1 During playback press INFO MENU m to display the On Screen display 2 Use s w to select the Angle option 3 Use a d to select the desired angle 4 Press BACK 1 to exit the On Screen display Using the Recording title Copy You can copy recording title from to the other storage device Preparations y y Insert a blank DVD disc in the DVD deck and close the disc tray y y Ins...

Страница 51: ...d files can be different from that of original files y y It might not be copied if it is copy protected contents y y Successful copying contents also depend on disc s capability y y Not supported resolution on the setting menu turns disabled y y If you use the disc copy during timeshift the timeshift is terminated automatically y y If there is not enough disc space the recording may not be run tot...

Страница 52: ...tion The remote control does not work properly y y The remote control is not pointed at the remote sensor of the unit y y The remote control is too far from the unit y y There is an obstacle in the path between the remote control and the unit y y The battery in the remote control are exhausted y y The remote s manufacturer code returned to the default setting when you replaced the battery Reset th...

Страница 53: ...successfully y y Check the remaining space on the HDD y y If your source is copy protected you cannot record it using this recorder Timer record does not record successfully y y Clock is not set to correct time y y The start time of the timer recording is past y y When setting the recording programme make sure you set the recorder s built in tuner not the TV s built in tuner y y If the HDD is dama...

Страница 54: ... of handling 96 kHz sampling frequency set the Sampling Freq option to 48 kHz on the setup menu When this choice is made this unit will automatically convert any 96 kHz signals to 48 kHz so your system can decode them y y If your TV is not equipped with Dolby Digital and MPEG decoder set the Dolby Digital and MPEG options to PCM on the setup menu Customer Support You can update the Player using th...

Страница 55: ...TV with the supplied remote control If your TV is listed in the table below set the appropriate manufacturer code 1 While holding down 1 TV POWER button press the manufacturer code for your TV with the numerical buttons see the table below Manufacturer Code Number LG 1 Default 2 Zenith 1 3 4 GoldStar 1 2 Samsung 6 7 Sony 8 9 Hitachi 4 2 Release the 1 TV POWER button to complete setting Depending o...

Страница 56: ...GL Hong Kong HK Hungary HU India IN Indonesia ID Israel IL Italy IT Jamaica JM Japan JP Kenya KE Kuwait KW Libya LY Luxembourg LU Malaysia MY Maldives MV Mexico MX Monaco MC Mongolia MN Morocco MA Nepal NP Netherlands NL Antilles AN New Zealand NZ Nigeria NG Norway NO Oman OM Pakistan PK Panama PA Paraguay PY Philippines PH Poland PL Portugal PT Romania RO Russian Federation RU Saudi Arabia SA Sen...

Страница 57: ...an 7285 Icelandic 7383 Indonesian 7378 Interlingua 7365 Irish 7165 Italian 7384 Japanese 7465 Kannada 7578 Kashmiri 7583 Kazakh 7575 Kirghiz 7589 Korean 7579 Kurdish 7585 Laothian 7679 Latin 7665 Latvian Lettish 7686 Lingala 7678 Lithuanian 7684 Macedonian 7775 Malagasy 7771 Malay 7783 Malayalam 7776 Maori 7773 Marathi 7782 Moldavian 7779 Mongolian 7778 Nauru 7865 Nepali 7869 Norwegian 7879 Oriya ...

Страница 58: ...Laboratories The terms HDMI and HDMI High Definition Multimedia Interface and the HDMI logo are trademarks of HDMI Licensing LLC in the United States other countries DVD Logo is a trademark of DVD Format Logo Licensing Corporation DivX DivX Certified and associated logos are trademarks of Rovi Corporation or its subsidiaries and are used under license ...

Страница 59: ...tandard Type A OPTICAL DIGITAL AUDIO OUT 3 V p p Optical jack x 1 ANTENNA IN Antenna input 75 Ω VIDEO IN OUT 1 0 Vp p 75 ohms sync negative RCA jack x 1 AUDIO IN OUT 2 0 Vrms more than 47 kohms RCA jack L R x 1 USB Port 4 pin USB 2 0 standard x 1 System Laser Semiconductor laser wavelength 405 nm 650 nm Signal system Standard PAL NTSC colour TV system Frequency response 20 Hz to 20 kHz 48 kHz 96 k...

Страница 60: ...shipping the unit Please save the original shipping carton and packing materials If you need to ship the unit for maximum protection re pack the unit as it was originally packed at the factory Keeping the exterior surfaces clean y y Do not use volatile liquids such as insecticide spray near the unit y y Wiping with strong pressure may damage the surface y y Do not leave rubber or plastic products ...

Страница 61: ... it off If you need to move the player please follow the steps below 1 After the message OFF is shown in the display wait at least two minutes 2 Unplug from the wall socket 3 Move the player y y If there s a power failure while the player is on there is a chance that some data on the HDD will be lost y y The HDD is very delicate If used improperly or in an unsuitable environment it is possible tha...

Страница 62: ......

Отзывы: