background image


Form 080/01 


Complimentary Reference Material 


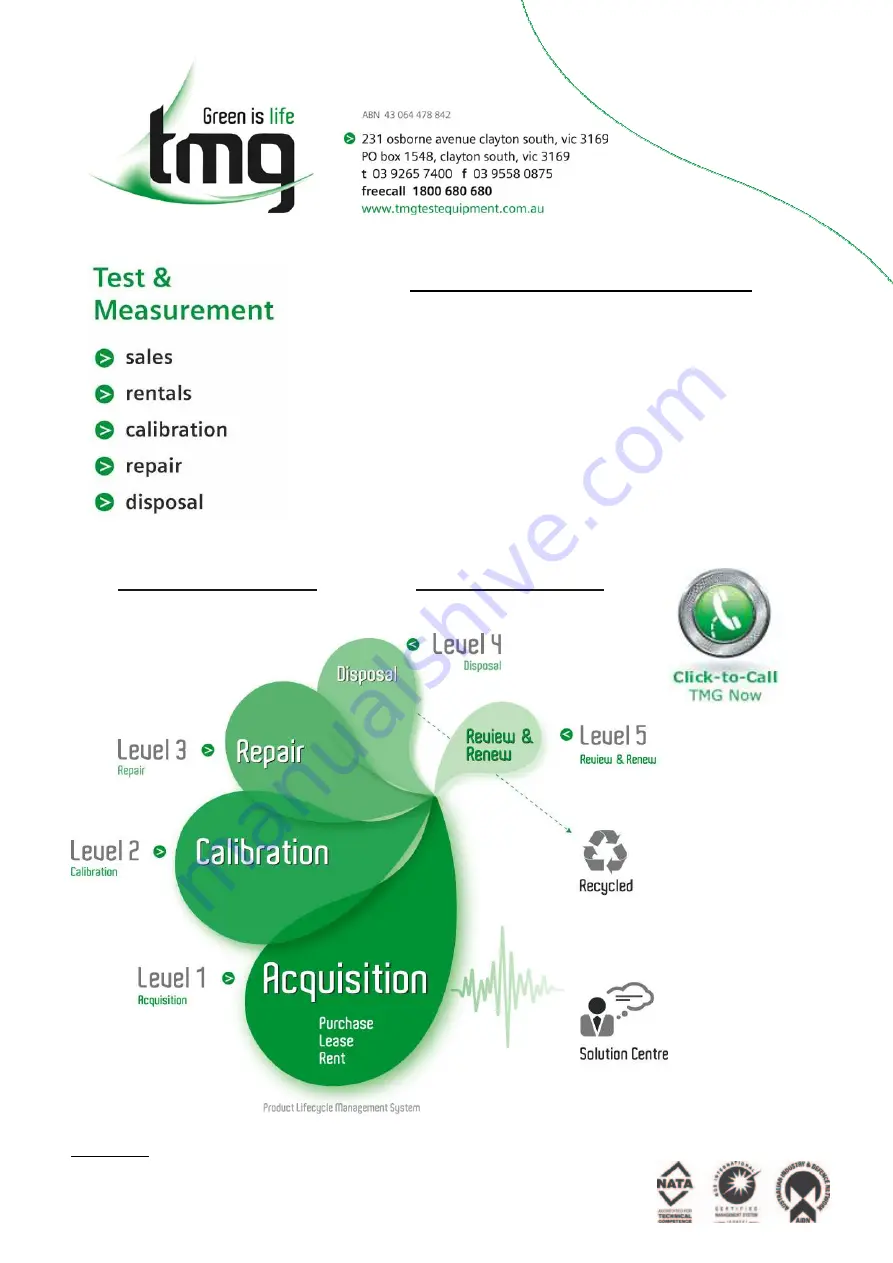
This PDF has been made available as a complimentary service for you to assist in 
evaluating this model for your testing requirements. 
 
TMG offers a wide range of test equipment solutions, from renting short to long 
term, buying refurbished and purchasing new.  Financing options, such as 
Financial Rental, and Leasing are also available on application. 
 
TMG will assist if you are unsure whether this model will suit your requirements.   
 
Call TMG if you need to organise repair and/or calibrate your unit.  
 
If you click on the 

Click-to-Call

 logo below, you can all us for FREE! 


 TMG Corporate Website                      TMG Products Website 


Disclaimer: 

All trademarks appearing within this PDF are trademarks of their respective owners. 

Summary of Contents for DR231

Page 1: ...furbished and purchasing new Financing options such as Financial Rental and Leasing are also available on application TMG will assist if you are unsure whether this model will suit your requirements C...

Page 2: ...DR130 DR231 DR241 Hybrid Recorder Stand alone model IM DR231 01E Instruction Manual 9th Edition IM DR231 01E...

Page 3: ...dicated software package must be the same or higher than the style number of the main unit or subunit where the package is installed and where it performs control Any equipment software not meeting th...

Page 4: ...nt of active power and apparent power on ch3 to ch6 for power monitor modules Flag for M1 option Group reset for M1 option The following functions are not available for style number S3 Report function...

Page 5: ...3 DCV TC DI input screw terminal 4 DCV TC DI input clamp terminal Power Supply 1 100 240VAC 2 12 28VDC for DR241 only Power Cord D 3 pin inlet w UL CSA cable Part No A1006WD F 3 pin inlet w VDE cable...

Page 6: ...clamp terminal 10 channel DCV TC DI input module screw terminal 20 channel DCV TC DI input module screw terminal 30 channel DCV TC DI input module screw terminal 10 channel DCV TC DI input module clam...

Page 7: ...ength 30 m grid 25 mm B9855AY 1 Recording width 150 mm length 20 m grid 10 mm 6 Mounting brackets B9900CW 1 2 7 User s Manual IMDR231 01E 1 this manual IMDR231 11E 1 Communication Interface manual onl...

Page 8: ...400 013 for DR231 Rack mount kit DV400 015 for DR130 Optional Software Name Model Description DAQ 32 DP120 13 Windows 95 98 and Windows NT DAQ 32 Plus DP320 13 Windows 95 98 and Windows NT Spares Name...

Page 9: ...re turning ON the power Necessity of Protective Grounding Never cut off the internal or external protective grounding wire or disconnect the wiring of protective grounding terminal Doing so poses a po...

Page 10: ...ecording span and recording format Chapter 7 Executing Recording Explains how to start and stop recording Chapter 8 Setting Displaying and Explains how to set an alarm and what to do when an Recording...

Page 11: ...hould be observed to prevent damage to the DR130 231 241 Note Provides information that is important for proper operation of the DR130 231 241 Relevant Keys Indicates the relevant panel keys and indic...

Page 12: ...10 IM DR231 01E...

Page 13: ...hart and Ribbon Cassette 3 6 3 4 Connecting the Interface Cables 3 11 3 5 Connecting the Signal Lines 3 16 3 6 Connecting the Power Cable and Turning the Power ON OFF 3 21 3 7 Setting the Date and Tim...

Page 14: ...Clearing Alarm Message Buffers and Displaying and Initializing Module Communications Information 9 16 9 5 Fail Chart End Output and Remote Control Signal Input 9 18 9 6 Summer Winter Time 9 19 Chapte...

Page 15: ...etting Actions to be Carried out in Case of Computation Error and Setting the Time Axis for TLOG SUM 12 12 Chapter 13 Trouble shooting and Maintenance 13 1 Periodic Maintenance and Recommended Parts R...

Page 16: ...ITAL PR Section 6 4 number of rows to print Channel to manual print Press the SET key for about three seconds SET MANUAL PR Section 6 4 Alarm print Press the SET key for about three seconds SET ALARM...

Page 17: ...IST START Section 7 4 Procedure varies according to the menu configuration of the FUNC key see section 10 8 Other Settings Parameters Procedure Selecting menu Reference Timer SET key SET TIMER Section...

Page 18: ...ll in one type in which the measurement section and display recording section are contained in one box While this simplifies operation on the one hand it is difficult to adapt to changes in the measur...

Page 19: ...witch See page 3 18 Front door Floppy disk drive Only for DR130 1 Rear Example of DR130 with 20 input channels AC power supply model Heat sink fins Power connector See page 3 21 Power fuse See page 13...

Page 20: ...ee page 3 18 Front door Floppy disk drive Only for DR231 1 Rear Example of DR231 with 30 input channels AC power supply model Heat sink fins Power fuse See page 13 2 Power connector See page 3 21 Term...

Page 21: ...tion panel Located behind the front door See chapters 3 to 12 Handle to open close the front door Front door Power switch Located inside the front door See page 3 18 Floppy disk drive Only for DR241 1...

Page 22: ...ee page 3 18 Front door Floppy disk drive Only for DR231 1 Rear Example of DR231 with 30 input channels AC power supply model Heat sink fins Power fuse See page 13 2 Power connector See page 3 21 Term...

Page 23: ...is mode can be set for sub display 1 Measurement values which are shown on the main display will be shown as a bargraph The display update interval is the same as the interval of the main display Alar...

Page 24: ...nt input functions refer to page 2 3 recording functions refer to page 2 5 alarm functions refer to page 2 14 computation functions refer to page 2 17 event action function key lock function and exter...

Page 25: ...el input or contact input and recording can be set ON or OFF per channel In case of the voltage level input a voltage level up to 2 4V results in recording OFF whereas a voltage level of 2 4V or more...

Page 26: ...s 60Hz and 100ms 10Hz When AUTO is selected the integration time will be automatically decided according to the 50 60Hz frequency of the power supply AUTO does not function if the instrument is a DC p...

Page 27: ...easurement data and recording conditions the correct position on the chart will be decided and on that position the dot will be printed Trend recording conditions consist of the following chart speed...

Page 28: ...ease mark Page 2 13 Reference position of dot recording start Page 2 8 Starting time of dot recording Page 2 8 Ending time of previous dot recording Page 2 8 Left margin Header Page 2 13 Digital print...

Page 29: ...tarting date time of manual printout Trend recording Page 2 5 Channel No or tag of dot recording Channel No or tag of manual printout Alarm occurrence mark Page 2 13 Alarm release mark Page 2 13 Chart...

Page 30: ...oint to the time of starting Selecting the Number of Columns for Digital Printouts You can select how many columns where one column equals data of one channel will be used in one line for printing out...

Page 31: ...scan interval 2 to 60s regardless of the chart speed Recording interval for digital printouts This recording interval can be selected from MULTIPLE or SINGLE MULTIPLE Six preset recording intervals Ti...

Page 32: ...igger Recording All channels where an alarm occurred will be recorded Even when the alarm is released recording will continue Level Recording All channels where an alarm occurred will be recorded When...

Page 33: ...compressing 25 of recording span Bounda value Chart direction Chart direction Interpolation Function When carrying out trend recording and a measurement value differs greatly from the previous one the...

Page 34: ...18 Tags for each channel input type recording span and linear scaling values this print can be selected ON OFF Alarm this print can be selected ON OFF Group setting For each individual channel whethe...

Page 35: ...ach channel the selection whether to print the channel No or the tag refer to page 2 8 can also be done Scale printout values corresponding to the scales will be printed refer to page 2 10 Alarm print...

Page 36: ...nt value Measured variation T T t t Set interval 2 1 t t Set variation 2 1 T T High limit on rate of change Low limit on rate of change Alarm Hysteresis You can set the width between the value of alar...

Page 37: ...AND OR Setting When a group of alarms share the same internal switch or alarm output relay you can select how the internal switches alarm output relays will be operated AND will be operated when all a...

Page 38: ...H 10 000mV Alarm Display Hold Function This function allows the alarm display to remain even when the alarm has already been released This function can be selected ON or OFF and applies to all alarms...

Page 39: ...values are cenverted into linear scaling values Left span 2V left scale 0 1A Right span 2V Right scale 1 1A Moving Average This function computes a moving average over a preset number K of measuremen...

Page 40: ...t speed 2 and with recording interval 2 set at the menu displayed after having pressed the SET key for three seconds Group trend recording refer to page 2 10 Saving and reading of measured data comput...

Page 41: ...NC NO C NC Usually In case of Chart end In case of power OFF Controlling Recording Functions by Remote Control The recording functions can be controlled by the input of up to 12 contact signals when...

Page 42: ...rm lower limit alarm can be set for computation channels RRJC Remote RJC available if the instrument is equipped with the optional MATH function In cases where the object is located in distance for te...

Page 43: ...of the instrument Never place another instrument or any objects containing water on top of the instrument Otherwise a failure may occur When moving the instrument First turn off the power of the equi...

Page 44: ...ent or power lines where the level of mechanical vibrations is high in an unstable place Installation Method DR130 DR231 Can be used on a desk top installed on the floor or rack mounted Always install...

Page 45: ...1 11 3 7 310 146 1 44 5 44 5 44 5 37 5 44 5 146 1 310 7 44 5 37 5 11 3 98 8 6 221 25 Rack Mounting Dimensions 1 2 Removed DR130 AC power supply model DC power supply model AC power supply model DC pow...

Page 46: ...ensions 11 3 30 Panel face 482 6 1 265 9 1 190 5 0 5 37 7 6 8 1 1 2 1 2 Removed 11 3 37 7 6 8 265 9 1 190 5 0 5 30 Panel face 1 1 2 1 2 Removed 30 252 98 8 DC power supply model AC power supply model...

Page 47: ...anel Insert the blocks of the mounting brackets as accessories into the rectangular holes after removing seals on right and left sides of the instrument push the brackets toward the rear and engage th...

Page 48: ...aring the Chart Cassette 2 Open the front door and draw out the chart cassette from inside of the main unit by pulling forward the chart cassette pressers while simultaneously pushing them both right...

Page 49: ...e plate 1 and align the right and left perforations again 9 Close the chart pressure plate 2 Press lightly on chart pressure plate 2 until it latches securely 10 Fitting the guide pin of the chart cas...

Page 50: ...loaded otherwise the platen may be scratched or the chart paper may break Load the Ribbon Cassette into the DR130 DR231 1 Open the front door and remove the chart cassette from the main unit 2 Press t...

Page 51: ...te is properly loaded in the carriage If a ribbon cassette is used for a long time the ribbon may become wavy and move out of the dot printing range of the printer head If this happens replace the rib...

Page 52: ...tating knob once more in the direction of the arrow counterclockwise to take up the ribbon slack 7 Feed the chart paper by pressing the FEED key on the operation panel to prevent a delay in starting t...

Page 53: ...unction grounding terminal DR130 DR231 DR241 When connecting the cable take note of the following To reduce noise use two ferrite cores e g ZCAT 3035 1330 from TDK at both ends of the interface cable...

Page 54: ...OFF OFF OFF OFF 300 OFF OFF ON OFF 600 OFF ON OFF OFF 1200 OFF ON ON OFF 2400 ON OFF OFF OFF 4800 ON OFF ON OFF 9600 ON ON OFF OFF initial value 19200 ON ON ON OFF 38400 OFF OFF OFF ON Data length dip...

Page 55: ...s of the interface cable If the noise is particularly bad use several ferrite cores in series Use a shielded cable for the interface cable and make a one point grounding at the ground terminal of this...

Page 56: ...4 SW3 No 1 SW4 No 2 SW4 No 3 SW4 No 4 SW4 1 OFF OFF OFF OFF ON Default Setting 2 OFF OFF OFF ON OFF 3 OFF OFF OFF ON ON 4 OFF OFF ON OFF OFF 5 OFF OFF ON OFF ON 6 OFF OFF ON ON OFF 7 OFF OFF ON ON ON...

Page 57: ...net mask and default gateway are set for the DR Test mode A mode in which the condition of the physical connection is tested Communication mode A mode in which the DR is connected to the network to ca...

Page 58: ...t apply an input voltage exceeding the following levels to each terminal of each module Otherwise the internal circuits may be damaged Allowable input voltage Universal or DCV TC DI input module 2 VDC...

Page 59: ...gether at one point Refrain from wiring the input signals parallel However if you do then the following considerations are necessary Ground all equipment at the same point Do not turn the power of oth...

Page 60: ...circuit or equipment being measured or the DR232 or DR242 recorder itself as well as bodily injury Fuses are not built into voltage and current input terminals ALWAYS install a fuse on the interconne...

Page 61: ...5 N m Wiring Diagrams Single phase Two wire Configuration LOAD V V A A SOURCE SOURCE LOAD FUSE FUSE A1 V1 Single phase Three wire Configuration power monitor modules for three phase use only SOURCE LO...

Page 62: ...LOAD A A A A 1 3 R S T V V 1 V V 3 V V 2 A A 2 SOURCE LOAD S T R FUSE FUSE FUSE A1 V1 A2 V2 FUSE FUSE A3 V3 FUSE Three phase Four wire Configuration power monitor modules for three phase use only SOUR...

Page 63: ...er use an extension cord that does not have protective grounding otherwise the protection feature will be negated Connecting Procedure 1 Check that the power switch is turned off 2 Connect the plug of...

Page 64: ...grounding terminal marked terminal under the power connecting part as the protective grounding terminal For AC power and ground wiring use crimp on lugs for 4mm screws with insulation sleeves Make su...

Page 65: ...to avoid electric shock or damaging the instrument WARNING Connect the power wires after checking that the power is turned off to prevent electric shock To prevent fire use wires with cross sectional...

Page 66: ...this manual The device takes about 30 minutes to warm up The service life of the lithium battery used to save the settings is about 10 years at an ambient temperature of 23 C If the settings cannot be...

Page 67: ...irst menu to which the single menu belongs Note that newly selected or set items will be canceled When the device displays that setting is completed the newly set or selected details are fixed CLOCK 9...

Page 68: ...follows thyristor noise commercial power supply pulse noise Inverter Commercial power supply is converted to direct current by a rectifier sometimes the thyristor is used as the rectifier to stabilize...

Page 69: ...supply frequency Since data acquisition equipment is often used for measurements of equipment subjected to the pulse noise test the influence of noise must be considered Propagation of Noise Noise is...

Page 70: ...e and Normal Mode Noise R1 R2 ENM H L Z2 Z1 ECM Z3 i2 i1 EO EONM Case Circuit common Floating amp Signal source resistances Normal mode noise Signal voltage E Common mode noise Signal component Normal...

Page 71: ...ut In other words prevention of such a conversion is the key to anti noise measures As can be understood from the previous section it is important to take the following measures to reduce normal mode...

Page 72: ...00 0ms n 10Hz approx 3 2Hz for both 50Hz 60Hz n 1 2 3 As shown in the table the merit of 100 0 ms integration is not only that it applies to both 50 and 60Hz but also that it provides a low cut off fr...

Page 73: ...d power lines If the power lines are not shielded the operating voltage is 220V or less and the operating current is 10A or more the distance between the signal cables and power cords must be 60cm or...

Page 74: ...d is the point of common mode noise suppression Equipment under measurement EUM The instrument ec ec EUM The instrument EUM The instrument if grounding is difficult or The difference in the potential...

Page 75: ...by the coil is proportional to the area of the coil The smaller the area of the coil becomes the smaller the noise becomes em Magnetic field Coil If the directions of coils 1 and 2 are reversed by twi...

Page 76: ...es forms a loop and has an adverse effect on a high frequency Ex Connecting a power meter and The instrument grounded at one point to an inverter AC power meter The instrument Noise source inverter et...

Page 77: ...ser circuit connect to the relay socket terminal directly C R C 0 01 to 1 F Must withstand a voltage of at least three times the operating voltage R 0 3Re to 1Re Re Relay coil s DC resistance AC relay...

Page 78: ...he arrow mark on the Sub display upward 2 Select AUT using the MODE key 003 0 0045V 004 0 0931V AUT Sub display 1 AUTO Mode for Sub display 1 1 Select sub display 1 using the DISP key Direct the arrow...

Page 79: ...al computation channels When a measurement value does not reach the following value will be displayed DC voltage a minimum value of the measuring range max value min value 0 05 TC RTD min value of the...

Page 80: ...lues Engineering Units and Selected Display Mode Same as for the sub display 1 Others Same as for the sub display 1 Points to Note when Using the AUTO Mode When all three displays are set to AUTO mode...

Page 81: ...sub display 1 using the DISP key 2 Select MAN using the MODE key 002 0 0422V 003 0 0726V Sub display 1 MAN 3 Select the right or left channel using the keys A dash will appear below the unit number of...

Page 82: ...nel is set to SKIP then no engineering unit will be displayed MANUAL Display for the Sub display 1 and 2 Data of two channels are displayed here simultaneously on each display Channel No Difference be...

Page 83: ...then SKIP will be displayed When the channel other than the channel of the input module is selected appears Engineering Units Same as for the AUTO mode refer to page 4 2 except for the following When...

Page 84: ...2 Select SER using the MODE key 005 0 2108V 006 0 0951V Sub display 1 SER ALARM SEARCH Display for the Main Display Only the channels in which an alarm occurred will be displayed When an alarm occurs...

Page 85: ...et to ALARM SEARCH display then this will be displayed on the main display regardless the settings of sub display 1 and 2 When sub display 1 is set to ALARM SEARCH display and the main display is set...

Page 86: ...y The measurement data on the main display are displayed as a bargraph on sub display 1 The bargraph shows a graph corresponding to the measurement value showing the recording span divided into 40 equ...

Page 87: ...2 ALM 011 Alarm Status Display The status of alarms can be displayed on sub display 1 and 2 On each sub display the alarms of maximum 30 channels can be monitored which also depends on the number of...

Page 88: ...of 10 channels S11 Sub display 1 RLY RELAY STATUS Display for Sub display 2 1 Select the sub display 2 using the DISP key 2 Select RLY using the MODE key S01 Sub display 1 and 2 RLY S01 3 Select the...

Page 89: ...communication interface option is present The display of the relay status for the alarm output relays depends on the installed options and is as follows When the alarm module is installed A4 option 10...

Page 90: ...O D E E S C 1 Select the sub display 2 using the DISP key 2 Select CLK using the MODE key 005 0 8210V 006 0 0095V Sub display 1 and 2 CLK Dec 30 95 13 16 19 Clock Display The date and time can be dis...

Page 91: ...although new settings selections will not be kept New settings selections will be kept when you reach the final display of that setting 001 01 VOLT 2V Select Channel No 001 01 VOLT 2V Select Channel...

Page 92: ...how the number of the first channel to which settings apply Default is 001 and the first character is always 0 The setting ranges from 001 to the maximum number of input channels of your unit 010 for...

Page 93: ...LTA difference between channels Destination channels should lie within the first channel No to the last channel No range The number of the reference channel should be lower than the number of the dist...

Page 94: ...menu will appear although new settings selections will not be kept New settings selections will be kept when you reach the final display of that setting 001 01 VOLT 2V Select Channel No 001 01 VOLT 2V...

Page 95: ...t type can be selected from the following The default setting is VOLT VOLT DC voltage Refer to page 5 3 TC thermocouple Refer to page 5 3 RTD resistance temperature detector Refer to page 5 3 DI conta...

Page 96: ...re canceled Reaching the step showing the message SET OK confirms the latest settings selections Setting the Measuring Range and Recording Span 001 01 AC 1Ph3W 001 01 AC 1Ph3W Main menu item 001 01 AC...

Page 97: ...urrent 3Ph3W 2I three wire input modules only Three phase three wire 3 Voltage 3 Current 3 Ph3W 3I three wire input module only Three phase four wire 3Ph4W three wire input modules only Setting the In...

Page 98: ...three wire configuration triple voltage triple current modules for three phase use only V0 V1 V2 V3 I0 I1 I2 I3 V1 V2 V3 I1 I2 I3 V1 V2 V3 I1 I2 I3 CH1 P0 P1 P2 P3 CH2 VA0 VA1 VA2 VA3 CH3 V1 V2 V3 P0...

Page 99: ...Apparent power 0 00 to 25 00VA 0 0 to 250 0VA 0 0 to 250 0VA 0 to 2500VA VA13 Apparent power 0 00 to 37 50VA 0 0 to 375 0VA 0 0 to 375 0VA 0 to 3750VA VA0 Reactive power 0 00 to 12 50Var 0 0 to 125 0...

Page 100: ...To escape from a lower menu press the MODE ESC key Its main menu will appear although new settings selections will not be kept New settings selections will be kept when you reach the final display of...

Page 101: ...matically decided by measurement interval and chart speed Engineering Unit UNIT An engineering unit of up to six characters can be assigned to each channel The default setting is all spaces The charac...

Page 102: ...6 9 for details TIME MODE The following two modes can be selected The default is RELATIVE RELATIVE the number of days hours minutes can be set to any value between 00 days 00 hours 01 minute to 31 da...

Page 103: ...setting CHART CHART SPEED _100mm H Chart Speed Max 1500mm H SET OK ENTER ENTER ESC Main menu Lower menu Setting Chart Speed 2 Press the SET key for three seconds to enter the SET3 menu Select set usi...

Page 104: ...led Record enabled 1 to 9mm h 10 to 1500mm h Chart speed Record enabled Record enabled Chart Speed 2 CHART2 This setting consists of a chart speed and recording interval Depending on the Event Action...

Page 105: ...will not be kept New settings selections will be kept when you reach the final display of that setting SET ZONE PARTIAL 001 01 ZONE _ _0 250mm 1 Select Channel No 001 01 ZONE _ _0 250mm 1 Select Chann...

Page 106: ...ue RATE This setting specifies which percentage 1 to 99 of the full recording span will be compressed The default value is 50 Boundary value This setting specifies the boundary value which corresponds...

Page 107: ...g 001 01 TAG _ _ _ _ _ _ _ _ _ _ _ TAG _ _ _ _ _ _ _ _ _ _ _ _ _ _ _ _ Select Channel No 001 01 TAG _ _ _ _ _ _ _ _ _ _ _ TAG _ _ _ _ _ _ _ _ _ _ _ _ _ _ _ _ Select Channel No 001 01 TAG 12345678901 T...

Page 108: ...logging mode The default setting is ON OFF Digital printout will not be carried out for this channel ON Digital printout will be carried out for this channel The recording interval can be selected fro...

Page 109: ...3 menu Select set using the keys To escape from a lower menu press the MODE ESC key Its main menu will appear although new settings selections will not be kept New settings selections will be kept whe...

Page 110: ...stored in memory Information on more than 30 alarm occurrences releases will be discarded After one alarm printout 29 alarm occurrences releases are stored and another alarm occurrence release can the...

Page 111: ...ress the MODE ESC key Its main menu will appear although new settings selections will not be kept New settings selections will be kept when you reach the final display of that setting 001 01 SCALE PR...

Page 112: ...printed at 0 100 and boundary value positions of the zone when the recording zone is 50mm to 99mm scaled values at 0 and 100 of the recording span will be printed at 0 and 100 positions of the zone Li...

Page 113: ...e kept New settings selections will be kept when you reach the final display of that setting MESSAGE No 01 MSG01 _ _ _ _ _ _ _ _ _ _ _ _ _ _ _ _ MSG01 _ _ _ _ _ _ _ _ _ _ _ _ _ _ _ _ 0123456789 ABC KL...

Page 114: ...ing the event action function refer to 9 1 on page 9 1 for details Displaying a message A message can be displayed on the main display using the even action function Entering a Header HEADER LINE No s...

Page 115: ...ill not be kept New settings selections will be kept when you reach the final display of that setting MATCH TIME No 1 1 2 3 1 TIME 01 00 00 Set Day Time DD HH MM 00 SET OK 001 01 MOVE AVE 0 Select Cha...

Page 116: ...ing average is being displayed printed Interpolation INTERPOL This setting can be set for each channel individually If the instrument is equipped with the optional computation function or floppy disk...

Page 117: ...ctions can also be used to perform the above printing and recording see Page 9 1 Feeding the recording paper Press the FEED key to feed the recording paper Even if the FEED key is pressed while record...

Page 118: ...g For details on setting the time for temporarily stopping printing see the previous page After list printing starts the operation display mode appears During list printing the menu displays LIST STOP...

Page 119: ...the ENTER key is pressed messages are printed If an alarm occurs messages are also printed See Section 6 5 Setting the Alarm Printout on page 6 11 Message printout buffer Analog trend Up to 10 message...

Page 120: ...list of the settings made in the SETUP menu For details of the settings and their values see Chapter 10 Press the ENTER key to start printing the set up list After printing starts the operation displa...

Page 121: ...SC ESC ESC ENTER Main menu Lower menu Selecting channel Nos Channels Nos A01 to A30 are available for computation channels optional Selecting the alarm item number Set the alarm item number for each c...

Page 122: ...tation channels Setting alarm values Set one alarm value for each alarm number within the following range depending on the type of input The default value is 0 zero H and L VOLT TC RTD DI and DELTA Wi...

Page 123: ...o 0 N 1 0 A4 option N Slot number for an alarm module Ten relays are provided 0M1 to 0M2 R1 option M Slot number for a DI DO module Two relays are provided For the model with both A4 and R1 options bo...

Page 124: ...er the alarm status is released the displays still flash When the alarm status hold function is ON use the alarm acknowledge function to determine the current status of the alarm To do this display th...

Page 125: ...C COPY Select Setting Parameter E S C Press the SET key to enter the SET menu Select set using the keys To escape from a lower menu press the MODE ESC key Its main menu will appear although new settin...

Page 126: ...11 12 13 14 15 16 17 18 19 20 ACT EDGE MATH START ACT EDGE MATH START START STOP CLEAR RESET ACT EDGE FLAG F01 ACT EDGE FLAG F01 ENTER F01 F02 F03 F04 F05 F06 F07 F08 F09 F10 F11 F12 F13 F14 F15 F16...

Page 127: ...01 02 03 04 05 06 07 08 09 10 11 12 13 14 15 16 17 18 19 20 ACT EDGE MATH START ACT EDGE MATH START START STOP CLEAR RESET ACT EDGE FLAG F01 ACT EDGE FLAG F01 F01 F02 F03 F04 F05 F06 F07 F08 F09 F10 F...

Page 128: ...17 18 19 20 ACT EDGE MATH START ACT EDGE MATH START START STOP CLEAR RESET ACT EDGE FLAG F01 ACT EDGE FLAG F01 F01 F02 F03 F04 F05 F06 F07 F08 F09 F10 F11 F12 F13 F14 F15 F16 ACT EDGE MEMRY DATA_WR AC...

Page 129: ...12 13 14 15 16 17 18 19 20 ACT EDGE MATH START ACT EDGE MATH START START STOP CLEAR RESET ACT EDGE FLAG F01 ACT EDGE FLAG F01 F01 F02 F03 F04 F05 F06 F07 F08 F09 F10 F11 F12 F13 F14 F15 F16 ACT EDGE...

Page 130: ...08 09 10 11 12 13 14 15 16 17 18 19 20 ACT EDGE MSG DISP 01 ACT EDGE MSG DISP 01 01 02 03 04 05 06 07 08 09 10 11 12 13 14 15 16 17 18 19 20 ACT EDGE MATH START ACT EDGE MATH START START STOP CLEAR R...

Page 131: ...SG PR 01 01 02 03 04 05 06 07 08 09 10 11 12 13 14 15 16 17 18 19 20 ACT EDGE MSG DISP 01 ACT EDGE MSG DISP 01 01 02 03 04 05 06 07 08 09 10 11 12 13 14 15 16 17 18 19 20 ACT EDGE MATH START ACT EDGE...

Page 132: ...4 05 06 07 08 09 10 11 12 13 14 15 16 17 18 19 20 ACT EDGE MSG DISP 01 ACT EDGE MSG DISP 01 01 02 03 04 05 06 07 08 09 10 11 12 13 14 15 16 17 18 19 20 ACT EDGE MATH START ACT EDGE MATH START START ST...

Page 133: ...tches on page 8 1 for setting internal switches and relays CHART END When the end of the chart is detected the action is executed TIMER If the selected timer s set time is up the action is executed Si...

Page 134: ...et normal digital print functions are disabled Only one function can be set in the event action functions MSG PR Prints messages For details see Section 7 3 Starting Message Printing on page 7 3 Selec...

Page 135: ...dge and level actions cannot be set simultaneously For the level action only one action is available MEMRY available with the DR130 1 DR231 1 DR241 1 equipped with the floppy disk drive DATA_WR saves...

Page 136: ...he SET key to enter the SET menu Select set using the keys To escape from a lower menu press the MODE ESC key Its main menu will appear although new settings selections will not be kept New settings s...

Page 137: ...and interpolation ON OFF OFF The copying of other items is disabled Setting a copy source channel Sets a copy source channel with up to three characters For details on these characters see Section 4...

Page 138: ...e menus that are not displayed due to the basic settings as described in Chapter 10 ALARM ACK ALARM RST TIMER RESET MATH START 1 MATH CLR START MATH STOP 2 MATH ACK 3 KEY LOCK ON MSG PRINT ENTER Opera...

Page 139: ...sults then re starts computation Computation stop MATH STOP Stops computation Clearing Incomplete Measurement Status MATH ACK Clears the status indication displayed due to incomplete measurement which...

Page 140: ...DE ESC key Its main menu will appear although new settings selections will not be kept There may be some menus that are not displayed due to basic settings as described in Chapter 10 ALM BUF CLEAR MSG...

Page 141: ...ation on individual modules is displayed as follows Module Display ID inside the display Description Input module INPUT 00 to 3F DI DO module REMOTE 57 With R1 option Alarm module RELAY 5C to 5F With...

Page 142: ...IM DR231 01E 9 5 Fail Chart End Output and Remote Control Signal Input Function See Section 2 6 Other Functions on page 2 19 Connections and Notice See Section 3 5 Connecting the Signal Lines on page...

Page 143: ...kept when you reach the final display of that setting SET TIME SUMMER SUMMER WINTER SUMMER 96 05 01 00 Set Data Time YY MM DD HH 00 00 SET OK DST ENTER ENTER ENTER ESC SET Main menu Lower menu Using t...

Page 144: ...st turn off the power switch 2 Turn the switch back on while pressing the DISP key and continue pressing the DISP key for about 5 seconds Select set using the keys To escape from a lower menu press th...

Page 145: ...nge is 1 to 500 The set value 1 corresponds to about 0 1 mm of the dot printing position Adjustment of Full scale Position FULL If a line composed of printed dots shifts from the scale line at the rig...

Page 146: ...ey for about 5 seconds Select set using the keys To escape from a lower menu press the MODE ESC key Its main menu will appear although new settings selections will not be kept New settings selections...

Page 147: ...e number selected here will be printed For the number of characters when displaying see chapter 4 Selection of Dot printing Recording System TREND MODE Select it from the following systems The default...

Page 148: ...Pitch CHANNEL PITCH In trend recording select how many millimeters are taken as the channel number printing interval When TAG has been selected in channel number TAG selection the TAG corresponding t...

Page 149: ...Setting Tag Digital Printout and Manual Printout page 6 9 SINGLE Digital print The interval is determined by the chart speed and the number of columns to be printed See the table in chapter 14 page 14...

Page 150: ...switch 2 Turn the switch back on while pressing the DISP key and continue pressing the DISP key for about 5 seconds Select set using the keys To escape from a lower menu press the MODE ESC key Its mai...

Page 151: ...m the following AUTO the frequency of 50 60 Hz is automatically switched corresponding to the power frequency of this instrument However AUTO does not function when using DC power supply Selecting AUT...

Page 152: ...and continue pressing the DISP key for about 5 seconds Select set using the keys To escape from a lower menu press the MODE ESC key Its main menu will appear although new settings selections will not...

Page 153: ...et in the order of slot 0 slot 1 as viewed facing the rear Ex 1 When the alarm module is mounted in slot 3 31 to 40 Ex 2 The DI DO module is mounted in slot4 41 to 42 The default setting is OFF Settin...

Page 154: ...viewed facing the rear Ex 1 When the alarm module is mounted in slot 3 31 to 40 Ex 2 The DI DO module is mounted in slot4 41 to 42 End relay number The same settings of the second or third characters...

Page 155: ...on while pressing the DISP key and continue pressing the DISP key for about 5 seconds Select set using the keys To escape from a lower menu press the MODE ESC key Its main menu will appear although n...

Page 156: ...e Junction Compensation RJC Set either the internal or the external compensation for each channel INT internal compensation is performed EXT external compensation is performed For external compensatio...

Page 157: ...ER ENTER ESC COLOR 001 01 COLOR PURPLE Select Channel No 001 01 COLOR PURPLE Select Channel No 001 01 COLOR PURPLE PURPLE RED GREEN BLUE BROWN BLACK NAVY YEL_GR RED_PR ORANGE COLOR SET Main menu Lower...

Page 158: ...itch back on while pressing the DISP key and continue pressing the DISP key for about 5 seconds Select set using the keys To escape from a lower menu press the MODE ESC key Its main menu will appear a...

Page 159: ...e turning on off of the power switch DISP MODE key operation and cursor key operation are effective Other than the above whether operation of the following keys is made effective or locked can be sele...

Page 160: ...for about 5 seconds Select set using the keys To escape from a lower menu press the MODE ESC key Its main menu will appear although new settings selections will not be kept New settings selections wi...

Page 161: ...OFF PANEL MSG PRINT MSG PRINT FUNC FUNC FUNC3 OFF PANEL ALM BUF CLEAR ALM BUF CLEAR FUNC3 FUNC FUNC3 OFF PANEL MSG BUF CLEAR MSG BUF CLEAR FUNC3 FUNC FUNC3 OFF PANEL MODULE INF MODULE INF FUNC3 FUNC F...

Page 162: ...C3 menu OFF not displayed in either menu The default setting is as shown in the operating procedure diagram on pages 10 17 and 10 18 The last operation menu PANEL ALL ITEM is the menu that globally se...

Page 163: ...DISP key for about 5 seconds Select set using the keys To escape from a lower menu press the MODE ESC key Its main menu will appear although new settings selections will not be kept New settings sele...

Page 164: ...ENTER ENTER ENTER ENTER ENTER ENTER ENTER From previous page To previous page PANEL SCALE PR SCALE PR SET3 SET SET3 OFF PANEL LIST PR LIST PR SET3 SET SET3 OFF From the following page To next page PAN...

Page 165: ...L INTERPOL SET3 SET SET3 OFF PANEL GROUP GROUP SET3 SET SET3 OFF PANEL DST DST SET PANEL COPY COPY SET SET SET3 OFF PANEL ALL ITEM ALL ITEM SET SET SET3 OFF INIT ENTER ENTER ENTER ENTER ENTER ENTER EN...

Page 166: ...SET menu SET3 displayed in the SET3 menu OFF not displayed in either menu The default setting is as shown in the operating procedure diagram on pages 10 20 and 10 21 The last operation menu PANEL ALL...

Page 167: ...you reach the final display of that setting AUTO INTERVAL 2 2 3 4 5 AUTO INTVL SET SETUP ABORT ABORT STORE DISPLAY END ENTER ESC ENTER ENTER ESC ENTER SET UP end Main menu Lower menu SET UP Explanatio...

Page 168: ...n the following procedure 1 When the display presents the operation display mode or a menu other than the SET UP menu first turn off the power switch 2 Turn the switch back on while pressing the DISP...

Page 169: ...Input TC Note that accuracy of reference junction compensation is not considered RTD High resolution RTD R S B K E J T L U N W KPvsAu7Fe Pt100 1mA Pt100 2mA JPt100 1mA JPt100 2mA Pt50 2mA Ni100 1mA SA...

Page 170: ...low To exit any of the following menu items during the procedure press the MODE ESC key This returns to the first item of the menu Note however that your new settings and selections are canceled Reach...

Page 171: ...ec INTVL sec min hour day REPORT CH SET configuration complete SETUP ABORT ABORT STORE REPORT END ENTER ENTER Main menu item Submenu items SET UP ENTER ENTER ENTER ENTER ESC ENTER ENTER ENTER Complete...

Page 172: ...monthly report making all to on at the same time In addition you can set daily and monthly reports to either the standard format ON1 or the enhanced format ON2 of output Note that the enhanced format...

Page 173: ...s The DR recorder resets this value each time it makes any of these reports Cumulative sum The total sum up to the preset time to make a report in the case of hourly reports or the sum up to a preset...

Page 174: ...0000 2 0000 1 0000 R02 002 INST V 10 000 R03 003 SUM L 2 400000E 01 4 800000E 01 R04 R05 R06 TAG A01CH_______ AVE unit06 20000 000 10000 000 30000 000 R07 A02 INST 200000 00 R08 A03 SUM 2 400000E 01...

Page 175: ...ing Report 1 Report 2 Report 3 Report n Start of report making denotes the point in time a report is created Time to make report Time to make report Time to make report Stop of report making Data item...

Page 176: ...omputed contain any faulty data the DR recorder treats the data as summarized in the following table depending on the type of computing and faulty data Type of Faulty Data Average Minimum Maximum Inst...

Page 177: ...light savings time is specified the report for the day to shift from standard time to the daylight savings time seemingly includes data for only a 23 hour day and at the same time the report for the d...

Page 178: ...ollowing paragraphs show the flow operation for a case where a measured data file is saved using the occurrence of an alarm as a trigger 1 Setting an Event Action Menu Item Setting LOGIC in SET menu L...

Page 179: ...lay of that setting Selecting the channel to be saved MEMORY CH SET CH_SET WRITE READ SAVE LOAD COPY DELETE INFO INIT 001 01 CH SET ON Select Channel No 001 01 CH SET ON Select Channel No 001 01 CH SE...

Page 180: ...50 60 70 80 90 100 WRITE START End of setting ENTER SET MEMORY ESC Main menu ENTER ENTER ENTER ENTER ENTER ENTER Saving files repeatedly using the event action function The action in the event action...

Page 181: ...ze of the RAM disk is 512 KB Saving method WRITE MODE The following three methods are available DIRECT Measured computed data is saved immediately after setting has been completed Saving is complete w...

Page 182: ...a detailed description of the event action function refer to 9 1 Setting Event Action Functions page 9 1 Data length WRITE LENGTH Used to set the number of pieces of data per channel Select one of the...

Page 183: ...length For instance if the number of channels is 10 number of computation channels is 5 and specified data length is 5k the data size can be calculated as follows Data size 576 64 x 10 5 10 x 2 5 x 4...

Page 184: ...e kept New settings selections will be kept when you reach the final display of that setting Reading measured computed data immediately from the RAM disk MEMORY READ CH_SET WRITE READ SAVE LOAD COPY D...

Page 185: ...STAND ALONE 96 07 07 00 00 00 LENGTH 20000 SAMPLE 10 Sec TRIG DATA No 1 CHANNEL 001 60 ON 001 ON 031 INFO END End of setting SET MEMORY ESC Main menu ENTER ENTER ENTER ENTER ENTER ENTER Assigning the...

Page 186: ...ead data To display or record the read data it is necessary to assign the read data to computation channels A01 to A30 using the SET menu To view or record read data you must set the data you want dis...

Page 187: ...pying a Data File for more information Status display during reading The following status symbols are displayed in the sub display 2 lowest display section It is not possible to make media settings ot...

Page 188: ...y to enter the SET menu Select set using the keys To escape from a lower menu press the MODE ESC key Its main menu will appear although new settings selections will not be kept New settings selections...

Page 189: ...SC ENTER ENTER ENTER ENTER Set up data except for date time is saved to the internal RAM disk or a floppy disk Set up data for the SETUP mode can be saved to a floppy disk only Data is always saved in...

Page 190: ...the keys To escape from a lower menu press the MODE ESC key Its main menu will appear although new settings selections will not be kept New settings selections will be kept when you reach the final d...

Page 191: ...SET UP menu 1 If the SET UP menu is not currently displayed turn the power OFF 2 While holding the DISP key turn the power ON Make sure depression of the DISP key is maintained for approximately anoth...

Page 192: ...ecording spans One event must be set for the LD_TRG1 LD_TRG2 and LD_TRG3 actions during event action function setting For a detailed description of the event action function refer to 9 1 Setting Event...

Page 193: ...ugh new settings selections will not be kept New settings selections will be kept when you reach the final display of that setting MEMORY COPY CH_SET WRITE READ SAVE LOAD COPY DELETE INFO INIT COPY MO...

Page 194: ...sk first then copied to a floppy disk It is not possible to change the file name when copying the file Displaying recording measured computed data saved on a floppy disk using the instrument To use th...

Page 195: ...he MODE ESC key Its main menu will appear although new settings selections will not be kept New settings selections will be kept when you reach the final display of that setting ENTER MEMORY COPY CH_S...

Page 196: ...030 A02 for example converts data on channels 030 A01 and A02 Conversion data COPY DAT Used to specify the conversion range for the channels specified by COPY CH Enter the conversion start data No and...

Page 197: ...227 315 42 23 2 5 2 15 9 96 02 14 15 05 29 0 12 233 315 81 23 2 5 2 15 8 96 02 14 15 05 31 0 13 822 315 03 23 2 5 1 15 8 96 02 14 15 05 33 0 12 324 315 05 23 2 5 2 15 8 96 02 14 15 05 35 0 13 220 315...

Page 198: ...tions will be kept when you reach the final display of that setting MEMORY DELETE CH_SET WRITE READ SAVE LOAD COPY DELETE INFO INIT DELETE TYPE DATA DATA PANEL DELETE FILE AAA AAA BBB CCC DELETE OK En...

Page 199: ...ain menu will appear although new settings selections will not be kept New settings selections will be kept when you reach the final display of that setting FLOPPY INFO SAVE LOAD DELETE INFO FORMAT VO...

Page 200: ...d and Set up Data 11 Internal RAM disk and floppy disk information is displayed Internal RAM disk Remaining memory size is displayed Floppy disk Volume name and remaining memory size are displayed 11...

Page 201: ...u press the MODE ESC key Its main menu will appear although new settings selections will not be kept New settings selections will be kept when you reach the final display of that setting MEMORY INIT C...

Page 202: ...C key Its main menu will appear although new settings selections will not be kept New settings selections will be kept when you reach the final display of that setting FLOPPY FORMAT SAVE LOAD DELETE I...

Page 203: ...e FORMAT MODE Select the format mode from the following 2HD 1 44 MB 1 2 MB 2DD 720 KB Volume name Give the volume name using no more than 11 standard width characters Beginning the volume name with a...

Page 204: ...channel 001 0 and channel 002 0 0 when channel 001 nonzero and channel 002 0 1 when channel 001 0 and channel 002 nonzero 1 when both channel 001 and channel 002 are nonzero 0 Logical negation NOT NOT...

Page 205: ...ting equations Multiple operators can be used in 1 computing equation But there are following limitations Number of characters that can be used 40 characters Total number of channel numbers and consta...

Page 206: ...0 For a detailed description of alarm setting refer to 8 1 Setting Alarms and Relays including internal switches page 8 1 Event action function The event action function can be used to start stop com...

Page 207: ...er menu press the MODE ESC key Its main menu will appear although new settings selections will not be kept New settings selections will be kept when you reach the final display of that setting ENTER E...

Page 208: ...al data G Used to specify the group No for which CLOG computation of data of a group measured on the same time is to be used Restrictions in Equations Computation channel No The specified computation...

Page 209: ...beforehand Example of settings where the averages for channels 001 002 003 004 006 and 008 are computed Configuration of groups In the SET menu assign channels 001 002 003 004 006 and 008 to group G01...

Page 210: ...menu press the MODE ESC key Its main menu will appear although new settings selections will not be kept New settings selections will be kept when you reach the final display of that setting CONST No K...

Page 211: ...red This is displayed while computation is in progress MACH ACK Clears status indication which is displayed in case of incomplete measurement during computation For a detailed description of the FUNC...

Page 212: ...continue When a further hour elapses computation results will be reset The above operations will be carried out repeatedly until computation is stopped For a detailed description of the event action f...

Page 213: ...TCH TIME 1 ACT EDGE MATH CLEAR SET OK configuration complete LOGIC BOX No 2 01 to 30 EVT MATCH TIME 1 ACT EDGE MATH START SET OK configuration complete LOGIC BOX No 3 01 to 30 EVT MATCH TIME 2 ACT EDG...

Page 214: ...tems ENTER ENTER Absolute time ENTER One hour interval Sets the reference time Setting the EVENT ACTION fields Configure the DR recorder so it clears computed values at the time set on the timer LOGIC...

Page 215: ...UP menu 1 If the SET UP menu is not currently displayed turn the power OFF 2 While holding the DISP key turn the power ON Make sure you still continue to hold down the DISP key for approximately anot...

Page 216: ...of abnormal data during TLOG or CLOG TLOG CH ERROR Used to select the process method for abnormal data obtained during TLOG or CLOG ERROR Abnormal data is processed as a computation error SKIP Abnorma...

Page 217: ...ended period of time The table below shows the recommended parts replacement periods for specific parts that wear out These replacement periods indicate where the recorders have been used under normal...

Page 218: ...rated current 2 5 A Type time lag Standard IEC VDE certified Part number A1350EF For DC power supply Maximum rated voltage 250V Maximum rated current 6 3A Type time lag Standard IEC VDE certified Part...

Page 219: ...power switch 2 Disconnect the power connections 3 Use a standard screwdriver to turn the fuse holder screw counterclockwise located next to the DC power terminals Then remove the fuse holder 4 Remove...

Page 220: ...all input terminal cover properly against ambient temperature changes Protect recorder from blowing air of fan Keep temperature changes near input terminals small Input connected improperly Connect in...

Page 221: ...channel for Change the range in the reference channel interchannel differential computations 043 SCALE in range setting in the reference Change the range in the reference channel channel for interchan...

Page 222: ...were selected Specify correct modules 143 Modules selected which cannot be calibrated Specify correct modules 144 Calibration done improperly Check electrical connections Calibrate again If the same e...

Page 223: ...calibration mode Once the module has been selected it is no longer selected again as long as the calibration END mode is not executed Calibration mode CAL EXEC mode This mode enables specified ranges...

Page 224: ...to 240 VDC DC power supply voltage 12 to 28 VDC Power supply frequency 50 60 Hz 1 for AC power supply model only Warm up time at least 30 minutes for this recorder and necessary warm up time for the...

Page 225: ...ode AD JUST MODE CAL EXEC MODULE No 0 DISPLAY CAL EXEC END 5 Press the ENTER key 6 With select the calibration range AD JUST RANGE 20mV MODULE No 0 20mV 60mV 200mV 2V 6V 20V 50V Pt 1mA P 7 Enter the r...

Page 226: ...librated The calibrating procedures for DC V TC DI input modules are those except RTD in universal input modules 13 The calibrated values are displayed as follows 20mV ZERO 1 MODULE No 0 14 Press the...

Page 227: ...ules select the items for the calibration range from among the following 20 mV 60 mV 200 mV 2 V 6 V 20 V 50 V Pt 1 mA Pt 2 mA Pt 1 mA H Pt 2 mA H Cu 2 mA When the DC V TC DI input module is selected R...

Page 228: ...above order each time the ENTER key is pressed If the MODE key is pressed while displaying calibrated values the display returns to A D calibration mode selection and the calibrated value already adj...

Page 229: ...0 A D integration time 20ms 50Hz 16 7ms 60Hz 100ms 10Hz selectable or automatically switched between 50 60Hz Except auto switch does not function on the DC power supply model Minimum measurement inter...

Page 230: ...o 550 0 C 200 0 to 250 0 C 200 0 to 550 0 C 200 0 to 250 0 C 60 0 to 180 0 C 70 0 to 200 0 C 0 0 to 300 0K 200 0 to 300 0 C 140 00 to 150 00 C 70 00 to 70 00 C 140 00 to 150 00 C 70 00 to 70 00 C OFF...

Page 231: ...ange C 0 02 of span C for CU10 Thermocouple burnout Detected in a TC range On Off enabled current of 4 A detectable pulse width of approx 5ms 2 k or lower is considered normal 100 k or greater is cons...

Page 232: ...ing range and or wiring Measuring Accuracy and Resolution As described below under the following operating conditions Ambient temperature 23 2 C ambient humidiy 55 10 RH power supply voltage 90 to 250...

Page 233: ...eg 80 0 to 80 0 deg 80 0 to 80 0 deg PHi i 1 2 3 13 0 Frequency 45 00 to 65 00 Hz 45 00 to 65 00 Hz 45 00 to 65 00 Hz 45 00 to 65 00 Hz FREQ Ranges of Indication Measured Data Item 25 V 0 5A 25 V 5 A...

Page 234: ...F1 PF3 PF1 PF3 PF1 PF2 PF3 PF1 PF2 PF3 PF13 PF13 PF13 PF0 Phase angle PH PH1 PH1 PH3 PH1 PH3 PH1 PH2 PH3 PH1 PH2 PH3 PH13 PH13 PH13 PH0 Continuously Applicable Maximum Voltage and Current Voltage 250...

Page 235: ...ction Recording modes Analog trend mode and logging mode Chart paper feed chart speed 1 to 1500 mm hour chart speed change 2 kinds changes by event action function chart feed method by pulse motor cha...

Page 236: ...er line max 5 rows channel No or tag up to 7 characters alarm search measurement values engineering unit Bargraph display measurement values of the main display are displayed as a bargraph Auxiliary d...

Page 237: ...s 1 Disk types 2HD 2DD Supported formats 1 2 MB 1 44 MB and 720 KB Applicable data Setting values measured values and computed values only possible whe optional math function is specified Method to sa...

Page 238: ...on AND OR NOT and XOR relational computation exponentiation previously measured value reference hold and reset Statistical computation CLOG Computation process of simultaneously measured values within...

Page 239: ...SUM Sum and cumulative sum over a preset interval Sum Cumulative Sum Hourly report Hourly sum Sum over 24 hours resets at the time to make up a daily report Daily report Daily sum Sum over a month res...

Page 240: ...covered before the preset time for report printing If a power failure time is longer than 12 hours the DR recorder stops report making even if the power is restored The recorder prints a report for da...

Page 241: ...ed by the customer AC power supply Maximum rated voltage current 250 V 2 A Type Time lag Standard IEC VDE DC power supply Maximum rated voltage current 250V 6 3A Type Time lag Standard UL CSA AC power...

Page 242: ...within 10 V however it must be within 100 V when burnout is specified 3 RTD Variation with respect to change of 10 per wire when all wires have the same resistance value Indication within 0 1 of rdg 1...

Page 243: ...P6 option approx 438 W 291 381 D mm DR241 approx 444 W 288 H 343 D mm Weight DR130 approx 9 3kg 1 10 8kg 3 DR231 approx 13kg 2 14 5kg 3 DR241 approx 16kg 2 1 with 20 input channels and alarm output A4...

Page 244: ...unication method half duplex Synchronization mode Start stop synchronization synchronized by a start and a stop bit Baud rate 150 300 600 1200 2400 4800 9600 19200 38400 bps Start bit Fixed at 1 bit D...

Page 245: ...es M4 screws Minimum response time 0 10 20 50 or 100 ms selectable Reception buffer length 250 bytes Escape sequence Trigger Status call Open and Close Electrical characteristics SDA SDB RDA RDB SG Be...

Page 246: ...ode Transfer contact normal open common normal close type Energize de energize switchable Hold non hold switchable Reflash alarm can be set Contact rating 250V DC 0 1A resistive load 250V AC 2A resist...

Page 247: ...e following functions can be controlled by contact input alarm acknowledge alarm reset timer reset starting stopping recording manual printout digital printout message printout message display changin...

Page 248: ...0 207 98 8 6 221 25 Rear Panel Number of input channels 30 Unit mm If not specified the tolerance is 3 However in cases of less than 10mm the tolerance is 0 3mm 30 252 98 8 AC power supply model DC po...

Page 249: ...98 8 266 25 424 Rear Panel Unit mm If not specified the tolerance is 3 However in cases of less than 10mm the tolerance is 0 3mm AC power supply model DC power supply model AC power supply model DC po...

Page 250: ...DR231 01E DR241 40 203 100 288 424 444 280 Rear Panel Number of input channels 30 Unit mm If not specified the tolerance is 3 However in cases of less than 10mm the tolerance is 0 3mm 14 3 Dimensional...

Page 251: ...Y Setting the recording mode page 6 1 Setting the engineering unit page 6 1 Setting the recording channel page 6 1 Setting the recording interval timer page 6 1 Setting computation chapter 12 Setting...

Page 252: ...3 Setting action to be carried out in case of computation error and setting the units for TLOG SUM page 12 12 Saving reading set up data chapter 11 Setting report format page 10 27 Selecting alarm int...

Page 253: ...tenuation 2 4 AUTO for recording interval See also Display 2 9 6 2 Averaging See Moving average B Backup of set values 14 15 Bargraph Display 2 1 4 9 Basic Setting SET UP Chapter 10 Baud rate 3 12 3 1...

Page 254: ...2 to 1 4 Functions Action 2 18 Alarm 2 14 to 2 16 Alarm display hold 2 16 10 8 Computation 2 17 Display 2 1 Event action 2 18 9 1 to 9 11 External input output 2 19 Interpolation 2 11 6 17 Key lock k...

Page 255: ...MULTIPLE 2 9 10 6 N Names of parts 1 2 to 1 5 3 6 to 3 9 Name plate 3 NO ALARM 4 7 to 4 9 Noise countermeasures 3 26 to 3 35 O Operating conditions reference 14 4 Operation panel 1 2 to 1 4 Operation...

Page 256: ...10 6 SKIP skipping 4 2 4 3 4 5 to 4 7 4 9 5 3 Slots 4 2 4 3 4 10 4 12 10 10 10 11 Software 6 Span for recording 2 10 5 3 calibrated values of 13 12 Spares 6 Sprocket 3 7 Stop bit 3 12 14 16 14 17 Sty...

Reviews: