


Owner’s & Installation Manual
7
E
N
G
L
IS
H
Installation Instructions
6
New Wide Wired Remote Controller
Installation Instructions
GND
GND
12V
Signal wire
Signal wire
GND
12V
B Y R
B Y R
MASTER
SLAVE
Signal wire
GND
12V
Signal wire
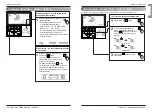
Group control
1. When installing more than 2
units of air conditioner to one
wired remote controller, please
connect as pictured to the right
• This needs more clarification before
it can be edited
• Check for event communication
through the product manual.
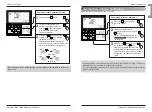
2. When installing more than 2 wired remote
controllers to one air conditioner, please
connect as pictured to the right.
• When installing more than 2 units of wired
remote controller to one air conditioner, set
one wired remote controller as master and the
others all as slaves, as shown in the right
picture.
• You cannot control the group as shown in the
right for some products.
• Refer to the product manual for more details.
When controlling multiple indoor units with event communication function with one remote
controller, you must change the master/slave setting from the indoor unit.
- When changing the master/slave configuration, changes will take effect after the unit is turned
on after being powered off for one minute.
- For ceiling type cassette and duct product group, change the switch setting of the indoor PCB.
- For wall-mount type and stand type indoor units, change the master/slave setting with the
wireless remote controller. (Refer to wireless remote controller manual for details)
When installing 2 remote controllers to one indoor unit with event communication function, set
the master/slave of the remote controller. (Refer to remote controller master/slave selection)
When in a slave setting, some functions(fan speed, lock and time setting) may not be available.
When simultaneously connecting
2 sets of wired remote controller
• When controlling in groups, set the master/slave of the remote controller. Refer to Installer
setting section on how to set master/slave for more details.
#3 switch OFF: Master
(Factory default setting)
#3 switch ON: Slave
Wall
Side
Wall
Side
Wall
Side
Wall
Side
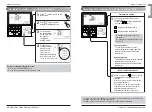
Connecting order
Separating order
3. Place the top part of the remote controller into
the setup board you have screwed into the wall,
as pictured to the right, and connect the pieces
by pressing the bottom into the board.
- Arrange the cable through the top or right guide grooves before
closing if necessary, and do not leave a gap between the
remote controller and the setup board.
To separate the remote controller from the
setup board, insert a flathead screw driver into
the separation holes on the bottom of the
remote controller and turn clockwise to release
the remote controller.
- There are two separating holes on the remote controller, and
they should be separated individually. Make sure not to
damage any interior components with the screwdriver when
separating.
4. Please connect indoor unit and remote controller using connection cable.
5. Please use an extension cable if the distance between the wired remote controller
and indoor unit is more than 10m.
Please check if connector is normally connected.
Connecting cable
Indoor
Unit side
When installing the wired remote controller, do not bury it in the wall.
(It can cause damage in the temperature sensor.)
Do not install the cable to be 50m or above.
(It can cause communication error.)
• When installing the extension cable, check the connecting direction of the connector of the remote controller
side and the product side for correct installation.
• If you install the extension cable in the opposite direction, the connector will not be connected.
• Specification of extension cable: 2547 1007 22# 2 core 3 shield 5 or above.
CAUTION
• Installation work must be performed in accordance with the national wiring standards by authorized
personnel only.
• Installations must comply with the applicable local/national or international standards.
• Apply a totally enclosed noncombustible conduit (metal raceway) if local electric and building codes require
plenum cable usage.
CAUTION
12V
Red
Signal
Yellow
GND
Black
Содержание PQRCVSL0
Страница 38: ......


