17
Status indicators
Ch3. System information
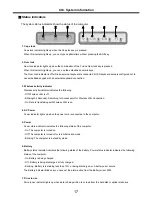
The system status indicators show the status of the computer
2
3
4
5
6
1
7
1. Caps lock
Caps lock indicator lights up when the Caps lock key is pressed.
When this indicator lights up, you can type capital letters without pressing the Shift key.
2. Num lock
Num lock indicator lights up when the combination of the Fn and Num lock key is pressed.
When this indicator lights up, you can use the embedded numeric keys.
The Num Lock indicator is off while an external keyboard is connected if OSD keyboard setup is configured not to
use embedded keypad with an external keyboard connection.
3. Wireless activity indicator
Wireless activity indicator indicates the following.
- Off: Wireless LAN is off.
- Blinking(3-4 Seconds): Searching for Access point for Wireless LAN Connection.
- On: Data is transferring with Wireless LAN is on.
4. AC Power
Power indicator lights up when the power cord is connected to the computer.
5. Power
Power status indicator indicates the following status of the computer.
- On: The computer is turned on.
- Off: The computer is turned off or is in hibernation mode.
- Blinking: The computer is in standby mode.
6. Battery
Battery status indicator indicates the following status of the battery. Power status indicator indicates the following
status of the computer.
- On: Battery is being charged.
- Off : Battery is being discharged or fully charged.
- Blinking : Battery is remaining less than 10%, or being discharged, or A battery error occurs.
The Battery indicator blinks as you have set the alarm action from the Battery miser 2005.
7. Drive in use
Drive in use indicator lights up when data is being written to or read from the hard disk or optical disk drive.
Содержание LE50
Страница 1: ...0 Service Manual LE50 LG Electronics ...
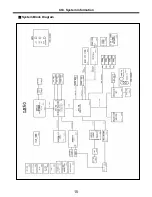
Страница 16: ...15 System Block Diagram Ch3 System information ...
Страница 40: ...39 3 Disconnect Antenna Connector then remove Wireless LAN Card Ch5 Removing and replacing a part ...
Страница 43: ...42 4 Remove Keyboard Ch5 Removing and replacing a part ...
Страница 45: ...44 3 Disconnect Retainer Connector 4 Remove Retainer Ch5 Removing and replacing a part ...
Страница 49: ...48 4 Remove 4 Screws 4 D4 3 X L5 0 1SZZBA4014C 1 Qty Specification FRU No No Ch5 Removing and replacing a part ...
Страница 54: ...53 Ch5 Removing and replacing a part 3 Remove dummy using a type screwdriver ...
Страница 59: ...58 Ch5 Removing and replacing a part ...
Страница 64: ...1 LE50 ...
Страница 75: ...12 LE50 ...
Страница 78: ...15 LE50 ...

