background image

System Setting

System Setting

20

S

ys

tem Se

tting

3

Settings

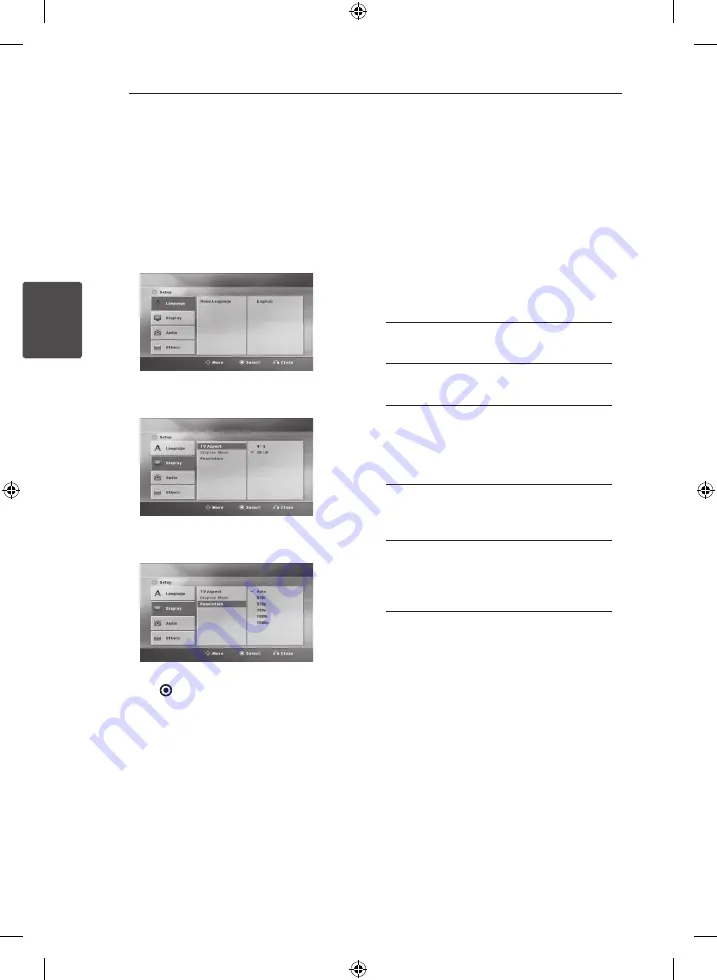
Adjusting the Setup Settings

You can change the settings of the unit in the 
[Setup] menu.
1. Press 

SETUP

.  

The [Setup] menu appears.

2.


Use 

W

/

S

 to select the first setup option, and 

press 

D

 to move to the second level.

3. Use 

W

/

S

 to select a second setup option, and 

press 

D

 to move to the third level.

4. Use 

W

/

S

 to select a desired setting, and press 

ENTER

 ( ) to confirm your selection.

[Language] Menu

Menu Language

Select a language for the [Setup] menu and on-
screen display.

[Display] Menu

TV Aspect

Select which screen aspect to use based on the 
shape of your TV screen.

[4:3]

Select when a standard 4:3 TV is connected.

[16:9]

Select when a 16:9 wide TV is connected.

Display Mode

The Display Mode setting works only when the TV 
Aspect mode is set to 4:3.

[Letterbox]

Displays a wide picture with bands on the 
upper and lower portions of the screen.

[Panscan]

Automatically displays the wide picture on 
the entire screen and cuts off the portions 
that do not fit.

NA7520P-FU_DZAFLLX_ENG.indd   20

2013-06-24     3:52:48

Содержание ARX8500

Страница 1: ...GH PERFORMANCE 3D A V RECEIVER SYSTEM Please read this manual carefully before operating your set and retain it for future reference ARX8500 ARX8500 S72P2 F S C W ENGLISH NA7520P FU_DZAFLLX_ENG indd 1 2013 06 24 3 52 31 ...

Страница 2: ...n of the product and to protect it from over heating The openings shall be never be blocked by placing the product on a bed sofa rug or other similar surface This product should not be placed in a built in installation such as a bookcase or rack unless proper ventilation is provided or the manufacturer s instruction has been adhered to CAUTION concerning the Power Cord Most appliances recommend th...

Страница 3: ...ing the pictures of these discs picture noise will appear This product incorporates copyright protection technology that is protected by U S patents and other intellectual property rights Use of this copyright protection technology must be authorized by Macrovision and is intended for home and other limited viewing uses only unless otherwise authorized by Macrovision Reverse engineering or disasse...

Страница 4: ...necting portable devices 3 System Setting 20 Settings 20 Adjusting the Setup Settings 20 Language Menu 20 Display Menu 21 Audio Menu 22 Others Menu 4 Operating 23 Basic operations 23 Selecting the input source 24 Adjusting the speaker levels 24 Enjoying various sound mode 26 Radio Operations 26 Listening to FM radio 26 Improving poor FM reception 26 Presetting the Radio Stations 26 Deleting the sa...

Страница 5: ...e of Contents 5 1 2 3 4 5 6 5 Troubleshooting 34 Troubleshooting 6 Appendix 35 Trademarks and licenses 35 Maintenance 35 Handling the unit 36 Specifications NA7520P FU_DZAFLLX_ENG indd 5 2013 06 24 3 52 33 ...

Страница 6: ... Used in this Manual Note Indicates special notes and operating features Caution Indicates cautions for preventing possible damages from abuse About the Symbol Display may appear on your TV display during operation and indicates that the function explained in this owner s manual is not available on that specific media A section whose title has one of the following symbols is applicable only to the...

Страница 7: ...cable y y Coaxial digital audio cable y y USB cable y y HDMI cable y y Portable cable 3 5 mm Stereo plug y y Turn off the power to all components before making any connections y y When connecting an audio video cable be sure to match the color coded pins to the appropriate jacks on the components yellow video to yellow white left audio to white and red right audio to red y y When connecting optica...

Страница 8: ...jack PORTABLE Selects the input source connected to PORT IN jack OPTICAL Selects the input source connected to OPTICAL IN 1 2 jack COAXIAL Selects the input source connected to COAXIAL IN 1 2 jack HDMI IN Selects the input source connected to HDMI IN 1 2 jack RADIO Selects the FM tuner USB Selects the input source connected to USB port CLEAR Deletes preset stations page 26 REPEAT Selects a play mo...

Страница 9: ...the sound BASS BLAST Selects the BASS BLAST sound mode directly page 25 d SETUP Displays or exits the SETUP menu RETURN x Moves backwards in the menu or exits the setup menu INFO DISPLAY Displays or exits On screen Display Page 30 31 32 ENTER Acknowledges menu selection MARKER Marks music files on the MUSIC menu page 29 PRESET Selects a preset stations TUNING Tunes in the desired radio station W S...

Страница 10: ...LAY PAUSE Starts playback Pauses playback press it again to exit pauses status Moves to the BASS mode if you press PLAY PAUSE on the front panel while the USER EQ is displayed in the display window STOP Stops playback USER EQ Sets the USER EQ mode BASS MIDDLE and TREBLE page 24 SOUND EFFECT Selects a sound effect mode page 25 BASS BLAST Selects the BASS BLAST sound mode directly page 25 I PORT IN ...

Страница 11: ...n optical digital audio output C Cooling fan D Power cord E HDMI IN 1 2 Connects the component with HDMI output F HDMI OUT TO TV G AV IN 1 VIDEO IN L AUDIO R Connects the components with analog audio video output jacks H OUTPUT VIDEO OUT L AUDIO R Connects the components with analog audio video input jacks I ANTENNA FM Connects the FM wired antenna Rear panel D A B C I F G H E NA7520P FU_DZAFLLX_E...

Страница 12: ... the screen surface as possible Center speaker Place the center speaker above or below the monitor or screen Rear speaker L R Place these speakers behind your listening position facing slightly inwards Subwoofer The position of the subwoofer is not so critical because low bass sounds are not highly directional But it is better to place the subwoofer near the front speakers Turn it slightly toward ...

Страница 13: ...er Orange Subwoofer Any front position Red Front Front right White Front Front left Grey Rear Rear right Blue Rear Rear left To connect the cable to the speakers press each plastic finger pad to open the connection terminals on the base of each speaker Insert the wire and release the finger pad y y Be careful to make sure children not to put their hands or any objects into the speaker duct Speaker...

Страница 14: ...dio and video signal over one cable you can enjoy them without additional audio cable TV HDMI cable HDMI cable DVD Blu ray disc player etc 1 Connect the HDMI IN 1 2 jack on AV Receiver System to your video device with HDMI OUT jack using HDMI cable 2 Connect the HDMI OUT TO TV jack on AV Receiver System to the HDMI IN jack on your TV 3 Set the input source to HDMI page 23 NA7520P FU_DZAFLLX_ENG in...

Страница 15: ...with non HDCP device y y This unit does not playback and TV screen is changed to black screen y y If there are noises or lines on the screen please check the HDMI cable length is generally limited to 4 5 m 15 ft y y Changing the resolution when the connection has already been established may result in malfunctions To solve the problem turn off the unit and then turn it on again y y When the HDMI c...

Страница 16: ... a composite video cable 2 Connect the left and right AUDIO IN jacks of AV Receiver System to the left and right AUDIO OUT jacks on your video device using an audio cables 3 Connect the VIDEO OUT jack on your AV Receiver System to the VIDEO IN jack on your TV 4 Set the input source to AV 1 page 23 When connecting an audio video cable be sure to match the color coded pins to the appropriate jacks o...

Страница 17: ...cal cable Coaxial cable DVD Blu ray disc player etc TV 1 Connect AV IN 1 COAXIAL 1 2 or OPTICAL 1 2 jack on AV Receiver System to your audio device s OUTPUT jack you want 2 Set the input source to AV IN 1 COAXIAL 1 2 or OPTICAL 1 2 you connect page 23 When connecting an audio video cable be sure to match the color coded pins to the appropriate jacks on the components yellow video to yellow white l...

Страница 18: ...ideo cable 2 Connect the left and right AUDIO IN jacks on the front of AV Receiver System to the audio left and right OUT jacks on your device using an audio cables 3 Connect the VIDEO OUT jack on the back panel of AV Receiver System to the VIDEO IN jack on your TV 4 Set the input source to AV 2 page 23 When connecting an audio video cable be sure to match the color coded pins to the appropriate j...

Страница 19: ...e FM wire antenna After connecting the FM wire antenna keep it horizontal Note Connecting portable devices 1 Connect the PORT IN jack on AV Receiver System to the head phone or LINE OUT jack on your portable device MP3 player etc using a portable cable 3 5 mm stereo plug Portable cable MP3 player etc 2 Set the input source to PORTABLE page 23 NA7520P FU_DZAFLLX_ENG indd 19 2013 06 24 3 52 48 ...

Страница 20: ... Language Menu Menu Language Select a language for the Setup menu and on screen display Display Menu TV Aspect Select which screen aspect to use based on the shape of your TV screen 4 3 Select when a standard 4 3 TV is connected 16 9 Select when a 16 9 wide TV is connected Display Mode The Display Mode setting works only when the TV Aspect mode is set to 4 3 Letterbox Displays a wide picture with ...

Страница 21: ...er Setup Make the following settings for the built in 5 2 channel surround speaker 1 Select Speaker Setup on the Audio menu 2 Press ENTER The SPEAKER menu appears 3 Use A D to select the desired speaker 4 Adjust options using W S A D buttons 5 After adjusting the desired options press RETURN x The menu moves to the previous screen Speaker Select a speaker that you want to adjust Certain speaker se...

Страница 22: ... sound Set DRC to On for this effect HD AV Sync Sometimes Digital TV encounters a delay between picture and sound If this happens you can compensate by setting a delay on the sound so that it effectively waits for the picture to arrive this is called HD AV Sync Use W S on the remote control to scroll up and down through the delay amount which you can set at anything between 0 ms and 300 ms This fu...

Страница 23: ...ted to OPTICAL IN 1 jack OPTICAL 1 Component connected to OPTICAL IN 2 jack OPTICAL 2 Component connected to COAXIAL IN 1 jack COAXIAL 1 Component connected to COAXIAL IN 2 jack COAXIAL 2 Component connected to HDMI IN 1 jack HDMI IN 1 Component connected to HDMI IN 2 jack HDMI IN 2 FM radio FM USB device connected to USB port USB By using the remote control 1 Press 1 on the remote control 2 Selec...

Страница 24: ...aker right 5 to 0 RR Rear speaker right 5 to 5 RL Rear speaker left 5 to 5 3 Repeat and adjust the sound level of the other speakers Enjoying various sound mode You can enjoy various sound mode For details refer to Setting the USER EQ Sound effect and Bass Blast Setting the USER EQ You can listen to music with desired sound effect by adjusting the BASS MIDDLE and TREBLE 1 Press USER EQ on the fron...

Страница 25: ...ves the treble sound BASS BLAST During playback reinforces the bass sound LOUDNESS Improves the bass and treble sound 3D SOUND 3D Sound features deliver sound creating a wider spot so you can enjoy more immersive and cinematic surround sound BYPASS You can enjoy the sound without equalizer effect y y In some of surround modes some speakers there s no sound or low sound It depends on the mode of su...

Страница 26: ... improve the reception Presetting the Radio Stations You can preset 50 stations for FM Before tuning make sure to turn down the volume 1 Tune in to a radio station 2 Press ENTER A preset number will blink in the display window 3 Press PRESET to select the preset number you want 4 Press ENTER The station is stored 5 Repeat steps 1 to 4 to store the other stations 6 To listen to a preset station pre...

Страница 27: ... by using A D and press ENTER To stop playback MUSIC MOVIE PHOTO Press Z during playback To pause playback MUSIC MOVIE Press M during playback Press d to resume playback To scan forward or backward MUSIC MOVIE Press c or v to play fast forward or fast reverse during playback You can change the various playback speeds by pressing c or v repeatedly Press d to return to normal speed To skip to the ne...

Страница 28: ...e extensions mp3 wma Compatible USB Devices y y MP3 Player Flash type MP3 player y y USB Flash Drive Devices that support USB 2 0 or USB 1 1 y y Some USB device may not work with this unit USB device requirement y y Devices which require additional program installation connected to a computer are not supported y y Do not extract the USB device while in operation y y For a large capacity USB it may...

Страница 29: ... to the USB menu RETURN x Playing your favorite music It enables you to listen to music by marking your favorite files 1 During playback select your favorite files by using W S 2 Press MARKER The indicator appears on the MUSIC menu 3 Repeat steps 1 2 4 Press d or ENTER The play mode is displayed on the MUSIC menu Mark Play Current Play 5 Select the desired play mode by using W S Mark Play Plays th...

Страница 30: ...ormal playback Playing a movie file You can play movie files contained in a USB device 1 Select Movie using A D on the USB menu 2 Select a file using W S A D and press d or ENTER to play the file Displaying content information on screen You can display and adjust various information and settings about the content 1 During playback press INFO DISPLAY to show various playback information a Title Cur...

Страница 31: ...o select desired code option 4 Press RETURN x to exit the On Screen display Movie file requirement Movie file compatibility with this unit is limited as follows y y Available resolution within 720 x 576 W x H pixels y y The file name of the DivX subtitle should be entered within 45 characters y y If there is impossible code to express in the DivX file it may be displayed as _ mark on the display y...

Страница 32: ...ess Z during slide show To pause a slide show Press M during slide show Press d or M to re start the slide show To skip to the next previous photo While viewing a photo in full screen press A or D to go to the previous or next photo Options while viewing a photo You can use various options while viewing a photo in full screen 1 While viewing a photo in full screen press INFO DISPLAY to display the...

Страница 33: ... device mode The screen saver appears when you leave the unit in Stop mode for about five minutes Using the Sleep Timer You can set the unit to turn off automatically at a specified time Press SLEEP repeatedly The indicator changes cyclically in the display window as follows SLEEP 180 150 120 90 80 70 60 50 40 30 20 10 Off No display To check the remaining time press SLEEP The remaining time appea...

Страница 34: ... Sleep function is activated Press DIMMER or SLEEP to cancel the function Radio stations cannot be tuned in properly y y The antenna is positioned poorly Adjust its position y y The signal strength of the radio station is too weak Tune to the station manually y y No stations have been preset or preset stations have been cleared when tuning by scanning preset channels Preset some radio stations see...

Страница 35: ...on and packing materials If you need to ship the unit for maximum protection re pack the unit as it was originally packed at the factory Keeping the exterior surfaces clean y y Do not use volatile liquids such as insecticide spray near the unit y y Wiping with strong pressure may damage the surface y y Do not leave rubber or plastic products in contact with the unit for a long period of time Clean...

Страница 36: ...ync negative RCA jack x 2 OPTICAL IN 3 0 Vrms p p Optical jack x 2 COAXIAL IN 3 0 Vrms p p Coaxial jack x 2 PORT IN 0 5Vrms 3 5 mm stereo jack x 1 HDMI IN OUT 19 pin Type A HDMI connector x 2 AUDIO OUT 2 0 Vrms 1 kHz 0 dB 600 Ω RCA jack L R x 1 VIDEO OUT 1 0 Vrms p p 75 Ω sync negative RCA jack x 1 Tuner FM Tuning Range 87 5 to 108 0 MHz or 87 50 to 108 00 MHz Amplifier Stereo mode 170 W 170 W 4 Ω...

Страница 37: ...imensions WxHxD 546 x 185 x 238 mm Net Weight 1EA 4 9 kg Rear speakers Type 1 Way 1 Speaker Impedance 4 Ω Rated Input Power 170 W Max Input Power 340 W Net Dimensions WxHxD 273 x 185 x 228 mm Net Weight 1EA 2 3 kg Subwoofer Type 1 Way 1 Speaker Impedance 3 Ω Rated Input Power 200 W Max Input Power 400 W Net Dimensions WxHxD 273 x 390 x 364 mm Net Weight 1EA 7 4 kg Designs and specifications are su...

Страница 38: ...NA7520P FU_DZAFLLX_ENG indd 38 2013 06 24 3 52 52 ...

Отзывы: