background image


30


Attach cables

A parallel port requires an IEEE-1284 compliant parallel 
cable such as Lexmark part number 1329605 (3 m [10 ft]), or 
1427498 (6 m [20 ft]).

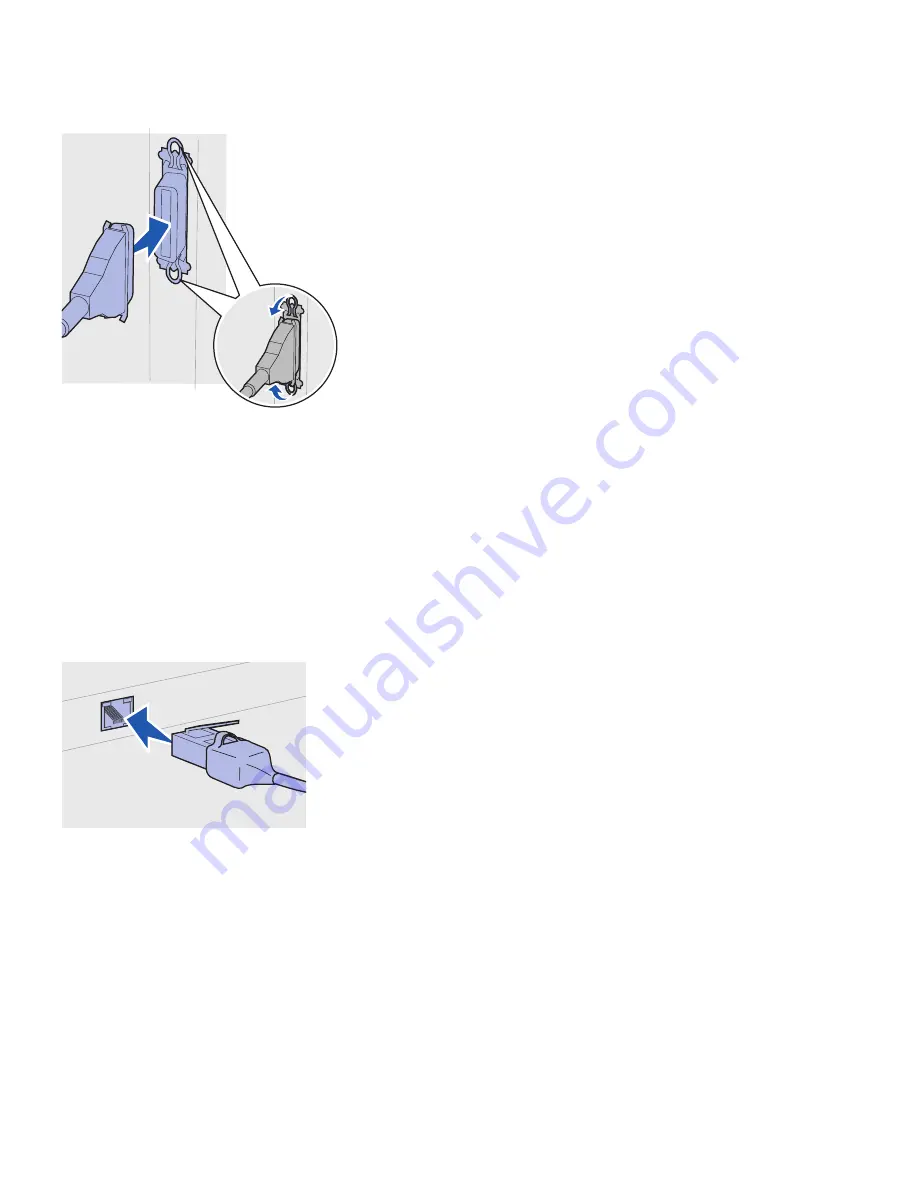
Attaching a 
network cable

You can attach your printer to a network using standard network 
cables.

Ethernet

A 10BaseT/100BaseTx Fast Ethernet port is standard on the network 
model.

To attach the printer to a network:

1

Make sure the printer is turned off and unplugged.

2

Plug one end of the standard network cable into a LAN drop or 
hub and the other end into the Ethernet port on the back of the 
printer. The printer automatically adjusts for the network speed.

Use Category 5 cable with an RJ-45 
connector for the standard network port.

Содержание T 430

Страница 1: ...e March 2004 Lexmark and Lexmark with diamond design are trademarks of Lexmark International Inc registered in the United States and or other countries 2004 Lexmark International Inc 740 West New Circle Road Lexington Kentucky 40550 ...

Страница 2: ......

Страница 3: ...English Setup Guide ...

Страница 4: ...e compatible with the PostScript 3 language This means the printer recognizes PostScript 3 commands used in various application programs and that the printer emulates the functions corresponding to the commands Other trademarks are the property of their respective owners 2004 Lexmark International Inc All rights reserved UNITED STATES GOVERNMENT RIGHTS This software and any accompanying documentat...

Страница 5: ...er 1 Step 2 Install drivers for local printing 2 Windows 2 Macintosh 4 UNIX Linux 7 Step 3 Unpack the printer 8 Step 4 Set up the printer and options 9 Positioning the optional drawer 9 Positioning the printer 11 Raising the paper rest 12 Attaching an operator panel overlay 12 Step 5 Install the print cartridge 13 Removing the packaging 13 Installing the print cartridge 15 ...

Страница 6: ...feeder 26 Step 8 Attach cables 29 Attaching a local cable 29 Attaching a network cable 30 Attaching the power cord 31 Step 9 Verify printer setup 32 Printing a menu settings page 33 Printing a network setup page 33 Printing a local test page 34 Printing Quick Reference information 34 Step 10 Configure for TCP IP 35 Assigning a printer IP address 35 Verifying the IP settings 36 Step 11 Install driv...

Страница 7: ...v Contents Step 12 Using the publications CD 47 Viewing the CD contents 47 Distributing the information 47 ...

Страница 8: ... sheet drawer 3 Optional 500 sheet drawer The printer can support up to 256MB of additional printer memory and up to 32MB of flash memory Lexmark T430d Lexmark T430dn Standard memory 32MB 64MB Resolution Up to 1200 dpi Paper inputs One 250 sheet tray Duplex capabilities Yes internal duplex unit Connectivity USB Parallel USB Parallel 10 100 Base TX Ethernet 1 2 3 ...

Страница 9: ...t bin 7 Power button 8 Handhold 9 Rear output bin The printer also has an internal duplex unit The operator panel has a 2 line by 16 character liquid crystal display LCD five buttons and one indicator light that flashes when the printer is processing a job indicated by the Busy message 6 8 3 5 1 4 2 9 7 Go 5 Stop 6 Return 4 1 Menu 2 Select 3 ...

Страница 10: ...ww lexmark com publications Quick Reference card The printer Quick Reference provides easy access to information about loading print media understanding common printer messages and clearing jams Quick Reference pages Quick Reference pages are stored inside the printer They provide information about loading print media printing confidential jobs and clearing jams from the printer Drivers CD The dri...

Страница 11: ...you are attaching a local printer you must install the printer driver on your computer before setting up your printer Continue with Step 2 Install drivers for local printing on page 2 Network printer A network printer is a printer attached to a network either by a network cable such as Ethernet or through the use of a server If you are attaching a network printer you must set up your printer on th...

Страница 12: ...ur printer This may mean that installation will seem automatic in later versions of Windows System printer drivers work well for simple printing but they contain less functionality than our enhanced custom printer driver Note Installing a custom driver will not replace the system driver A separate printer object will be created and appear in the Printers folder Use the drivers CD that shipped with...

Страница 13: ...drivers on your computer 3 Click Printer and Software 4 Click Agree to accept the license agreement 5 Select Suggested and then click Next The Suggested option is the default installation for local and network attached setup If you need to install utilities change settings or customize device drivers select Custom and follow the instructions on your screen 6 Select Local Attached and then click Fi...

Страница 14: ...location of the custom printer driver on the drivers CD The path should be similar to the following X Drivers Print Win_9xMe language Where X the letter of your CD ROM drive For example D Drivers Print Win_9xMe English 7 Click OK Macintosh Macintosh OS 8 6 or later is required for USB printing To print locally to a USB attached printer you must create a desktop printer icon Macintosh 8 6 9 x or cr...

Страница 15: ...9 0 Open Apple LaserWriter Macintosh 9 1 9 x Open Applications and then click Utilities 3 Double click Desktop Printer Utility 4 Select Printer USB and then click OK 5 In the USB Printer Selection section click Change If your printer does not appear in the USB Printer Selection list make sure the USB cable is properly connected and the printer is turned on 6 Select the name of your printer and the...

Страница 16: ...k Continue h On the Easy Install screen click Install All the necessary files are installed on your computer i Click Close when installation is complete 2 Open Finder click Applications and then click Utilities 3 Double click Print Center Note A PPD for your printer is also available in a downloadable software package on our Lexmark Web site at www lexmark com 4 Do one of the following If your USB...

Страница 17: ...d instructions for installing and using Lexmark printers in UNIX and Linux environments All the printer driver packages support local printing using a parallel connection The driver package for Sun Solaris supports USB connections to Sun Ray appliances and Sun workstations Visit our Lexmark Web site at www lexmark com for a complete list of supported UNIX and Linux platforms What do I do next Task...

Страница 18: ...flow and temperature extremes Remove all items from the box Make sure you have the following items 1 Printer with One 250 sheet tray Print cartridge shipped inside printer wrapped in packaging 2 Power cord 3 Operator panel overlay non English only 4 Setup Guide with a publications CD and Quick Reference card 5 Drivers CD If any items are missing or damaged contact the Lexmark Customer Support Cent...

Страница 19: ...here is an optional 250 sheet drawer and an optional 500 sheet drawer Each optional drawer consists of a support unit and a tray The printer can be set up in the following configurations 1 Base printer 2 One 250 sheet drawer 3 One 500 sheet drawer 4 Two 250 sheet drawers 5 One 250 sheet drawer and one 500 sheet drawer the 500 sheet drawer must be on the bottom of the stack Note The printer does no...

Страница 20: ... and tape from the support unit 2 Pull the tray out of the support unit Remove any packing material and tape from the tray 3 Grasp the support unit on each side at opposite corners and move it to the location selected for the printer 4 Reinstall the tray Push it fully into the support unit ...

Страница 21: ...l memory to install leave clearance on the left side of the printer Lift the printer by the recessed handholds on both sides and place it on the table or optional drawer To position the printer on an optional drawer 1 Align the tabs slots and connector on the drawer with the underside of the printer 2 Lower the printer into place Make sure it is seated securely on the drawer Slot Tab Connector Han...

Страница 22: ...nglish is not your preferred language and your printer shipped with an operator panel overlay attach the overlay with translated text 1 Open the upper front door 2 Remove the clear plastic cover from the operator panel as shown 3 Close the upper front door 4 Remove the existing plastic overlay 5 Align the holes in the new overlay with the lights and buttons on the operator panel and then set the o...

Страница 23: ...13 Install the print cartridge Step 5 Install the print cartridge Removing the packaging 1 Open the upper front door 2 Grasp the print cartridge by the handle and lift it out Handle ...

Страница 24: ...14 Install the print cartridge 3 Remove the packaging material Keep the packaging material Warning Do not touch the photoconductor drum on the bottom of the print cartridge ...

Страница 25: ...2 Install the print cartridge a Grasp the print cartridge by the handle b Align the tabs on each side of the cartridge with the slots on each side of the printer c Slide the cartridge into the printer until it snaps into place 3 Close the upper front door Make sure the door snaps closed on both sides or the printer will not function properly Slots ...

Страница 26: ...emory or firmware card sometime after setting up the printer turn the printer off and unplug the power cord before continuing The system board has one printer memory connector and two firmware card connectors Note You need a small Phillips screwdriver to remove the system board shield The instructions in this section help you install Printer memory cards Firmware cards Additional functionality Int...

Страница 27: ...he side cover and shield 1 Open the upper front door and the multipurpose feeder door 2 Firmly press on the two tabs simultaneously to free them from their slots 3 Slide the side cover off of the back of the printer as you swing it out to remove it Tab Tab ...

Страница 28: ...ory or firmware cards 4 Loosen the five screws Do not remove them completely 5 Slide the shield to the left until the screws fit into the keyholes on the cover 6 Pull the shield straight out and set it aside Screw in keyhole ...

Страница 29: ...s along the edge of the card Save the packaging 2 Push open the latches on both sides of the memory connector 3 Align the notches on the card with the notches on the connector 4 Push the memory card firmly into the connector until the latches on both ends of the connector snap into place It may require some force to fully seat the card Make sure each latch fits over the notch on the end of the car...

Страница 30: ...sh memory cards are easily damaged by static electricity Touch something metal on the printer before you touch a card 1 Unpack the card Avoid touching the metal pins on the bottom of the card 2 Holding the card by its sides align the pins on the card with the holes on the system board 3 Push the card firmly into place The entire length of the connector on the flash card must touch and be flush aga...

Страница 31: ...m board 2 Press the shield against the system board and then slide the shield to the right 3 Tighten the five screws 4 Align the three rear tabs on the side cover with the corresponding slots on the printer 5 Guide the tabs on the top bottom and front of the cover into their corresponding slots The top and front tabs snap into place 6 Close the upper front door and the multipurpose feeder door Mak...

Страница 32: ...apacity Sizes supported Types supported Go to page Tray 1 250 A4 A5 JIS B5 folio letter legal executive statement Paper transparencies 23 Optional 250 sheet tray 250 A4 A5 JIS B5 folio letter legal executive statement Paper only 23 Optional 500 sheet tray 500 A4 JIS B5 folio letter legal executive Paper only 23 Multipurpose feeder 100 A4 A5 JIS B5 folio letter legal executive statement Universal P...

Страница 33: ...you change the Paper Type and Paper Size settings for that tray from the driver Refer to the publications CD for more information 1 Remove the tray Note The length guide on an optional 500 sheet tray is shaped differently than the length guide on the other trays but the function is the same 2 If you are loading an optional 500 sheet tray open the cover Cover Length guide Optional 500 sheet tray ...

Страница 34: ...h guide tab and the width guide together and then slide the guide all the way to the right 5 Squeeze the length guide tab and the length guide together and then fully extend the guide 6 Flex the sheets back and forth to loosen them and then fan them Do not fold or crease the print media Straighten the edges of the stack on a level surface Length guide tab Width guide tab ...

Страница 35: ...acing the front of the tray Do not load bent or wrinkled print media 8 Tuck the corner of the print media under the metal stop 9 Squeeze the width guide tab and the width guide together and then slide the guide to the edge of the print media 10 Squeeze the length guide tab and the length guide together and then slide the guide to the edge of the print media Metal stop Stack height indicator ...

Страница 36: ...se feeder in two ways Tray As a tray you can load print media in the feeder with the intention of leaving it there Manual feeder As a manual feeder you send a print job to the printer while specifying the type and size of media from your computer The printer then prompts you to load the appropriate print media before it prints Use the following instructions to load the multipurpose feeder ...

Страница 37: ...Pull out the extension 3 Unfold the extension 4 Slide the width guide all the way to the right 5 Flex the sheets back and forth to loosen them and then fan them Do not fold or crease the print media Straighten the edges of the stack on a level surface Finger grip ...

Страница 38: ...ose feeder with the print side up and facing into the multipurpose feeder 7 Push the print media forward but do not force it 8 Slide the width guide until it lightly touches the stack of print media Refer to the publications CD for additional information on loading different types of media such as letterhead transparencies card stock and envelopes Stack height limiter ...

Страница 39: ... models Windows 98 SE Windows Me Windows 2000 and Windows XP operating systems support USB connections Some UNIX Linux and Macintosh computers also support USB connections Refer to your computer operating system documentation to see if your system supports USB To attach the printer to a computer 1 Make sure the printer is turned off and unplugged 2 Connect the printer to the computer using a USB o...

Страница 40: ...ables Ethernet A 10BaseT 100BaseTx Fast Ethernet port is standard on the network model To attach the printer to a network 1 Make sure the printer is turned off and unplugged 2 Plug one end of the standard network cable into a LAN drop or hub and the other end into the Ethernet port on the back of the printer The printer automatically adjusts for the network speed Use Category 5 cable with an RJ 45...

Страница 41: ... tests the Ready message indicates that the printer is ready to receive jobs If you see a message other than Ready on the display follow these steps to clear the message a Launch the publications CD b Select your language c Click Printing d Click Understanding printer messages and then follow the instructions on your screen 3 Make sure your computer and any other peripherals are turned on 4 Contin...

Страница 42: ...our installation For help printing the menu settings page see page 33 The network setup page provides information that is needed if you are attaching your printer to a network For help printing the network setup page see page 33 If you set up your printer as a local printer step 2 on page 2 this is a good time to verify that your computer and printer are communicating properly For help printing a ...

Страница 43: ... memory installed is correctly listed under Printer Information 6 Verify that the paper trays are configured for the sizes and types of paper you loaded Printing a network setup page If the printer is attached to a network print a network setup page to verify the network connection This page also provides important information that helps you configure for network printing 1 Make sure the printer i...

Страница 44: ...ation Information about using the printer and clearing jams is included on the publications CD that shipped with your printer documentation We recommend you print this information and store it in a convenient location near the printer To print Quick Reference information stored on the CD 1 Launch the CD 2 Click Quick Reference 3 Print the documents The same Quick Reference pages are stored in the ...

Страница 45: ...Printing a network setup page on page 33 2 Go to Verifying the IP settings on page 36 and begin with step 2 If your network is not using DHCP then you must manually assign an IP address to the printer An easy way to do this is to use the printer operator panel 1 Press Menu until you see NETWORK MENU and then press Select 2 Press Menu until you see Standard Network and then press Select 3 Press Men...

Страница 46: ...ngs 1 Print another network setup page Look under the TCP IP heading and make sure the IP address netmask and gateway are what you expected See Printing a network setup page on page 33 if you need help Note To display a command prompt on a Windows computer click Start Æ Programs Æ Command prompt or Accessories Æ Command prompt if using Windows 2000 2 Ping the printer and verify that it responds Fo...

Страница 47: ...m printer driver System drivers are built into Windows operating systems Custom drivers are available on the drivers CD Updated system and custom drivers are available on our Lexmark Web site at www lexmark com Note Installing a custom driver will not replace the system driver A separate printer object will be created and appear in the Printers folder For basic printer functionality you can instal...

Страница 48: ...n 6 Select Network Attached and then click Next 7 If prompted select the printer you are setting up and then click Next Note The port may be identified by a printer ID host name or by the IP address of the printer 8 Select the port you want to use and then click Finish Printing configuration Operating system Go to page Direct Printer is connected directly to the network using a network cable such ...

Страница 49: ...tom printer driver 1 Turn on your computer 2 Click Start Æ Settings Æ Printers and then double click Add Printer 3 When prompted select Network printer 4 Enter the network path or name of your network printer 5 Select the manufacturer and model of your printer and then click Have Disk 6 Insert the drivers CD If the CD launches automatically click Exit to return to the Add Printer Wizard 7 Specify ...

Страница 50: ...nse agreement 5 Select Suggested and then click Next 6 Select Local Attached and then click Finish 7 Select the port you are using to connect the printer to the computer and then click Next 8 Click Done 9 Print a test page to verify printer installation Step 2 Share the printer on the network 1 Click Start Æ Settings Æ Printers 2 Select the printer you just created 3 Click File Æ Sharing 4 Check t...

Страница 51: ...click Network Neighborhood 2 Locate the host name of the server computer and then double click the host name 3 Right click the shared printer name and then click Install 4 Wait a few minutes for the driver information to be copied from the server computer to the client computer and for a new printer object to be added to the Printers folder The time this takes varies based on network traffic and o...

Страница 52: ...computers A PostScript Printer Description PPD file must be installed on each computer used to print to a network printer In addition the computer must also have either a desktop printer Mac OS 8 6 to 9 x or a print queue in Print Center Mac OS X A print queue can be created either through AppleTalk or IP Printing Follow the instructions for your operating system to install a PPD file and create a...

Страница 53: ...he desktop printer icon you just created b Choose Printing Æ Change Setup If the PPD file displayed in the PostScript Printer Description PPD file portion of the menu is correct for your printer then printer setup is complete If the PPD file displayed in the PostScript Printer Description PPD file portion of the menu is not correct for your printer repeat Step 1 Install a custom PPD file on page 4...

Страница 54: ...der click Applications and then click Utilities 2 Double click Print Center 3 Choose Add Printer from the Printers menu 4 Choose AppleTalk from the pop up menu Note If you don t know which zone or printer to select look on the network setup page under the AppleTalk heading 5 Select the AppleTalk zone from the list 6 Select the new printer from the list and then click Add 7 Verify printer installat...

Страница 55: ...inter s Address box 6 Choose Lexmark from the Printer Model pop up menu 7 Select the new printer from the list and then click Add 8 Verify printer installation a Open Finder click Applications and then click TextEdit b Choose Print from the File menu c Choose Summary from the Print Panel menu d Do one of the following If the PPD file displayed in the Summary window is correct for your printer then...

Страница 56: ...printer driver package for each supported UNIX and Linux platform The User s Guide in each package gives detailed instructions for installing and using Lexmark printers in UNIX and Linux environments You can download these packages from our Lexmark Web site You may also find the driver package you need on the drivers CD NetWare Your printer supports both Novell Distributed Print Services NDPS and ...

Страница 57: ...placing supplies Solutions to common printing problems Methods for clearing paper jams Overview of printer menus Explanation of printer messages Distributing the information You can give users access to the information on the publications CD in several ways Give the publications CD to a system administrator or the Help desk Copy the entire contents of the CD or just specific topics to a shared net...

Страница 58: ...48 Using the publications CD Congratulations You are now ready to use your new printer Save this book if you anticipate purchasing printer options in the future ...

Отзывы: