background image

31

6

Reinstall the tray.

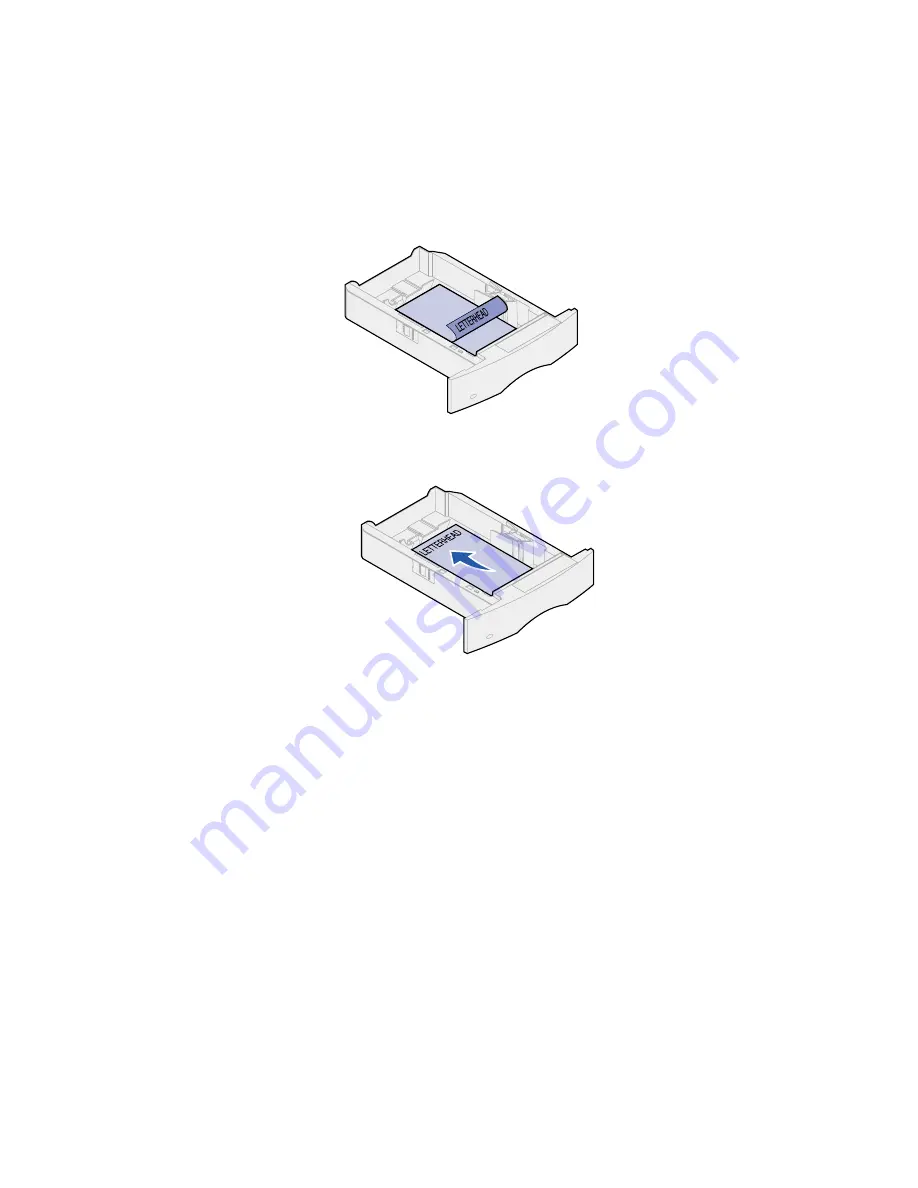
Loading letterhead 

For simplex (single-sided) printing on letterhead, place the printed side face down as shown.

For duplex printing on letterhead, place the printed side face up as shown.

Note: The Paper Loading menu item lets you print simplex (single-sided) jobs on 

letterhead (or other preprinted media) that has been loaded specifically for duplex 
printing
. See 

Paper Loading

 for more information.

Содержание Optra T522

Страница 1: ...www lexmark com User s Reference May 2001 Lexmark T522 ...

Страница 2: ......

Страница 3: ...d deleting held jobs 12 Accessing held jobs from the operator panel 13 Recognizing when format errors occur 13 Repeat Print 14 Reserve Print 14 Verify Print 14 Confidential jobs 14 Chapter 4 Canceling a print job 16 Chapter 5 Printing folio and statement size paper 17 Chapter 6 Choosing print material 18 Paper characteristics 18 Weight 18 Curl 19 Smoothness 19 Moisture content 19 Grain direction 1...

Страница 4: ...Capacity 32 Paper dimensions 32 Trouble free printing 32 Loading paper and transparencies 36 Loading envelopes 36 Loading letterhead 37 Closing the multipurpose feeder 39 Chapter 11 Loading the envelope feeder 40 Chapter 12 Loading the 2000 sheet drawer 44 Chapter 13 Storing paper 45 Chapter 14 Tray linking 46 Chapter 15 Tips for avoiding paper jams 47 Chapter 16 Replacing the print cartridge 48 C...

Страница 5: ...e 59 202 Paper Jam Open Rear Door 60 Before reaching the output bin 61 While exiting to the output bin 62 230 Paper Jam Check Duplex 63 24x Paper Jam Check Tray x 66 On the incline surface of a tray or between two trays 66 Between three trays 67 Between a tray the duplex unit and the integrated tray 68 In the 2000 sheet drawer 70 250 Paper Jam Check MP Feeder 71 260 Paper Jam Check Env Feeder 71 A...

Страница 6: ...r 33 Finishing Menu 119 Chapter 34 Infrared Menu 125 Chapter 35 Job Menu 130 Chapter 36 LocalTalk Menu 133 Chapter 37 Network Menu 137 Chapter 38 Paper Menu 141 Chapter 39 PCL Emul Menu 149 Chapter 40 Parallel Menu 154 Chapter 41 PostScript Menu 159 Chapter 42 Quality Menu 160 Chapter 43 Serial Menu 162 Chapter 44 Setup Menu 168 Chapter 45 Utilities Menu 174 Chapter 46 USB Menu 178 Chapter 47 Disa...

Страница 7: ...191 Resident fonts 192 Symbol sets 197 Symbol sets for PCL 6 emulation 197 Downloadable fonts 198 Printing a font sample list 198 Chapter 54 Printer specifications 199 Dimensions 199 Duty cycle 199 Notices 200 Edition notice 201 Trademarks 201 Licensing notice 202 Safety information 203 Cautions and warnings 203 Electronic emission notices 203 With a network cable attached 203 Without a network ca...

Страница 8: ...vi ...

Страница 9: ...printer it may look more like the fully configured model For information on other possible configurations refer to the Setup Guide Standard output bin Operator panel Tray 1 integrated tray Tray 5 2000 sheet drawer Optional envelope feeder Tray 2 Tray 3 Optional duplex unit Tray 4 Standard network model configuration Fully configured Multipurpose feeder Tray 1 integrated tray ...

Страница 10: ...inter operator panel If you cannot change a setting from your application use the printer operator panel or the remote operator panel available from MarkVision Changing a printer setting from the printer operator panel or from MarkVision makes that setting the user default Understanding the operator panel The printer operator panel has a 2 line by 16 character liquid crystal display LCD five butto...

Страница 11: ... a function Press Menu When Ready is displayed to take the printer offline out of the Ready state and scroll through the menus When Busy is displa yed to take the printer to the Job Menu When the printer is offline press Menu to scroll through the menus Press Menu to go to the previous item in the menus For menu items with numeric values such as Copies press and hold Menu to scroll through the val...

Страница 12: ...e selection is a menu item the default setting for the menu item appears The current user default setting has an asterisk beside it Each menu item has a list of values for the menu item A value can be A phrase or word to describe a setting A numerical value that can be changed An On or Off setting 4 Press Menu to move to the value you need 5 Press Select to select the value on the second line of t...

Страница 13: ...he Factory Defaults menu item in the Utilities Menu See Utilities Menu for more information When you select a new setting from the operator panel the asterisk moves next to the selected setting to identify it as the current user default User defaults are the settings you select for different printer functions and store in printer memory Once stored these settings remain active until new ones are s...

Страница 14: ...re stored in printer memory you can use the printer operator panel to specify what you want to do with one or more of the jobs You can select either Confidential Job or Held Jobs Repeat Print Reserve Print and Verify Print jobs from the Job Menu If you select Confidential Job you must enter the personal identification number PIN you specified in the driver when you sent the job See Confidential jo...

Страница 15: ...Select when the correct job is displayed An asterisk appears next to the job name indicating you have chosen to print or delete that job If you are prompted to enter the number of copies you want to print use the Menu button to increase or decrease the number on the display and then press Select 8 Press Go to print or delete specific jobs you have marked The printer briefly shows messages indicati...

Страница 16: ...ify Print job the printer prints one copy and holds the remaining copies you requested from the driver in printer memory Use Verify Print to examine the first copy to see if it is satisfactory before printing the remaining copies See Printing and deleting held jobs if you need help printing the additional copies stored in memory Note Once all copies are printed the Verify Print job is deleted from...

Страница 17: ... to reenter the PIN or press Stop to exit the Confidential Job menu When you enter a valid PIN you have access to all print jobs matching the user name and PIN you entered The print jobs matching the PIN you entered appear on the display when you enter the Print A Job Delete A Job and Print Copies menu items You can then choose to print or delete jobs matching the PIN you entered See Printing and ...

Страница 18: ...isplay and Cancel Job appears on the second line Note Job Menu is the only available menu item when the printer is in the Busy state 2 Press Select Canceling Job briefly appears in the display The printer finishes printing any page already being printed and then stops The printer returns to the Ready state ...

Страница 19: ...he display 4 Press Menu to select the input option that will hold the folio or statement size paper and then press Select The first line of the display shows the selected input option and the second line shows the current setting 5 Press Menu to change the setting to Off and then press Select SAVED appears briefly on the display and then is replaced by Config Menu on the first line and Size Sensin...

Страница 20: ...u keep these guidelines in mind when evaluating new paper stock For detailed information refer to the Card Stock Label Guide located on the Lexmark Web site at www lexmark com Weight The printer can automatically feed paper weights from 60 to 176 g m2 16 to 47 lb bond grain long Paper lighter than 60 g m2 16 lb might not be stiff enough to feed properly causing paper jams For best performance use ...

Страница 21: ... 47 lb bond paper grain long fibers are recommended For papers heavier than 176 g m2 47 lb bond grain short is preferred For the multipurpose feeder 60 to 135 g m2 16 to 36 lb bond paper grain long fibers are recommended For the multipurpose feeder papers heavier than 135 g m2 36 lb bond grain short is preferred Fiber content Most high quality xerographic paper is made from 100 chemically pulped w...

Страница 22: ...ning more than 25 post consumer waste that do not meet DIN 19 309 Choosing preprinted forms and letterhead Use the following guidelines when selecting preprinted forms and letterhead paper for the printer Use grain long papers for best results Use only forms and letterhead printed using an offset lithographic or engraved printing process Choose papers that absorb ink but do not bleed Avoid papers ...

Страница 23: ...uble free printing To help avoid paper jams or poor print quality Always use new undamaged paper Before loading paper you need to know the recommended print side of the paper you re using This information is usually indicated on the paper package Do not use paper that you have cut or trimmed yourself Do not mix paper sizes weights or types in the same paper source mixing results in paper jams Do n...

Страница 24: ...u can use up to 105 g m2 28 lb bond weight for the multipurpose feeder or 105 g m2 28 lb bond weight for the envelope feeder as long as the cotton content is 25 or less Envelopes with 100 cotton content must not exceed 90 g m2 24 lb bond weight To minimize jams do not use envelopes that Have excessive curl or twist Are stuck together or damaged in any way Contain windows holes perforations cutouts...

Страница 25: ...the Card Stock Label Guide available on the Lexmark Web site at www lexmark com Choosing card stock Card stock is single ply and has many properties The orientation of paper fibers moisture content thickness and texture can all affect printing on card stock See Print material specifications for information on the preferred weight for the grain direction of print materials When printing on card sto...

Страница 26: ...th laser printers that heat transparencies to 212 C 414 F Use only transparencies that are able to withstand these temperatures without melting discoloring offsetting or releasing hazardous emissions For detailed information refer to the Card Stock Label Guide which is available on the Lexmark Web site at www lexmark com Transparencies can be fed automatically from the multipurpose feeder and all ...

Страница 27: ...onal 500 UAT Multipurpose tray Optional 2000 sheet drawer Optional envelope feeder Optional duplex unit A4 210 x 297 mm 8 27 x 11 7 in A5 148 x 210 mm 5 83 x 8 27 in JIS B5 182 x 257 mm 7 17 x 10 1 in Letter 215 9 x 279 3 mm 8 5 x 11 in Legal 215 9 x 355 6 mm 8 5 x 14 in Executive 184 2 x 266 7 mm 7 25 x 10 5 in Folio2 216 x 330 mm 8 5 x 13 in Statement2 139 7 x 215 9 mm 5 5 x 8 5 in 1 This defaul...

Страница 28: ...5 Envelope 176 x 250 mm 6 93 x 9 84 in Other Envelope1 98 4 x 162 mm to 176 x 250 mm 3 87 x 6 38 in to 6 93 x 9 84 in Paper size Dimensions 250 sheet drawer 250 UAT Optional 500 sheet drawer Optional 500 UAT Multipurpose tray Optional 2000 sheet drawer Optional envelope feeder Optional duplex unit 1 This default setting is 215 9 x 355 6 mm 8 5 x 14 in You can set the actual page size from your app...

Страница 29: ...nal 250 sheet drawer Envelope feeder Paper Xerographic or business paper 60 to 176 g m2 grain long 16 to 47 lb bond 60 to 135 g m2 grain long 16 to 36 lb bond N A Card stock maximum grain long 1 Index Bristol 163 g m2 90 lb 120 g m2 67 lb N A Tag 163 g m2 100 lb 120 g m2 74 lb N A Cover 176 g m2 65 lb 135 g m2 50 lb N A Card stock maximum grain short 1 Index Bristol 199 g m2 110 lb 163 g m2 90 lb ...

Страница 30: ... to 36 lb bond N A Envelopes 100 cotton content maximum weight 24 lb Sulfite wood free or up to 100 cotton bonds N A 60 to 105 g m2 16 to 28 lb bond 3 4 75 to 90 g m2 20 to 24 lb bond Print material Type Print material weight Integrated tray and optional 500 sheet drawer Multipurpose feeder and optional 250 sheet drawer Envelope feeder 1 Grain short is preferred for papers over 176 g m2 2 Printing...

Страница 31: ...nd ensure trouble free printing Before loading paper you need to know the recommended print side of the paper you re using This information is usually indicated on the paper package Click below for information on loading a particular option Loading a paper tray Loading the multipurpose feeder Loading the envelope feeder Loading the 2000 sheet drawer ...

Страница 32: ...length guide to the correct position for the size paper you are loading 4 Place the paper into the paper tray with the recommended print side face down for single sided printing and face up for double sided printing Do not fill paper above the stack height mark 5 Pull the width guide tab and slide the width guide to the left until it lightly rests against the edge of the paper stack Pull here Leng...

Страница 33: ...ed side face down as shown For duplex printing on letterhead place the printed side face up as shown Note The Paper Loading menu item lets you print simplex single sided jobs on letterhead or other preprinted media that has been loaded specifically for duplex printing See Paper Loading for more information ...

Страница 34: ...imensions Width 69 85 mm 2 75 in to 229 mm 9 01 in Length 127 mm 5 in to 355 6 mm 14 in Trouble free printing Load only one size of paper or envelopes at a time in the multipurpose feeder To achieve the best possible print quality use only high quality print media that is designed for use in laser printers For more guidelines on paper see Choosing print material To prevent paper jams do not add or...

Страница 35: ...load the multipurpose feeder with paper how to turn an envelope for printing and how to load letterhead paper for simplex and duplex printing See Loading letterhead for detailed instructions on loading documents loaded on letterhead Note The Paper Loading menu item in the Paper Menu lets you print simplex single sided jobs on letterhead or other preprinted media that has been loaded specifically f...

Страница 36: ...ose feeder far enough to accommodate the paper you will be using 3 Slide the paper width guide to the far right 4 Prepare the print material for loading Flex paper or fan envelopes back and forth Do not fold or crease the paper Straighten the edges on a level surface ...

Страница 37: ...ch or leave fingerprints on the transparencies 5 Use the stack height limiter as a guide for stack height when loading print materials 6 Load one type of print material in the multipurpose feeder Do not mix types Click a topic for loading instructions Loading paper and transparencies Loading envelopes Loading letterhead Stack height limiter ...

Страница 38: ...s flap side down with the stamp area and flap on the left side The end of the envelope with the stamp area enters the multipurpose feeder first WARNING Never use envelopes with stamps clasps snaps windows coated linings or self stick adhesives These envelopes may severely damage the printer b Continue with step 7 Note If envelopes jam while printing try reducing the number of envelopes in the mult...

Страница 39: ...ex unit a Load letterhead paper for single sided printing with the logo face up The end of the sheet with the logo should enter the printer first b Continue with step 7 With a duplex unit a Load letterhead paper for duplex printing with the logo face down The end of the sheet with the logo should enter the printer last Without a duplex unit With a duplex unit ...

Страница 40: ...de the paper width guide to the left until it lightly touches the stack of print material Do not bend the print material 9 Select the paper source size and type from your software application and select paper size and type from the printer operator panel a Make sure the Paper Size and Paper Type for the multipurpose feeder MP Feeder Size and MP Feeder Type are set to the correct value for the prin...

Страница 41: ...the multipurpose feeder 1 Remove print material from the multipurpose feeder 2 Push the metal bar straight back to collapse the multipurpose feeder to its short length position 3 Close the multipurpose feeder door ...

Страница 42: ...ard the printer for short envelopes Extended to the middle position for medium length envelopes Fully open extended to its full length for long envelopes WARNING Do not place objects on the envelope feeder Avoid pressing down on it or applying excessive force 2 Lift the envelope weight back toward the printer It stays in place ...

Страница 43: ...on a level surface Press down the corners to flatten them Fan the envelopes This prevents the edges of the envelopes from sticking together and helps them feed properly Note When you load envelopes do not exceed the maximum stack height of 64 7 mm 2 55 in The envelope feeder holds a maximum of 85 envelopes 75 g m2 20 lb bond ...

Страница 44: ...tly more than the ones at the top of the stack WARNING Never use envelopes with stamps clasps snaps windows coated linings or self stick adhesives These envelopes may severely damage the printer See Choosing envelopes for more information Note Do not load more envelopes by forcing them under the envelope feeder weight This causes jams 6 Slide the envelope edge guide to the left until it lightly to...

Страница 45: ...d type from printer operator panel a Make sure the Paper Size for the envelope feeder Env Feeder Size is set to the correct envelope size you are loading See Paper Size for detailed information about this setting b Press Go to return to Ready Note Software settings may override operator panel settings If envelopes jam see Clearing paper jams ...

Страница 46: ...44 12 Loading the 2000 sheet drawer For information on loading the 2000 sheet drawer refer to the 2000 Sheet Drawer User s Guide on the Lexmark T522 Publications CD that came with your printer ...

Страница 47: ... where the temperature is approximately 21o C 70o F and the relative humidity is 40 Store cartons of paper on a pallet or shelf rather than directly on the floor If you store individual packages of paper out of the original carton make sure they rest on a flat surface so the edges do not buckle or curl Do not place anything on top of the paper packages ...

Страница 48: ...et to the same paper type When one tray becomes empty the printer automatically selects print material from the other tray since the printer sees the trays as linked If you use different print material in the trays each source with a different print material must have the Paper Type set to a unique value to disable the automatic linking feature If all the trays do not have the same paper type when...

Страница 49: ...remove paper trays while print jobs are in process Flex fan and straighten the paper before loading it Fan stacks of labels or transparencies before loading them into trays or the multipurpose feeder If jams do occur using the multipurpose feeder try feeding one sheet at a time Do not load wrinkled creased damp or curled paper Do not mix paper types or paper sizes in one tray Do not add paper to e...

Страница 50: ... Refer to the documentation that comes with the print cartridge for detailed installation information 1 Turn the printer off and unplug the printer power cord 2 Open the front doors and remove the used print cartridge WARNING Never touch the photoconductor drum on the underside of the print cartridge Use the handhold on the cartridge to avoid touching this area 3 Clean the printer 4 Install the ne...

Страница 51: ...efer to the documentation that comes with the charge roll for detailed installation information 1 Turn the printer off and unplug the printer power cord 2 Open the front doors and remove the print cartridge 3 Remove the old charge roll 4 Install the new charge roll 5 Reinstall the print cartridge and close the front doors 6 Plug the printer power cord into a properly grounded electrical outlet 7 R...

Страница 52: ...oll Refer to the documentation that comes with the transfer roll for detailed installation information 1 Turn the printer off and unplug the printer power cord 2 Open the front doors and remove the print cartridge 3 Remove the old transfer roll 4 Install the new transfer roll 5 Reinstall the print cartridge and close the front doors 6 Plug the printer power cord into a properly grounded electrical...

Страница 53: ...ring a fuser assembly CAUTION The fuser assembly should only be replaced by a Lexmark service technician Note For best results use Lexmark supplies with the printer If you are in the U S or Canada call 1 800 438 2468 for information about Lexmark Authorized Supplies Dealers in your area In other countries contact the place where you bought your printer ...

Страница 54: ...and then Config Menu appears on the first line of the display 3 Press Menu until you see Reset Maint Cnt and then press Select Reset appears on the second line of the display 4 Press Select Resetting Maint Cnt Value appears briefly on the display and then is replaced by Config Menu on the top line and Reset Maint Cnt on the second line 5 Press Menu until you see Exit Config Menu and then press Sel...

Страница 55: ... specifically designed for your printer Label fuser cleaner A special label fuser cleaner should be used for label applications to optimize feeding reliability They are included in the print cartridge box when you order part number 12A6839 You also may order this item separately using part number 99A0725 Label fuser cleaners are not recommended for duplex printing Charge roll Order part number 99A...

Страница 56: ...assembly Order a fuser assembly when 80 Scheduled Maintenance first appears on the display See the following table for the fuser assembly part number for your specific printer Printer power supply Fuser assembly part number 115 V 11K0555 220 V 11K0556 ...

Страница 57: ...ady to install them Do not store supplies in Temperatures greater than 43 C 110 F An environment with extreme changes in humidity or temperature Direct sunlight Dusty places A car for a long period of time An environment where corrosive gases are present An environment with salty air ...

Страница 58: ...e printer power switch is on The electrical outlet is not turned off by any switch or breaker Other electrical equipment plugged into the outlet is working You try turning the printer off then wait for about 10 seconds and turn the printer on This often fixes the problem Your printer driver settings are correct Note If an error message appears see Understanding printer messages ...

Страница 59: ...e paper jam messages you must clear all paper from the paper path Press Go to resume printing The printer prints a new copy of the page that jammed if Jam Recovery is set to On or Auto however the Auto setting does not guarantee the page will print Identifying paper jam areas See the diagram on page 58 for the path the paper travels through the printer and options and areas where jams may occur Th...

Страница 60: ...ssage The 260 Paper Jam is shown here for a jam in the optional envelope feeder Both types of jams occur in the same way Note 24x Paper Jam may occur in any of the paper trays including the 2000 sheet drawer x indicates the tray where the jam is located Jams can occur between two or three trays on the incline surface of a tray or between a tray the duplex unit and the printer integrated tray ...

Страница 61: ...tions 200 and 201 Paper Jam Remove Cartridge A 200 Paper Jam message indicates the paper is jammed in the area under the print cartridge This requires removing the print cartridge from the printer A 201 Paper Jam message indicates the jam is farther inside the printer 1 Push the release latch and open the printer upper and lower front doors CAUTION The rear portion of the inside of the printer is ...

Страница 62: ...ay need to access the paper from the rear door See Between the envelope feeder and the printer for more information 4 Reinstall the print cartridge 5 Close the upper and lower front doors 202 Paper Jam Open Rear Door Jams that cause a 202 Paper Jam message require opening the printer rear door Note To resolve the message you must clear all paper from the paper path For instructions on clearing the...

Страница 63: ...d gently pull it straight out If paper is still in the fuser area open the upper front door and remove the paper If the end of the paper is visible pull the paper straight out If the paper does not move immediately when you pull stop pulling Remove the print cartridge and then pull the paper out See Replacing the print cartridge for more information 3 Close the rear door ...

Страница 64: ...62 While exiting to the output bin Pull the paper straight out If the paper does not move immediately when you pull stop pulling Open the upper front door and pull the paper out ...

Страница 65: ...per to determine how the paper is jammed If a short piece is visible inside the duplex unit next to the inner wall grasp it and pull it out If you cannot grasp it see step 6 If only a short piece of paper is visible toward the rear of the printer do not pull it out it may be easier to access from inside the printer See 200 and 201 Paper Jam Remove Cartridge for instructions If most of the paper is...

Страница 66: ... if the paper is in this position 5 Close the duplex rear door Make sure it snaps into place 6 Locate the recessed areas on each side of the duplex front access cover 7 Slowly pull the duplex front access cover straight out ...

Страница 67: ... 9 Otherwise close the duplex front access cover 9 Slide out the integrated tray 10 Remove any sheets of paper lying in the duplex front access cover 11 Slide the duplex front access cover back into the duplex unit Make sure it snaps into place 12 Slide the integrated tray back into the printer Interior view of duplex unit ...

Страница 68: ... using legal size paper in the trays or if you have an optional 250 sheet drawer installed with other optional drawers Between a tray the duplex unit and the integrated tray Between the envelope feeder and the printer In the 2000 sheet drawer On the incline surface of a tray or between two trays 1 Pull the paper tray halfway out of the support unit 2 Remove the paper based on how it is jammed If t...

Страница 69: ...hort piece of the paper is visible do not pull down to remove the paper 2 Gently slide the paper tray back into the support unit 3 Pull the paper tray out of the support unit that is above the tray you just closed 4 Pull the paper either up or down If it does not pull easily one way try the other way 5 Slide the paper tray back into the support unit Note With this type of jam there may be another ...

Страница 70: ...it and the integrated tray 1 Pull the paper tray out of the support unit If only a short piece of the paper is visible do not pull down to remove the paper 2 Slowly pull the duplex front access cover straight out from the duplex unit ...

Страница 71: ...e the duplex front access cover back into the duplex unit Make sure it snaps into place If you do not see the edge of the paper in the integrated tray a Push the tray back into the printer b Open the printer upper and lower front doors c Remove the print cartridge See Replacing the print cartridge for more information You should see the leading edge of the paper now d Pull the paper out ...

Страница 72: ...r and lower front doors g Slide the paper tray all the way into the printer In the 2000 sheet drawer 1 Open the loading door 2 Press the elevator down button 3 Remove the paper jam Clear all paper from the paper path of the drawer and printer 4 Make sure the stack of paper is neat and aligned otherwise another paper jam may occur 5 Close the door 6 Allow a few seconds for the elevator to reach the...

Страница 73: ...age you must clear all paper from the paper path For instructions on clearing the jam click the area where the jam occurred At entry into the envelope feeder Between the envelope feeder and the printer At entry into the envelope feeder Since the envelope feeder feeds envelopes from the bottom of the stack the envelope on the bottom is jammed 1 Lift the envelope weight 2 Flip the envelope weight ba...

Страница 74: ...If envelope jams continue to occur repeat these steps and feed a single envelope between steps 4 and 5 This may correct the problem Between the envelope feeder and the printer 1 Lift the envelope weight 2 Flip the envelope weight back toward the printer 3 Remove the stack of envelopes from the envelope feeder 4 Push the envelope support to the closed position 5 Open the printer upper front door ...

Страница 75: ...may have to remove the print cartridge to get the envelope out See Replacing the print cartridge for instructions 8 Reinstall the envelope feeder Make sure it snaps into place 9 Close the printer upper front door 10 Replace the stack of envelopes in the envelope feeder 11 Adjust the envelope edge guide 12 Lower the envelope weight to the stack ...

Страница 76: ...sages do not appear turn the printer off and call the Lexmark Customer Support Center Menu settings changed from the operator panel have no effect Settings in the software application the printer driver or the printer utilities are overriding the settings made from the operator panel Change the menu settings from the printer driver the printer utilities or the software application instead of the o...

Страница 77: ...e software application Make sure PCL SmartSwitch and PS SmartSwitch are set to On Job did not print or incorrect characters printed continued If you are using a print spooler verify that the spooler is not stalled If you print across a network or on a Macintosh computer see Network printing problems Check the printer interface from the Setup Menu Determine which host interface you are using Print ...

Страница 78: ...om sheets of a ream before loading the print material Load a paper source only when it is empty Envelope misfeeds or multiple feeds occur Remove the stack of envelopes from the envelope feeder Load one envelope feed it through the printer and then reload the stack of envelopes in the envelope feeder Page breaks in unexpected places Check the Print Timeout setting in the Setup Menu Increase the set...

Страница 79: ...ture settings in the Paper Menu See Paper Type Verify that the correct print material is being used Toner smears or print comes off the page If you are printing on an uneven print surface change the Paper Weight and Paper Texture settings in the Paper Menu See Paper Type Verify that the print material is within the printer specifications See Print material specifications for more details If the pr...

Страница 80: ...ridge by gripping the handles with both hands With the cartridge arrows pointing downward shake the print cartridge back and forth Reinstall the cartridge and then press Go Streaks appear on the page The toner may be low To utilize the remaining toner remove the cartridge by gripping the handles with both hands and then shake the print cartridge gently back and forth Reinstall the same print cartr...

Страница 81: ...r Resolution was automatically reduced Reduce the complexity of the print job or add additional printer memory See Res Reduced Part or all of the page is printed in black Check the print cartridge to see if it is installed correctly If the charge roll has been replaced verify that it is installed correctly The job prints but the top and side margins are incorrect Make sure the Paper Size setting i...

Страница 82: ...s 250 sheet drawer optional 500 sheet drawer or optional 2000 sheet drawer or the connection between a drawer and a duplex unit or the printer is secure Make sure the print material is loaded correctly See Loading print material for more details Duplex unit Make sure the connection between the duplex unit and the printer is secure If the duplex unit is listed on the menu settings page but print ma...

Страница 83: ...al print server also called an internal network adapter or INA is securely connected to the printer system board Make sure you are using the correct cable that it is securely connected and that the network software is correctly set up Refer to the drivers CD for more details Printer memory Check to make sure printer memory is securely connected to the printer system board Tri Port Adapter Make sur...

Страница 84: ...nd the network cable is connected Note Refer to the drivers CD for more details For Novell users Make sure the netware drv file is dated October 24 1994 or later Make sure the NT no tabs flag is included in the capture statement For Macintosh users The printer may need an optional internal print server to allow Macintosh connection Verify that the printer is set up correctly in Chooser ...

Страница 85: ...vers and utilities Visit the Lexmark Web site www lexmark com for the most current printer drivers or utilities I need to attache a serial cable to the printer If you have installed an optional interface card in your printer refer to the Setup Guide I can t find the printer escape codes Refer to the Technical Reference available on the drivers CD or at the Lexmark Web site www lexmark com ...

Страница 86: ...dicates possible printer problems you must resolve This topic provides a list of all printer messages explains what they mean and tells you how to clear the messages Click a letter or number at the bottom of the page to locate information about a message beginning with that character Enter PIN ___ 1 Menu 2 Select 3 Return4 Go5 Stop6 ...

Страница 87: ...alid Standard Network Code J K L Load Manual Load Tray x LocalTalk x M Menus Disabled N Network Card Busy Network x Network x y No Jobs Found Retry Not Ready O P Parallel x Performing Self Test Power Saver Print Jobs on Disk Go Stop Printing Directory List Printing Font List Printing Job Accounting Stat Printing Menu Settings Prog Engine Code Prog System Code Program Flash Programming Disk Q Queui...

Страница 88: ...ption x Error 54 Network x Software Error 54 Par x ENA Connection Lost 54 Parallel Error 54 Parallel Option x Error 54 Std Network Software Error 54 Std Par ENA Connection Lost 56 Parallel Port x Disabled 56 Std Parallel Port Disabled 56 Serial Port x Disabled 58 Too Many Disks Installed 58 Too Many Flash Options 58 Too Many Trays Attached 59 Incompatible device 6 61 Defective Disk 62 Disk Full 63...

Страница 89: ...usy What this message means The printer is busy receiving processing or printing data What you can do Wait for the message to clear Press Menu to open the Job Menu and cancel the current job See also Cancel Job Canceling Job What this message means The printer is processing a request to cancel the current print job What you can do Wait for the message to clear ...

Страница 90: ...ng If a hardware failure occurs turn the printer off and back on If the error recurs turn the printer off remove the specified device and call for service Clearing Job Accounting Stat What this message means The printer is deleting all job statistics stored on the hard disk What you can do Wait for the message to clear Close Door or Insert Cartridge What this message means The upper front door is ...

Страница 91: ...ssage is displayed WARNING Do not turn the printer off while this message is displayed Delete All Jobs Go Stop What this message means The printer is requesting confirmation to delete all held jobs What you can do Press Go to continue The printer deletes all held jobs Press Stop to cancel the operation Deleting Jobs What this message means The printer is deleting one or more held jobs What you can...

Страница 92: ...Disabling operator panel menus Disk Corrupted Reformat What this message means The printer has attempted a disk recovery process and cannot repair the disk The disk cannot be used unless it is reformatted What you can do Press Go All disk data will be lost when the disk is reformatted Press Stop to clear the message without reformatting the disk Disk Recovery may be displayed again and the printer...

Страница 93: ...is error in the future do not turn off the printer unless Ready is displayed Enabling Menus What this message means The printer is responding to a request to make the menus available to all users What you can do Wait for the message to clear and then press Menu to view the menus from the operator panel See also Disabling operator panel menus Enter PIN ___ What this message means The printer is wai...

Страница 94: ...atting the hard disk Since formatting the disk may take longer in some cases the second line shows the percent complete What you can do Wait for the message to clear WARNING Do not turn the printer off while this message is displayed Formatting Flash What this message means The printer is formatting the flash memory What you can do Wait for the message to clear WARNING Do not turn the printer off ...

Страница 95: ...ugh printer memory to process the job To avoid this error in the future Delete fonts macros and other data stored in printer memory Install more printer memory Note The messages 37 Insufficient Memory and Held Jobs may be lost alternate on the display Infrared x What this message means An infrared interface is the active communication link Insert Tray x What this message means The specified tray i...

Страница 96: ...ob See also Setup Guide What this message means The code in an internal print server is not valid The printer cannot receive and process jobs until valid code is programmed into the internal print server What you can do Download valid code to the printer internal print server No button actions are possible while this message is displayed Note You can download network code while this message is dis...

Страница 97: ...rom that tray If the printer cannot find a tray with the correct paper type and size it prints on whatever paper is installed in the default input source Press Menu to open the Job Menu and cancel the current job See also Loading the multipurpose feeder Load Tray x What this message means The printer is trying to feed paper from a source it detects is empty What you can do Load paper of the size a...

Страница 98: ...eed access to the printer menus contact your network administrator Network Card Busy What this message means An internal print server also called an internal network adapter or INA is being reset What you can do Wait for the message to clear Network x What this message means A network interface is the active communication link Network x y What this message means A network interface is the active c...

Страница 99: ...What this message means The printer is not ready to receive or process data Someone pressed Stop to take the printer offline What you can do Press Go to make the printer ready to receive jobs Parallel x What this message means A parallel interface is the active communication link Performing Self Test What this message means The printer is running the series of start up tests it performs after it i...

Страница 100: ...m the printer to normal operating temperature and display the Ready message Print Jobs on Disk Go Stop What this message means Jobs that were spooled to the hard disk before the printer was last turned off have not yet printed What you can do Press Go to print the jobs Press Return or Stop to delete the jobs from the hard disk without printing them Printing Directory List What this message means T...

Страница 101: ...r printing all job accounting statistics stored on the hard disk What you can do Wait for the message to clear Printing Menu Settings What this message means The printer is processing or printing the menu settings page What you can do Wait for the message to clear Prog Engine Code What this message means The printer is programming new code into the flash memory What you can do Wait for the message...

Страница 102: ...h memory What you can do Wait for the message to clear WARNING Do not turn the printer off while this message is displayed Programming Disk What this message means The printer is storing resources such as fonts or macros on the hard disk What you can do Wait for the message to clear WARNING Do not turn the printer off while this message is displayed Queuing and Deleting Jobs What this message mean...

Страница 103: ...nt jobs What you can do Send a job to print Ready Hex What this message means The printer is in Hex Trace mode and is ready to receive and process print jobs What you can do Send a job to print All data sent to the printer is printed in hexadecimal and character representation Control strings are printed not executed Turn the printer off and then on to exit Hex Trace mode and return to Ready statu...

Страница 104: ... back on If the error recurs turn the printer off remove the specified device and call for service Res Reduced What this message means The printer is reducing the resolution of a page in the current job from 600 dots per inch dpi to 300 dpi to prevent a 38 Memory Full error Res Reduced remains on the display while the job prints What you can do Press Menu to open the Job Menu and cancel the curren...

Страница 105: ...es fonts macros symbol sets in the printer memory are deleted All menu settings return to the factory default setting except The Display Language setting in the Setup Menu All settings in the Parallel Menu Serial Menu Network Menu Infrared Menu LocalTalk Menu and USB Menu What you can do Wait for the message to clear Serial x What this message means A serial interface is the active communication l...

Страница 106: ... message and continue printing You may notice reduced print quality Replace the print cartridge Tray x Empty What this message means The specified tray is out of paper What you can do Load paper in the tray to clear the message Tray x Low What this message means The specified tray is low on paper What you can do Add paper to the tray to clear the message Tray x Missing What this message means The ...

Страница 107: ...print the contents of the buffer Press Menu to open the Job Menu and cancel the current job 2 xx Paper Jam What this message means The printer detects a paper jam Although the location of the paper jam appears on the second line of the display you must clear paper from the entire paper path What you can do Clear the paper path 31 Defective Print Cartridge What this message means A defective print ...

Страница 108: ... of the display is too short to print the formatted data For auto size sensing trays this error occurs if the paper guides are not in the correct position What you can do Press Go to clear the message and continue printing The printer does not automatically reprint the page that prompted the message Make sure the Paper Size setting in the Paper Menu is correct for the size paper you are using If M...

Страница 109: ...able Resource Save from the Setup Menu Install additional memory 37 Insufficient Collation Area What this message means The printer memory or hard disk if installed does not have the free space necessary to collate the print job What you can do Press Go to print the portion of the job already stored and begin collating the rest of the job Press Menu to open the Job Menu and cancel the current job ...

Страница 110: ...ta in printer memory Install additional printer memory Note The messages 37 Insufficient Memory and Held Jobs may be lost alternate on the display 38 Memory Full What this message means The printer is processing data but the memory used to store pages is full What you can do Press Go to clear the message and continue printing the job The job may not print correctly Press Menu to open the Job Menu ...

Страница 111: ...ct to On in the Setup Menu Install additional printer memory 51 Defective Flash What this message means The printer detects defective flash memory What you can do Press Go to clear the message and continue printing You must install different flash memory before you can download any resources to flash 52 Flash Full What this message means There is not enough free space in the flash memory to store ...

Страница 112: ...ure the serial link is set up correctly and you are using the appropriate cable Press Go to clear the message and continue printing The job may not print correctly Press Menu to open the Job Menu and reset the printer What these messages mean The printer cannot establish communications with an installed network port What you can do Press Go to clear the message and continue printing The job may no...

Страница 113: ... Go to clear the message and continue printing The job may not print correctly Make sure the cable connecting the printer and the computer is securely attached and that the cable is not defective Reset the printer What this message means Data has been sent to the printer through a parallel port but the parallel port is disabled What you can do Press Go to clear the message The printer discards any...

Страница 114: ... Disks Installed What this message means Too many hard disks are installed on the printer The printer only supports one hard disk at a time What you can do Turn off and unplug the printer Remove the excess hard disks from the printer Plug in the printer and turn it on 58 Too Many Flash Options What this message means Too many flash memory options are installed on the printer What you can do Turn o...

Страница 115: ...the specified device 61 Defective Disk What this message means The printer detects a defective hard disk What you can do Press Go to clear the message and continue printing Install a different hard disk before you perform any operations that require one 62 Disk Full What this message means There is not enough memory on the hard disk to store the data sent to the printer What you can do Press Go to...

Страница 116: ...stall a new hard disk and format it 70 79 message What these messages mean Messages labeled 70 79 identify problems related to the internal print server What you can do Refer to the drivers CD for more information Click View Documentation and then click MarkNet Print Servers 80 Scheduled Maintenance What this message means The printer requires replacement of routine maintenance items to maintain t...

Страница 117: ...andles with both hands With the cartridge arrows pointing downward shake the print cartridge back and forth Reinstall the cartridge and then press Go Press Go to clear the message and continue printing You may notice reduced print quality Replace the print cartridge 900 999 Service message What these messages mean Messages labeled 900 999 relate to printer problems that may require printer service...

Страница 118: ... Defaults Format Flash Defragment Flash Format Disk Job Acct Stat Setup Menu Printer Language Power Saver Resource Save Download Target Print Timeout Auto Continue Wait Timeout Jam Recovery Page Protect Display Language Alarm Control Toner Alarm Job Accounting PCL Emul Menu Font Source Font Name Point Size Pitch Symbol Set Orientation Lines per Page A4 Width Auto CR after LF Auto LF after CR Tray ...

Страница 119: ...rared Buffer Infrared Port Infrared Menu J Jam Recovery Job Accounting Job Acct Stat Job Buffering Parallel Menu Serial Menu Network Menu Infrared Menu LocalTalk Menu USB Menu Job Menu K L Lines per Page LocalTalk Addr LocalTalk Buffer LocalTalk Menu LocalTalk Name LocalTalk Port LocalTalk Zone M MAC Binary PS Network Menu USB Menu Max Baud Rate Multipage Border Multipage Order Multipage Print Mul...

Страница 120: ...us Print Net x Setup Print PS Error Print Resolution Print Timeout Printer Language Protocol PS SmartSwitch Parallel Menu Serial Menu Network Menu Infrared Menu LocalTalk Menu USB Menu Q Quality Menu R Reset Printer Resource Save Robust XON RS 422 Polarity RS 232 RS 422 S Separator Sheets Separator Source Serial Buffer Serial Menu Serial Protocol Setup Menu Substitute Size Symbol Set T Toner Darkn...

Страница 121: ...Pages Purpose To specify whether to include application generated blank pages as part of your printed output Values Blank Pages Multipage Order Collation Multipage Print Copies Multipage View Duplex Separator Sheets Duplex Bind Separator Source Multipage Border Do Not Print Does not print application generated blank pages as part of your job Print Prints application generated blank pages as part o...

Страница 122: ... set duplexing as the default for all print jobs Select Duplex from the printer driver to duplex only specific jobs Values See also Duplex Bind Off Prints each page of a job the number of times specified by the Copies menu item For example if you set Copies to 2 and send three pages to print the printer prints page 1 page 1 page 2 page 2 page 3 page 3 On Prints entire job the number of times speci...

Страница 123: ...nt a border around each page image when using Multipage Print Values See also Multipage Print Long Edge Assumes binding along the long end of the page left edge for portrait orientation and top edge for landscape orientation Short Edge Assumes binding along the short edge of the page top edge for portrait orientation and left edge for landscape orientation None Does not print a border around each ...

Страница 124: ...int multiple page images on one side of a sheet of paper Also called N Up or Paper Saver Values See also Multipage Border Multipage Order Multipage View Horizontal Vertical Rev Horizontal Rev Vertical Off Prints 1 page image per side 6 Up Prints 6 page images per side 2 Up Prints 2 page images per side 9 Up Prints 9 page images per side 3 Up Prints 3 page images per side 12 Up Prints 12 page image...

Страница 125: ... of the page landscape Short Edge Sets the short edge of the paper as the top of the page portrait None Does not insert separator sheets Between Copies Inserts a blank sheet between each copy of a job If Collation is Off a blank page is inserted between each set of printed pages all page 1 s all page 2 s and so on If Collation is On a blank page is inserted between each collated copy of the job Be...

Страница 126: ...tor sheets Values See also Separator Sheets Configure MP Tray x Tray 1 Selects separator sheets from the specified tray MP Feeder Selects separator sheets from the multipurpose feeder You must also set Configure MP to Cassette Env Feeder Inserts envelopes as separator sheets ...

Страница 127: ...ce Save Infrared Buffer PCL SmartSwitch Infrared Port PS SmartSwitch Job Buffering Transmit Delay Max Baud Rate Window Size NPA Mode Disabled Disables the infrared buffer Auto Printer automatically calculates the Infrared Buffer size recommended setting 5K to maximum size allowed User specifies the Infrared Buffer size The maximum size setting depends on the amount of memory in your printer the si...

Страница 128: ...er is automatically set during a power on reset However if your printer is situated in a bright or highly reflective environment you may experience intermittent communication problems If you do select a lower baud for the infrared connection Disabled Disables the infrared port and all other menu items in the Infrared Menu IR Option x Activates the specified infrared port Off Does not buffer print ...

Страница 129: ...fault printer language Values See also PS SmartSwitch Printer Language On Printer performs NPA processing If data is not in NPA format it is rejected as bad data Off Printer does not perform NPA processing Auto Printer examines the data to determine the format and then processes it appropriately On Printer examines the data on the infrared interface and selects PCL emulation if the data indicates ...

Страница 130: ...ata on the infrared interface and selects PostScript emulation if the data indicates that is the required printer language Off Printer does not examine the incoming data The printer uses PCL emulation to process the job if PCL SmartSwitch is On or uses the default printer language specified in the Setup Menu if PCL SmartSwitch is Off Auto Printer sets the Transmit Delay value during a power on res...

Страница 131: ...g an acknowledgment to the host computer Values Auto Printer sets the Window Size value during a power on reset to maximize link performance recommended 1 User sets the Window Size to one frame 1 If you have trouble printing using the infrared port changing the Window Size menu item to 1 may resolve the problem ...

Страница 132: ...played or when the printer is in Hex Trace mode Press Menu to open the Job Menu Select a menu item for more details Cancel Job Purpose To cancel the current print job Note Cancel Job is only displayed if the printer is processing a job or has a job in printer memory Cancel Job Confidential Job Held Jobs Print Buffer Reset Printer ...

Страница 133: ...name and PIN Delete A Job Deletes the specified confidential job Press Menu to scroll through the list of confidential jobs associated with your user name and PIN Press Select to delete a specific job Copies Determines the number of copies printed for each confidential job Press Menu to scroll through the list of confidential jobs associated with your user name and PIN Press Select to specify the ...

Страница 134: ...plete job is sent to the printer or an ASCII job such as a print screen command is printing Reset Printer Purpose To reset the printer to the user default value for each menu item delete all downloaded resources fonts macros and symbol sets stored in printer memory RAM and delete all data in the interface link buffer Note Before selecting Reset Printer exit the software application you are using ...

Страница 135: ...porarily store jobs on the printer hard disk before printing Values Note Changing the Job Buffering menu item automatically resets the printer Job Buffering LocalTalk Zone LocalTalk Addr NPA Hosts LocalTalk Buffer NPA Mode LocalTalk Name PCL SmartSwitch LocalTalk Port PS SmartSwitch Off Does not buffer the print job to the hard disk On Buffers print jobs to the hard disk Auto Buffers print jobs on...

Страница 136: ...rator panel LocalTalk Port Purpose To activate the LocalTalk port Values Disabled Disables the LocalTalk port Auto Printer automatically calculates LocalTalk Buffer size recommended 6K to maximum size allowed User specifies the LocalTalk Buffer size The maximum size depends on the amount of memory in your printer the size of the other link buffers and whether Resource Save is set to On or Off To m...

Страница 137: ...printer NPA Mode Purpose To specify whether the printer performs the special processing required for bidirectional communication following the conventions defined in the Network Printing Alliance NPA Protocol Values Note Changing this menu item automatically resets the printer 1 10 2 On Printer performs NPA processing If data is not in NPA format it is rejected as bad data Off Printer does not per...

Страница 138: ... On Printer examines data on the LocalTalk interface and selects PCL emulation if the data indicates that is the required printer language Off Printer does not examine the incoming data The printer uses PostScript emulation to process the job if PS SmartSwitch is On or uses the default printer language specified in the Setup Menu if PS SmartSwitch is Off On Printer examines data on the LocalTalk i...

Страница 139: ...fault settings Job Buffering Purpose To temporarily store jobs on the printer hard disk before printing Values Note Changing the Job Buffering menu item automatically resets the printer Job Buffering MAC Binary PS Network Buffer Network x Setup NPA Mode PCL SmartSwitch PS SmartSwitch Off Does not buffer jobs to the hard disk On Buffers print jobs to the hard disk Auto Buffers print jobs only if th...

Страница 140: ...ter processes raw binary PostScript print jobs from computers using the Macintosh operating system Note This setting often causes Windows print jobs to fail Off Printer filters PostScript print jobs using standard protocol Auto Printer processes print jobs from computers using either Windows or Macintosh operating systems Auto Printer automatically calculates the Network Buffer size recommended se...

Страница 141: ...default printer language Values See also PS SmartSwitch Printer Language On Printer performs NPA processing If data is not in NPA format it is rejected as bad data Off Printer does not perform NPA processing Auto Printer examines the data to determine the format and then processes it appropriately On Printer examines data on the network interface and selects PCL emulation if the data indicates tha...

Страница 142: ...alues See also PCL SmartSwitch Printer Language On Printer examines data on the network interface connection and selects PostScript emulation if the data indicates that is the required printer language Off Printer does not examine the incoming data The printer uses PCL emulation to process the job if PCL SmartSwitch is On or uses the default printer language specified in the Setup Menu if PCL Smar...

Страница 143: ...ht Paper Loading Substitute Size Paper Size Universal Setup Paper Source Cassette Printer treats the multipurpose feeder like any other paper tray If a print job requests a paper size or type that is only loaded in the multipurpose feeder the printer pulls paper from the multipurpose feeder for the job Manual Printer treats the multipurpose feeder like a manual feed tray and displays Load Manual w...

Страница 144: ...ce Purpose To ensure high quality printed envelopes and minimize envelope wrinkling Values If Envelope Enhance is On you may hear a tapping sound as the envelopes print We recommend you leave Envelope Enhance set to On unless the tapping sound is too loud for your work area To eliminate this sound select Off Print a few envelopes If the quality of print is acceptable leave Envelope Enhance set to ...

Страница 145: ... material Card Stock Load Colored Loading Ltrhead Loading Bond Loading Labels Loading Custom x Loading Preprint Loading Duplex Notifies the printer that the specified paper type is loaded properly for duplex printing If the printer receives a single sided job using that paper type the printer inserts blank pages as necessary to print the job properly on preprinted forms This setting may slow singl...

Страница 146: ... Paper Type menu items are correctly set the trays are automatically linked When one paper source is empty paper automatically feeds from the next linked source Tray x Size Manual Pap Size Env Feeder Size MP Feeder Size Manual Env Size Letter A4 B4 9 Envelope C5 Envelope Folio Legal A5 JIS B5 10 Envelope 7 3 4 Envelope Statement Executive DL Envelope Other Envelope B5 Envelope Universal Select Uni...

Страница 147: ... custom Type then the name is displayed instead of Custom x Texture The name is truncated to 14 characters Use Paper Texture in connection with the Paper Type and Paper Weight menu items You may need to change those menu items to optimize print quality for your specific paper See also Paper Type Paper Weight Plain Texture Preprint Texture Labels Texture Ltrhead Texture Card Stock Text Colored Text...

Страница 148: ...nu item to Optimize print quality for the specified paper Select paper sources through your software application by selecting type and size Automatically link paper sources Any sources containing the same type and size of paper are automatically linked by the printer if you have set the Paper Size and the Paper Type to the correct values See also Custom Types Tray x Type Env Feeder Type MP Feeder ...

Страница 149: ...sted size is not loaded Values Plain Weight Preprint Weight Bond Weight Labels Weight Cardstock Weight Color Weight Envelope Weight Ltrhead Weight Trnsprncy Weight Custom x Weight Light Normal Heavy Off Printer prompts the user to load the requested paper size Letter A4 Prints A4 size jobs on letter size paper if only letter size paper is loaded and prints letter size jobs on A4 size paper if only...

Страница 150: ...sal Values First select a unit of measure denotes a country specific factory default value Then select the values See also Print material specifications Inches Millimeters Portrait Width 3 00 14 17 in 76 360 mm 8 50 in 216 mm Portrait Height 3 00 14 17 in 76 360 mm 14 17 in 360 mm Feed Direction Short Edge Long Edge ...

Страница 151: ... the factory default settings A4 Width Purpose To select the width of the logical page for A4 size paper Values A4 Width Orientation Auto CR after LF Pitch Auto LF after CR Point Size Font Name Symbol Set Font Source Tray Renumber Lines per Page 198 mm Makes the logical page compatible with the Hewlett Packard LaserJet 5 Printer 203 mm Makes the logical page wide enough to print eighty 10 pitch ch...

Страница 152: ...cified font source Values The font name and font ID for all fonts in the selected font source are displayed The font source abbreviation is R for resident F for flash K for disk and D for download See also Font Source Off Printer does not perform a carriage return after a line feed control command On Printer performs a carriage return after a line feed control command Off Printer does not perform ...

Страница 153: ... Paper Size and Orientation menu items Select the correct Paper Size and Orientation before changing Lines per Page See also Orientation Paper Size Resident Displays all fonts resident in printer RAM when the printer ships from the factory Download Displays all fonts downloaded to printer RAM Flash Displays all fonts stored in flash memory Disk Displays all fonts stored on the printer s hard disk ...

Страница 154: ... changed Note Pitch is only displayed for fixed or monospaced fonts Point Size Purpose To change the point size for scalable typographic fonts Values Point size refers to the height of the characters in the font One point equals approximately 1 72 of an inch You can select point sizes from 1 to 1008 in increments of 0 25 points Note Point Size is only displayed for typographic fonts Portrait Print...

Страница 155: ...at use different source assignments for the paper trays First select a paper source Then select a value Other Tray Renumber selections Note Refer to the Technical Reference for more information about assigning source numbers 10U PC 8 country specific 12U PC 850 country specific Assign Tray x Assign Env Feeder Assign Man Env Assign MP Feeder Assign Man Paper Off Printer uses factory default paper s...

Страница 156: ...te Values marked by an asterisk are the factory default settings Advanced Status Purpose To enable bidirectional communication through the parallel port Values Advanced Status Parallel Mode 1 Honor Init Parallel Mode 2 Job Buffering PCL SmartSwitch NPA Mode PS SmartSwitch Parallel Buffer Protocol Off Disables parallel port negotiation On Enables bidirectional communication through the parallel int...

Страница 157: ...rocessing required for bidirectional communication following the conventions defined in the Network Printing Alliance NPA Protocol Values Note Changing this menu item automatically resets the printer Off Printer does not honor hardware initialization requests from the computer On Printer honors hardware initialization requests from the computer Off Does not buffer print jobs to the hard disk On Bu...

Страница 158: ... leading or trailing edge of strobe Values Disabled Disables the parallel port Auto Printer automatically calculates the Parallel Buffer size recommended setting 3K to maximum size allowed User specifies the Parallel Buffer size The maximum size depends on the amount of memory in your printer the size of the other link buffers and whether Resource Save is set to On or Off To maximize the range for...

Страница 159: ... On Printer examines data on the parallel interface and selects PCL emulation if the data indicates that is the required printer language Off Printer does not examine the incoming data The printer uses PostScript emulation to process the job if PS SmartSwitch is On or uses the default printer language specified in the Setup Menu if PS SmartSwitch is Off On Printer examines data on the parallel int...

Страница 160: ...fy the parallel interface protocol Values See also Technical Reference Standard May resolve some parallel interface problems Fastbytes Provides compatibility with most existing parallel interface implementations recommended setting ...

Страница 161: ...d flash or hard disk is installed and is neither defective nor Read Write or Write protected Print PS Error Purpose To print a page defining the PostScript emulation error when an error occurs Values Font Priority Print PS Error Resident Printer searches printer memory for the requested font before searching flash memory or hard disk Flash Disk Printer searches the hard disk and flash memory for t...

Страница 162: ...ing at 300 and 600 dots per inch dpi in PostScript emulation Values PQET Purpose To improve the quality of text and make characters appear smoother when Print Resolution is set to 300 dots per inch dpi Values PictureGradeTM PQET Print Resolution Toner Darkness On Uses modified screening parameters to improve print quality of graphics Off Uses standard screening parameters Off Does not alter qualit...

Страница 163: ...widths or darker grayscale images Select 10 for very bold text Select a value less than 8 to conserve toner A vertical bar indicates the factory default value An arrow symbol V indicates a user default value 300 dpi Offers a lower resolution printing option when memory is at a premium 600 dpi Produces high quality output for print jobs that are mostly text 1200 Image Q Uses line screening for prin...

Страница 164: ...an asterisk are the factory default settings Baud Purpose To specify the rate at which data can be received through the serial port Values See also Technical Reference Baud PS SmartSwitch Data Bits Robust XON Honor DSR RS 232 RS 422 Job Buffering RS 422 Polarity NPA Mode Serial Buffer Parity Serial Protocol PCL SmartSwitch 1200 57600 2400 115200 4800 138200 9600 172800 19200 230400 38400 345600 ...

Страница 165: ... serial cable This electrical noise can cause stray characters to print Select On to prevent stray characters from printing Job Buffering Purpose To temporarily store jobs on the printer hard disk before printing Values Note Changing the Job Buffering menu item automatically resets the printer 7 8 Off All data received by the serial port is treated as valid data On Only data received while the DSR...

Страница 166: ...e Changing this menu item automatically resets the printer Parity Purpose To select the parity for serial input and output data frames Values See also Technical Reference On Printer performs NPA processing If data is not in NPA format it is rejected as bad data Off Printer does not perform NPA processing Auto Printer examines the data to determine the format and then processes it appropriately Eve...

Страница 167: ... On Printer examines data on the serial interface and selects PCL emulation if the data indicates that is the required printer language Off Printer does not examine the incoming data The printer uses PostScript emulation to process the job if PS SmartSwitch is On or uses the default printer language specified in the Setup Menu if PS SmartSwitch is Off On Printer examines data on the serial interfa...

Страница 168: ...FF RS 422 Polarity Purpose To establish the behavior of the positive and negative signals when using RS 422 serial communication Values Off Printer waits to receive data from the computer On Printer sends a continuous stream of XONs to the host computer to indicate that the serial port is ready to receive more data RS 232 RS 422 Normal Uses default definition of one and zero Reverse Reverses the d...

Страница 169: ...culates the Serial Buffer size recommended setting 3K to maximum size allowed User specifies the Serial Buffer size The maximum size depends on the amount of memory in your printer the size of the other link buffers and whether Resource Save is set to On or Off To maximize the range for the Serial Buffer size disable or reduce the size of the parallel infrared LocalTalk and USB buffers DTR Hardwar...

Страница 170: ...ablish whether the printer sounds an alarm when the printer requires operator intervention Values Alarm Control Power Saver Auto Continue Print Timeout Display Language Printer Language Download Target Resource Save Jam Recovery Toner Alarm Job Accounting Wait Timeout Page Protect Off Printer does not sound an alarm Single Printer sounds three quick beeps Continuous Printer repeats three beeps eve...

Страница 171: ...mory or on the hard disk even when the printer is turned off Use MarkVision to download resources to the printer Disabled Printer does not resume printing until someone clears the error message 5 255 Printer waits the specified amount of time and then automatically resumes printing This timeout value also applies if the menus are displayed and the printer is offline for the specified period of tim...

Страница 172: ...To successfully print a page that may otherwise generate Complex Page errors Values If after selecting On you still cannot print the page you may also have to reduce the size and number of fonts on the page or increase the installed printer memory For most print jobs you do not need to select On When On is selected printing may be slower On Printer reprints jammed pages Off Printer does not reprin...

Страница 173: ...er ready to print with minimum warm up time Select a value between 1 and 240 minutes if you want a balance between energy consumption and a shorter warm up period Print Timeout Purpose To specify the amount of time in seconds the printer waits before printing the last page of a print job that does not end with a command to print the page The print timeout counter does not start until Waiting is di...

Страница 174: ...tt Packard printers PS Emulation PostScript emulation compatible with Adobe PostScript language Off Printer retains downloaded resources only until memory is needed It then deletes those resources associated with the inactive printer language On Printer retains all downloaded resources for all printer languages during language changes and printer resets If the printer runs out of memory 38 Memory ...

Страница 175: ...computer When this timeout expires the print job is canceled Values Note Wait Timeout is only available when you use PostScript emulation This menu item has no effect on PCL emulation print jobs Disabled Disables Wait Timeout 15 65535 40 Specifies the amount of time the printer waits for additional data before it cancels the job ...

Страница 176: ...n resources are deleted from flash memory Values WARNING Do not turn off the printer while the flash is defragmenting Defragment Flash Job Acct Stat Factory Defaults Print Directory Format Disk Print Fonts Format Flash Print Menus Hex Trace Print Net x Setup Yes Printer transfers all resources stored in flash memory to printer memory and then reformats the flash memory option When the format opera...

Страница 177: ...lel Menu Serial Menu Network Menu Infrared Menu LocalTalk Menu and USB Menu All downloaded resources fonts macros and symbol sets in printer memory RAM are deleted Resources residing in flash memory or on the hard disk are unaffected Do Not Restore User defined settings remain Yes Deletes any data stored on the hard disk and prepares the device to receive new resources No Cancels the request to fo...

Страница 178: ...ccounting Print Directory Purpose To print a list of all the resources stored in flash memory or on the hard disk Note Print Directory is available only when a nondefective flash or disk is installed and formatted See also Technical Reference Print Fonts Purpose To print a sample of all the fonts available for the selected printer language Values Print Prints all statistics available for the most ...

Страница 179: ...stalled options the amount of installed printer memory and the status of printer supplies Print Net x Setup Purpose To print information relating to the internal print server and the network settings defined by the Network x Setup menu item in the Network Menu See also Network x Setup ...

Страница 180: ...Buffering Purpose To temporarily store jobs on the printer hard disk before printing Values Note Changing the Job Buffering menu item automatically resets the printer Job Buffering MAC Binary PS NPA Mode PCL SmartSwitch PS SmartSwitch USB Buffer Off Does not buffer print jobs to the hard disk On Buffers print jobs to the hard disk Auto Buffers print jobs only if the printer is busy processing data...

Страница 181: ... print jobs from computers using the Macintosh operating system Note This setting often causes Windows print jobs to fail Off Printer filters PostScript print jobs using standard protocol Auto Printer accepts print jobs from computers using either Windows or Macintosh operating systems On Printer performs NPA processing If data is not in NPA format it is rejected as bad data Off Printer does not p...

Страница 182: ...a indicates that is the required printer language Off Printer does not examine the incoming data The printer uses PCL emulation to process the job if PCL SmartSwitch is On or uses the default printer language specified in the Setup Menu if PCL SmartSwitch is Off Disabled Disables the USB port Auto Printer automatically calculates the USB Buffer size recommended setting 3K to maximum size allowed U...

Страница 183: ...inter on 3 Release the buttons when you see Performing Self Test Config Menu appears on the first line of the display 4 Press Menu until you see Panel Menus and then press Select Disable appears on the second line of the display 5 Press Select Locking Menus appears briefly 6 Press Menu until you see Exit Config Menus and then press Select The menus are disabled If you press Menu the message Menus ...

Страница 184: ...move the printer and any options installed above it Remove paper options individually never attempt to remove two or more paper options at once Make sure the printer power is off and the power cord and any cables are unplugged before removing any options For more information click a topic Removing the envelope feeder Removing printer or flash memory Removing a paper tray or duplex unit Removing an...

Страница 185: ...183 48 Removing the envelope feeder 1 Remove envelopes from the envelope feeder 2 Push the envelope support to the closed position 3 Open the printer upper front door ...

Страница 186: ...184 4 Pull the envelope feeder up slightly and straight out of the printer Set it aside 5 Close both front doors 6 Refer to the Setup Guide when you are ready to reattach options ...

Страница 187: ...185 49 Removing a paper tray or duplex unit 1 Ask someone to help you lift the printer by the handholds and set it aside CAUTION Make sure your fingers are not under the printer when you set it down ...

Страница 188: ...186 2 Carefully lift the option straight up until it is completely disconnected from the option below it Set it aside 3 Refer to the Setup Guide when you are ready to reattach options ...

Страница 189: ...he printer before you touch the memory option 2 Push out on the latches at each end of the connector 3 Pull the memory option out of the connector 4 Place the memory option in its original packaging If you did not save the packaging wrap it in paper and store it in a box 5 If you need to install a replacement memory option or other option on the system board refer to the Setup Guide 6 Refer to the...

Страница 190: ...1 Locate the option you want to remove 2 Loosen and remove the two screws over and under the slot Gently pull the card out of the connector on the system board 3 Place the option card in its original packaging If you did not save the packaging wrap the card in paper and store it in a box 4 If you need to install another option on the system board refer to the Setup Guide 5 Refer to the Setup Guide...

Страница 191: ...he lines that form the characters Thicker lines result in darker characters Some words commonly used to describe the weight of a typeface are bold medium light black and heavy Style refers to other typeface modifications such as tilt or character width Italic and oblique are styles where the characters are tilted Narrow condensed and extended are three common styles that modify the character width...

Страница 192: ... point is defined as 1 72 inch The characters in a font printed at 24 point will be twice as large as the characters in the same font printed at 12 point The following illustration shows samples of a font printed in different point sizes The point size of a font is defined as the distance from the top of the tallest character in the font to the bottom of the lowest character in the font Due to the...

Страница 193: ... print characters from a scalable font the printer creates a bitmap of the characters at the point size you choose and saves it temporarily in printer memory These temporary bitmapped fonts are deleted when you turn off or reset the printer Scalable fonts provide the flexibility of printing in many different point sizes Your printer uses different scalable font formats for downloading fonts to the...

Страница 194: ...dium AlbertusMT AlbertusMT Italic AlbertusMT Light Albertus Extra Bold Antique Olive AntiqueOlive Roman Antique Olive Italic AntiqueOlive Italic Antique Olive Bold AntiqueOlive Bold AntiqueOlive Compact Arial ArialMT Arial Italic Arial ItalicMT Arial Bold Arial BoldMT Arial Bold Italic Arial BoldItalicMT ITC Avant Garde Book AvantGarde Book ITC Avant Garde Book Oblique AvantGarde BookOblique ITC A...

Страница 195: ...ld Helvetica Narrow Bold Helvetica Narrow Bold Italic Helvetica Narrow BoldOblique CG Times Intl CG Times CG Times Italic Intl CG Times Italic CG Times Bold Intl CG Times Bold CG Times Bold Italic Intl CG Times BoldItalic Univers Medium Intl Univers Medium Univers Medium Italic Intl Univers MediumItalic Univers Bold Intl Univers Bold Univers Bold Italic Intl Univers BoldItalic Courier Intl Courier...

Страница 196: ...TimesNewRomanPSMT Times New Roman Italic TimesNewRomanPS ItalicMT Times New Roman Bold TimesNewRomanPS BoldMT Times New Roman Bold Italic TimesNewRomanPS BoldItalicMT Univers Univers Oblique Univers Bold Univers BoldOblique Univers Condensed Medium Univers Condensed Univers Condensed Medium Italic Univers CondensedOblique Univers Condensed Bold Univers CondensedBold Univers Condensed Bold Italic U...

Страница 197: ...elGaramond Italic StempelGaramond Roman Apple Chancery Chicago Geneva Monaco NewYork Oxford Taffy MonaLisa Recut Candid Bodoni Bodoni Italic Bodoni Bold Bodoni BoldItalic Bodoni Poster Bodoni PosterCompressed CooperBlack CooperBlack Italic Copperplate ThirtyTwoBC Copperplate ThirtyThreeBC Eurostile Eurostile Bold Eurostile ExtendedTwo Eurostile BoldExtendedTwo Resident scalable fonts continued PCL...

Страница 198: ...ld Goudy BoldItalic Goudy ExtraBold HoeflerText Regular HoeflerText Italic HoeflerText Black HoeflerText BlackItalic HoeflerText Ornaments JoannaMT JoannaMT Italic JoannaMT Bold JoannaMT BoldItalic LubalinGraph Book LubalinGraph BookOblique LubalinGraph Demi LubalinGraph DemiOblique Line Printer 16 POSTNET Barcode Resident scalable fonts continued PCL 6 emulation PostScript 3 emulation ...

Страница 199: ...e PC 857 Latin 5 Turkish Legal ISO 60 Norwegian version 1 PC 858 Multilingual Euro MC Text ISO 61 Norwegian version 2 PC 860 Portugal Microsoft Publishing ISO 69 French PC 861 Iceland Russian GOST ISO 84 Portuguese PC 863 Canadian French Ukrainian ISO 85 Spanish PC 865 Nordic PCL ITC Zapf Dingbats ISO 8859 1 Latin 1 ECMA 94 PC 866 Cyrillic PS ITC Zapf Dingbats ISO 8859 2 Latin 2 PC 869 Greece PS M...

Страница 200: ... is on and the Ready status message is displayed 2 Press Menu to enter the menus 3 Continue to press and release Menu until you see Utilities Menu and then press Select 4 Press Menu until Print Fonts displays and then press Select 5 Press Menu until either PCL Fonts or PS Fonts appears on the second line of the display Select PCL Fonts to print a listing of the fonts available to the PCL emulator ...

Страница 201: ... Duty cycle Up to 75 000 pages per month Dimension Lexmark T522 Height with 500 sheet drawer 379 mm 14 9 in 513 mm 20 2 in Width 418 mm 16 5 in Depth 513 mm 20 2 in Weight with print cartridge with 500 sheet drawer 20 4 kg 45 lb 23 6 kg 52 lb ...

Страница 202: ...200 54 Notices Edition notice Trademarks Licensing notice Safety information Cautions and warnings Electronic emission notices Energy Star Laser notices ...

Страница 203: ... the manufacturer intends to make these available in all countries in which it operates Any reference to a product program or service is not intended to state or imply that only that product program or service may be used Any functionally equivalent product program or service that does not infringe any existing intellectual property right may be used instead Evaluation and verification of operatio...

Страница 204: ...eral Public License version 2 1 Software licensed under the BSD license and warranty statements Click the title of the document you want to review The Lexmark modified GNU licensed software is free software you can redistribute it and or modify it under the terms of the licenses referenced above These licenses do not provide you any rights to the Lexmark copyrighted software in this printer Since ...

Страница 205: ...to avoid the possibility of harmful emissions Cautions and warnings CAUTION A caution identifies something that might cause you harm WARNING A warning identifies something that might damage your printer hardware or software Electronic emission notices With a network cable attached Federal Communications Commission FCC Compliance Information Statement The Lexmark T522 has been tested and found to c...

Страница 206: ...ing and Technical Support Lexmark International S A Boigny France This product satisfies the Class A limits of EN 55022 and safety requirements of EN 60950 WARNING When a network cable is attached this is a Class A product In a domestic environment this product may cause radio interference in which case the user may be required to take adequate measures Without a network cable attached Federal Com...

Страница 207: ...da Cet appareil numérique de la classe B respecte toutes les exigences du Règlement sur le matériel brouilleur du Canada European Community EC Directives conformity This product is in conformity with the protection requirements of EC Council directives 89 336 EEC and 73 23 EEC on the approximation and harmonization of the laws of the Member States relating to electromagnetic compatibility and safe...

Страница 208: ...r notice The printer is certified in the U S to conform to the requirements of DHHS 21 CFR Subchapter J for Class I 1 laser products and elsewhere is certified as a Class I laser product conforming to the requirements of IEC 825 Class I laser products are not considered to be hazardous The printer contains internally a Class IIIb 3b laser that is nominally a 5 milliwatt gallium arsenide laser oper...

Страница 209: ... 22 loading feeder 40 loading the multipurpose feeder 32 settings 43 F Factory Defaults Utilities Menu 175 factory defaults restoring 175 Finishing Menu 119 Blank Pages 119 Collation 120 Copies 120 Duplex 120 Duplex Bind 121 Multipage Border 121 Multipage Order 122 Multipage Print 122 Multipage View 123 Separator Sheets 123 Separator Source 124 flash memory defragmenting 174 flash memory directory...

Страница 210: ...lk Menu 135 M MAC Binary PS Network Menu 138 MAC Binary PS USB Menu 179 maintenance replacing charge roll 49 replacing fuser 51 replacing print cartridge 48 replacing transfer roll 50 resetting maintenance counter 52 Max Baud Rate Infrared Menu 126 media guidelines 18 card stock 23 envelopes 22 labels 22 recommended paper 19 storing paper 45 unacceptable paper 20 memory Print and Hold function 12 ...

Страница 211: ...38 Network x Setup 138 Network Buffer 138 NPA Mode 139 PCL SmartSwitch 139 PS SmartSwitch 140 network port 137 buffer size 138 NPA mode 139 PCL SmartSwitch 139 PS SmartSwitch 140 NPA Hosts LocalTalk Menu 135 NPA Mode Infrared Menu 127 NPA Mode LocalTalk Menu 135 NPA Mode Network Menu 139 NPA Mode Parallel Menu 155 NPA Mode Serial Menu 164 NPA Mode USB Menu 179 n up printing 122 O operator panel 8 ...

Страница 212: ...lities Menu 176 print materials 18 degree of smoothness 19 direction of grain 19 fiber content 19 moisture content 19 tendency to curl 19 weight specifications 18 Print Menus Utilities Menu 177 Print Net x Setup Utilities Menu 177 Print PS Error PostScript Menu 159 print quality 160 adjusting PictureGrade 160 adjusting resolution 161 character smoothing 160 toner darkness 161 Print Resolution Qual...

Страница 213: ...ol Set PCL Emul Menu 153 symbol sets definition 197 T test printing Hex Trace mode 176 test printing menus page 177 timeout print 171 timeout wait 173 toner alarm 172 Toner Alarm Setup Menu 172 Toner Darkness Quality Menu 161 transfer roll replacing 50 Transmit Delay Infrared Menu 128 tray linking 46 Tray Renumber PCL Emul Menu 153 TrueType fonts 191 typeface description 189 U unacceptable paper t...

Страница 214: ...212 ...

Страница 215: ...exmark and Lexmark with diamond design are trademarks of Lexmark International Inc registered in the United States and or other countries 2001 Lexmark International Inc 740 West New Circle Road Lexington Kentucky 40550 ...

Отзывы: