background image

FIBER CONNECTOR SAFETY WARNINGS

  SAFETY INFORMATION

•  Always wear safety glasses.
• 

Isopropyl alcohol is flammable and may cause eye irritation. In case of contact with eyes, flush with water for at least  

15 minutes. When using isopropyl alcohol, always assure proper levels of ventilation. In case of ingestion, consult a  

physician immediately.

•  Never look directly into a laser light source, point source at a person’s eyes, or point 

source at reflective surfaces.

• 

When working on a fiber link, always turn laser source off, or disconnect completely.

• 

Always dispose of fiber debris properly, preferably using sticky tabs.

•  Do not place food or beverages in the vicinity of the work area.
• 

Thoroughly wash face and hands after terminating fiber.

• 

Carefully remove any fiber debris that may have been stuck to clothing, or left in work 

area, and  


dispose of properly.


TIPS AND RECOMMENDATIONS

• 

Using isopropyl alcohol, thoroughly clean exposed fiber and buffer ensuring both are free 

from dust, oil,  


and debris.

•  Do not lay ferrule dust covers on a dirty or dusty surface.
• 

Always use proper tools and/or accessories to terminate fibers and clean connector tips.

QUICK START GUIDE

The following instructions will help you quickly install your Leviton Opt-X

®

 Wallmount Enclosure for use in your equipment 

cabinet or rack.  For detailed information on each step, go to the page number listed below.

Safety 

Instructions      Pg. 

2

Quick 

Start 

Guide 

      Pg. 

2

Equipment 

Guide 

      Pg. 

Standard 

Accessories 

     Pg. 

4

Optional 

Accessories 

     Pg. 

4

Required 

Hardware 

and 

Tools 

    Pg. 

Configurations   


Pg. 5

• 

Adapter Plates

• 

Splicing

• 

SDX Cassette                           

Mounting                               


Pg. 5

Grommet Preparation and Use 


Pg. 5

Cable Installation Applications

• 

Adapter 

Plates 

     Pg. 

7

• 

SDX 

Cassette 

     Pg. 

7

• 

Splicing 

      Pg. 

8

Grounding 

armored 

cabling     

Installing the optional lock kit 


Pg. 10

Labeling 

       Pg. 

11

Page 2 of 11

PK-A3188-10-00-0B

Содержание Opt-X 5WMED-04C

Страница 1: ...n Mfg Co Inc Tech Support 1 800 824 3005 E mail appeng leviton com Web www leviton com Copyright 2017 Leviton Manufacturing Co Inc All rights reserved Subject to change without notice MTP is a registered trademark of US Conec Ltd Page 1 of 11 PK A3188 10 00 0B 5WSML 02C 5WMED 04C 5WMED 04C 5WSML 02C ...

Страница 2: ...n work area and dispose of properly TIPS AND RECOMMENDATIONS Using isopropyl alcohol thoroughly clean exposed fiber and buffer ensuring both are free from dust oil and debris Do not lay ferrule dust covers on a dirty or dusty surface Always use proper tools and or accessories to terminate fibers and clean connector tips QUICK START GUIDE The following instructions will help you quickly install you...

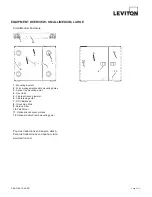
Страница 3: ...nce grommet 6 Cable lacing point 7 SDX Bulkhead 8 Grounding Stud 9 Service Door 10 Patch Door 11 Optional lock knockout blank 12 Optional Cable Clamp mounting point EQUIPMENT OVERVIEW SMALL MEDIUM LARGE Small Medium Enclosure 5 12 1 2 7 3 8 4 11 9 10 Pour les traductions en français allez à Para las traducciones en español visite www leviton com ...

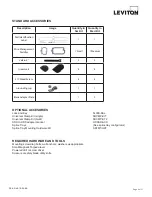
Страница 4: ...nk Adapter Plate 1 2 OPTIONAL ACCESORIES Lock and Key 5L000 KAL Universal Clamp Kit single 5RCMP KIT Universal Clamp Kit multi 5RCMP KT2 SDX to HDX adapter bracket HDXAD ACC Splice Trays See splice tray configurator Splice Tray Mounting Hardware Kit SPLMT HKT REQUIRED HARDWARE AND TOOLS Mounting screws lag bolts wall anchors washers as appropriate Small Magnetic Torpedo level Powered drill or scre...

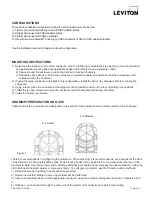
Страница 5: ... used with SDX adapter plates 3 Pigtail splicing used with Splice modules 4 Use with pre terminated MTP cabling and SDX cassettes or SDX to HDX adapter brackets See the Installation section for diagrams of each configuration GROMMET PREPARATION AND USE Cable Grommets are provided and designed for use at both trunk and patch cord entrance points to the enclosure There are several options in configu...

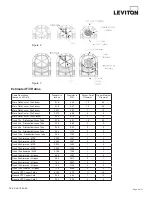
Страница 6: ...runk 48s Distribution Loose Tube 0 38 9 65 3 5 Trunk 72s Distribution Loose Tube 0 44 11 18 2 3 Trunk 144s Distribution Loose Tube 0 69 17 53 1 1 Trunk 12s Armored MDP 0 495 12 57 2 3 Trunk 24s Armored MDP 0 495 12 57 2 3 Trunk 48s Armored MDP 0 584 14 83 1 2 Trunk 72s Armored MDP 0 594 15 09 1 2 Trunk 144s Armored MDP 0 708 17 98 1 1 Trunk 12s Armored All types 0 55 13 97 1 2 Trunk 24s Armored Al...

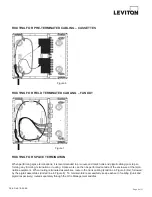
Страница 7: ...e 5 If applicable secure aramid yarn to lance point 6 When using Armored cable secure the ground wire from the armored cable to the provided grounding lug or ground by other code compliant methods to the provided grounding stud 7 Using the cable management saddles route the breakout fiber legs to the patching or termination point as shown in the configuration drawings below Figures 4 to 11 ROUTING...

Страница 8: ... or routing Splice work can then be performed outside of the enclosure at the termi nation equipment When routing terminated assemblies route in the trunk cabling solid line in Figure 8 first followed by the pigtail assemblies dotted line in Figure 8 To maintain future accessibility keep each set of cabling trunk and pigtail respectively routed separately through the Wire Management saddles ROUTIN...

Страница 9: ...S Securing the splice trays requires two components Splice Tray Mounting Kit including appropriate threaded stud and wing nut Velcro strip bulk Velcro or Velcro supplied in the Splice Tray Mounting Kit 1 Prior to mounting the enclosure install appropriate 10 32 threaded bolt from the rear of the enclosure base and secure trays with wing nut 2 Insert Velcro strip under the first arrow lance point w...

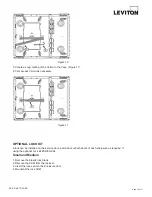
Страница 10: ...ure 10 Figure 11 OPTIONAL LOCK KIT A lock can be installed on the service door patch door or both doors of each enclosure as required If using the optional Lock kit 5L000 KAL Small and Medium 1 Remove the plastic lock blank 2 Remove the CAM from the lock set 3 Insert the lock set into the Enclosure door 4 Re install the lock CAM ...

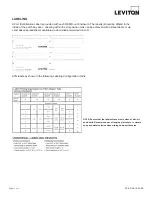
Страница 11: ...ng within the slot position cells can be achieved with printed labels or via excel based spreadsheets available via download at www leviton com Affix labels as shown in the following Labeling Configuration matrix NOTE Ensure that the label surface area is clean of dirt oil and debris Recommend use of isopropyl alcohol or a simple soap and water solution when wiping down surface area ...

Страница 12: ...PK A3188 10 00 0B Print on both sides ...

Отзывы: