background image

Chapter 1 Introduction 

Page 4 


N1000-006 User Guide

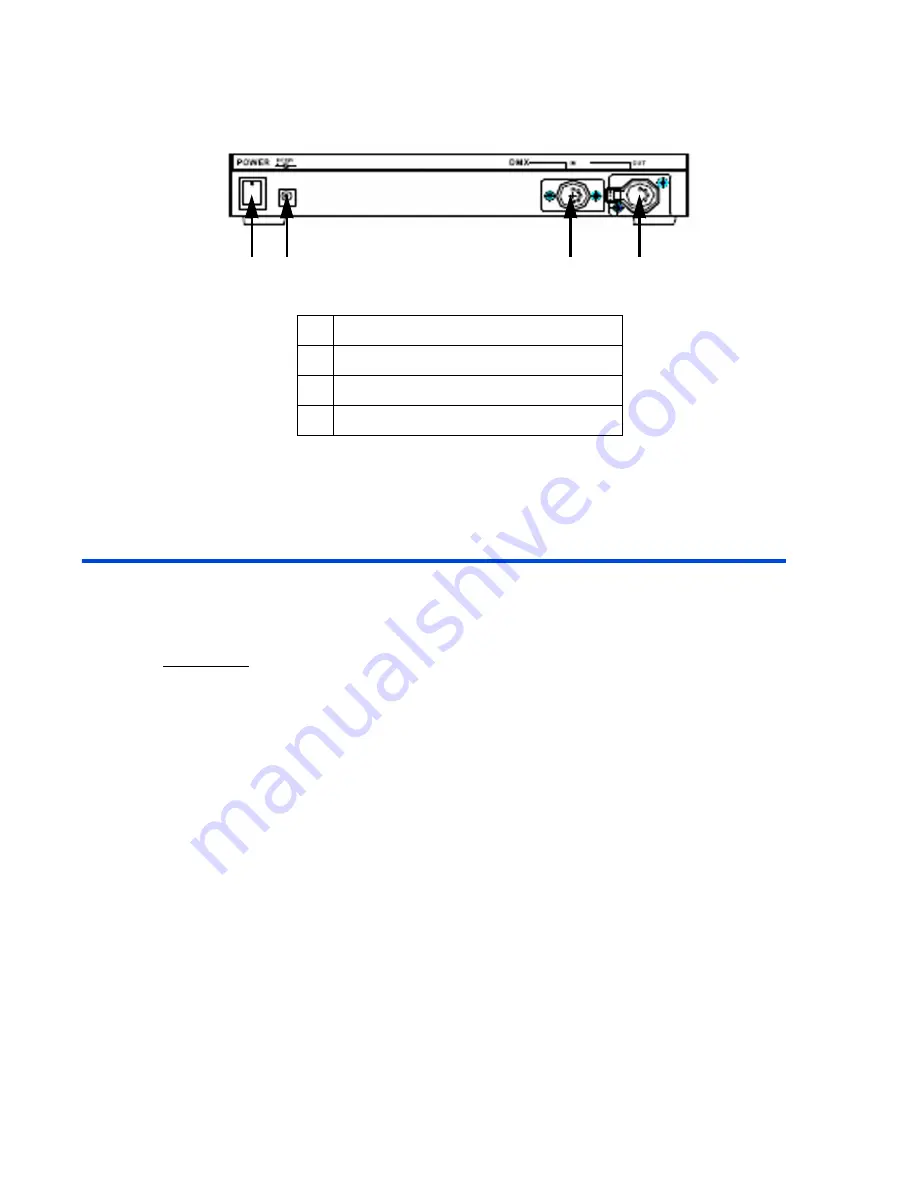
Rear Panel 

Using this Guide

Text Conventions 

Fader and Key control names are shown in 

Bolded Letters 

and


appear inside brackets 

[ ]

For example: 
Fader 1 appears as:

Fader 

[1]

The Enter key appears as:

[Enter]

Terminology Definitions

Channels

: Channels are the most basic unit of control and are used for setting lights to various 

intensity levels. A channel is represented by a single fader or bump button on a control console.

Scene

: A Scene is a recorded lighting look that is comprised of individual channel levels. It is recalled 

by raising one of the submaster faders or pressing a submaster bump button.

Chase: 

A Chase is a series of individual channel levels or pre-programmed scenes which is played 

back in a continuous loop.


Master Fader:

 The master fader is used to proportionally control the output of all the console 

channels. 

Dimmer Protocol:

 There are different types of dimmer control signals, also known 

as dimmer 

protocols

. The current standard for dimmer protocols is known as DMX 512. The amount of dimmers 

available for control depends on your model. For example, with the N3008 model, you can control up 

to eight dimmers. 

1

Power  Switch

2

Power Supply: DC 12V / 1A

3

DMX IN Connector: 5 Pin XLR

4

DMX OUT Connector: 5 Pin XLR

1

2

3

4

Содержание N1000-006

Страница 1: ...___________________________ User Guide N1000 006 Document Release Aug 2006 Revision A ...

Страница 2: ...anty period but agrees only to repair or replace defective equipment returned to its plant in Tualatin Oregon This Warranty is void on any product that has been improperly installed overloaded short circuited abused or altered in any manner Neither the seller nor Leviton shall be liable for any injury loss or damage direct or consequential arising out of the use of or inability to use the equipmen...

Страница 3: ...ing Channel Levels using the Keypad 10 Setting a Range of Channels 10 Channel Bump Buttons 11 Clearing Channel Levels 11 Scenes 12 Recording Scenes to Submasters 12 Recording Scenes to Scene Memory 13 Recalling Submaster Scenes 14 Submaster Bump Buttons 14 Recalling Memory Scenes 14 Modifying Submaster Memory 15 Modifying Scene Memory 16 Clearing Scene Levels 17 Chases 18 Channel Chase 18 Channel ...

Страница 4: ...Page ii N1000 006 User Guide ...

Страница 5: ...intended to orient you to the console and user guide The following sections are covered About the Console Features Specifications Warnings Console Controls Rear Panel Using this Guide Text Conventions Terminology Definitions Contacting Technical Support ...

Страница 6: ...LR 5 pin Male Weight 3 0 Kg 6 6 Lbs Dimensions 262L x 132W x 45H mm 10 3L x 5 2W x 1 8H inches Warnings Do not expose unit to rain or moisture or damage may occur There are no user serviceable parts inside Do not attempt any repairs yourself as doing so will void the warranty Please contact Leviton Technical Support if the unit is not functioning properly If the unit has been stored in a cold envi...

Страница 7: ...mp Button 4 Clear Key 5 Alpha Numeric Keypad 6 At Key 7 Thru Key 8 Enter Key 9 Down Select Key 10 Up Select Key 11 Master Black Out Button 12 Master Fader 13 Master Level LED 14 Record Key 15 Function Key 16 Channel Key 17 Scene Key 18 LCD Display 1 3 4 6 5 8 11 7 9 10 12 13 14 15 16 17 18 2 ...

Страница 8: ...ual channel levels It is recalled by raising one of the submaster faders or pressing a submaster bump button Chase A Chase is a series of individual channel levels or pre programmed scenes which is played back in a continuous loop Master Fader The master fader is used to proportionally control the output of all the console channels Dimmer Protocol There are different types of dimmer control signal...

Страница 9: ...may also call us during regular business hours at 1 800 959 6004 Please have the console model number and serial number available when you call Contact Information Leviton Lighting Management Systems Division 20497 SW Teton Tualatin OR 97062 Mailing Address PO Box 2210 Tualatin OR 97062 Customer Service 800 736 6682 Technical Support 800 959 6004 Fax 503 404 5601 Internet www lms leviton com ...

Страница 10: ...Chapter 1 Introduction Page 6 N1000 006 User Guide ...

Страница 11: ...g a Range of Channels Channel Bump Buttons Clearing Channel Levels Scenes Recording Scenes to Submasters Recording Scenes to Scene Memory Recalling Submaster Scenes Submaster Bump Buttons Recalling Memory Scenes Modifying Submaster Memory Modifying Scene Memory Clearing Scene Levels Chases Channel Chase Channel Chase Scene Sub Chase Chase Fade Auto Fade Auto Fade a Single Channel Auto Fade a Range...

Страница 12: ...rder to fully charge the internal battery When running on the internal battery the LCD screen will enter a power saving mode and dim if not used within eight seconds Pressing any key or pushing a fader will revert the LCD back to its lit state Auto Memory All programming data will be saved automatically when the console is turned off Please note that the data will be lost if the unit is not powere...

Страница 13: ...For example faders one through six will control channels 1 thru 6 or 7 thru 12 or 13 thru 18 etc In the following example we will use a fader to set channel seven to 80 Procedure Notes 1 Raise the Master Fader to 100 full Make sure the console is turned On 2 Press the FUNC key The LCD displays 3 Press the ENTER key 4 Press the S or T keys to select CH 7 5 Raise Fader 1 to 80 6 Lower the Master to ...

Страница 14: ...R Ch 7 s level is output and the LCD will advance to the next channel to be set Setting a Range of Channels A range of channels can be set at the same time For example to set channels 1 through 6 to 100 follow the procedure below Procedure Notes 1 Raise the Master Fader to 100 full 2 Press the FUNC key The LCD displays 3 Press the ENTER key 4 Press CH 1 6 AT 100 5 Press ENTER The levels are output...

Страница 15: ...dividual channels to change quickly to full intensity 100 while in CH SET mode Clearing Channel Levels There are two ways to clear the levels of all channels while in CH SET mode Procedure Notes 1 Press the CL and CH keys at the same time OR 1 Lower the Master Fader to 0 then Press the MASTER key ...

Страница 16: ...rding Scenes to Submasters In this example we will set levels on channels one through six and record them into submaster one Procedure Notes 1 Raise the Master Fader to 100 full 2 Press the FUNC key The LCD displays 3 Press the ENTER key 4 Press CH 1 6 AT 100 ENTER 5 Press the REC key 6 Press the SUB1 key 7 Press ENTER Sub is recorded Pressing any other key besides ENTER will cancel the recording ...

Страница 17: ...R 5 Press REC 1 6 Press ENTER If a scene has been previously recorded a warning will appear Press 1 to continue 7 Enter a name using the keypad Keypad numbers 0 9 represent the alphabet See Alpha Numeric chart below 8 Press ENTER Scene is recorded Alpha Numeric chart 1 A B C 6 P Q R 2 D E F 7 S T U 3 G H I 8 V W X 4 J K L 9 Y Z 5 M N O 0 Sp CH SETTING SUB MASTER CH SET 1 6 CH 1 0 CH SET 1 6 CH 1 6...

Страница 18: ...ster Bump Buttons As shown in Step 4 above pressing the bump buttons located below each fader allows individual submasters to change quickly to full intensity 100 while in SUB MASTER mode Recalling Memory Scenes Follow the steps below to playback a scene that was recorded to memory In this example we are recalling a scene that was previously recorded as scene 1 Procedure Notes 1 Press the FUNC key...

Страница 19: ...els Follow the example below Procedure Notes 1 Press the FUNC T The LCD displays 2 Press ENTER 3 Raise the submaster fader you wish to modify 4 Press the CH key 5 Press 1 AT 50 You can also select a range of channels For example 1 6 AT 50 Continued on next page SUB MASTER 1 6 LEVITON CORP LOAD SCENE _ KEYIN SC 1 40 LOAD SCENE 1 ABC SUB MASTER 1 6 LEVITON CORP CH SETTING SUB MASTER SUB MASTER 1 6 L...

Страница 20: ... T The LCD displays 2 Press ENTER 3 Press the SC key 4 Press 1 or the scene you wish to modify 5 Press ENTER 6 Press the CH key 7 Press 1 AT 50 to modify You can also select a range of channels For example 1 6 AT 50 8 Press ENTER to complete the operation SUB MASTER 1 6 LEVITON CORP CH SETTING SUB MASTER SUB MASTER 1 6 LEVITON CORP LOAD SCENE _ KEYIN SC 1 40 LOAD SCENE 1 ABC SUB MASTER 1 6 LEVITON...

Страница 21: ...ar the levels of a scene while in SUB MASTER mode Procedure Notes 1 Press the CL and SC keys at the same time OR 1 Lower the Master Fader to 0 then Press the MASTER key After clearing the levels you must re record the scene in order for the new levels to be saved ...

Страница 22: ...an also be run while a scene is active in the background please see the Channel Chase Scene further below Channel Chase To initiate a channel chase follow the steps below Procedure Notes 1 Press the FUNC key 2 Press T twice to select the channel chase function 3 Press ENTER to select start channel To change the start channel of the chase press the T S keys or use the keypad 4 Press ENTER to select...

Страница 23: ...sa This is because the console operates in an HTP Highest Takes Precedence mode Sub Chase There are two submaster chases available one will chase through subs 1 6 the other will chase through subs 3 6 Procedure Notes 1 Press the FUNC key 2 Press the T key three times 3 Press ENTER Use the T S keys to select sub chase 4 Press ENTER To change the chase speed use the T S keys 5 Raise faders to desire...

Страница 24: ... fade type The same method applies for a sub chase Procedure Notes 1 Press the FUNC key 2 Press T five times to select the chase fade function 3 Press ENTER 4 Press the T S keys to select fade type 5 Press ENTER to confirm The fade type can also be changed while a chase is running First start the chase then follow the above procedure CH SETTING SUB MASTER AUTO FADE CHASE FADE FADE OFF FADE ON FADE...

Страница 25: ...ion 3 Press ENTER to start the auto fade Press the T S keys to select CH or use the keypad 4 Press ENTER to select the speed To change the speed use the T S keys 5 To stop the auto fade press FUNC ENTER Auto Fade a Range of Channels Procedure Notes 1 Press the FUNC key 2 Press T four times to select the auto fade function 3 Press ENTER to start the auto fade Continued on next page CH SETTING SUB M...

Страница 26: ...n how to record a emergency backup scene The N1000 can also capture snapshots of DMX levels being sent from another console for further recording of backup scenes see procedure on next page on how to record a snapshot scene To take full control with the N1000 console after the DMX IN signal becomes lost Procedure Notes 1 Raise Fader 1 to 100 then lower to 0 To return to DMX IN control Procedure No...

Страница 27: ...t backup scene fade time function 3 Press the T S keys to adjust fade time 4 Press ENTER to save Recording a Snapshot Scene Follow the example below to use DMX IN to capture levels from another console and record them into a scene Procedure Notes 1 Connect other console s DMX OUT cable to the N1000 DMX IN connector 2 Press REC 1 3 Press ENTER If a scene has been previously recorded a warning will ...

Страница 28: ...ene Con t 4 Enter a name using the keypad Keypad numbers 0 9 represent the alphabet See Alpha Numeric chart below 5 Press ENTER Scene is recorded Alpha Numeric chart 1 A B C 6 P Q R 2 D E F 7 S T U 3 G H I 8 V W X 4 J K L 9 Y Z 5 M N O 0 Sp Name ABC KEYIN ENGLISH ...

Страница 29: ......

Страница 30: ...bject to change without notice Document Release Aug 2006 Rev A P N DI 000 N1000 05A Leviton Lighting Management Systems Division 20497 SW Teton Tualatin OR 97062 Mailing Address PO Box 2210 Tualatin OR 97062 Customer Service 800 736 6682 Technical Support 800 959 6004 Fax 503 404 5601 Internet www lms leviton com ...

Отзывы: