background image


HAI Dock Setup Utility 


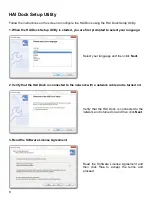
Follow the instructions on the screen to configure the HAI Dock using the HAI Dock Setup Utility. 


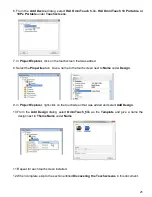
1. When the HAI Dock Setup Utility is started, you are first prompted to select your language: 


Select your language and then click 

Next


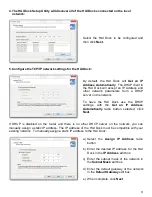
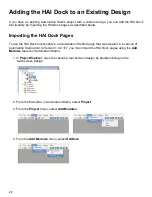
2. Verify that the HAI Dock is connected to the network with a network cable and is turned on: 


Verify that the HAI Dock is connected to the 

network and is turned on and then click 

Next


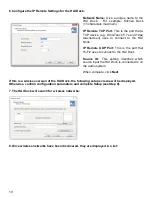
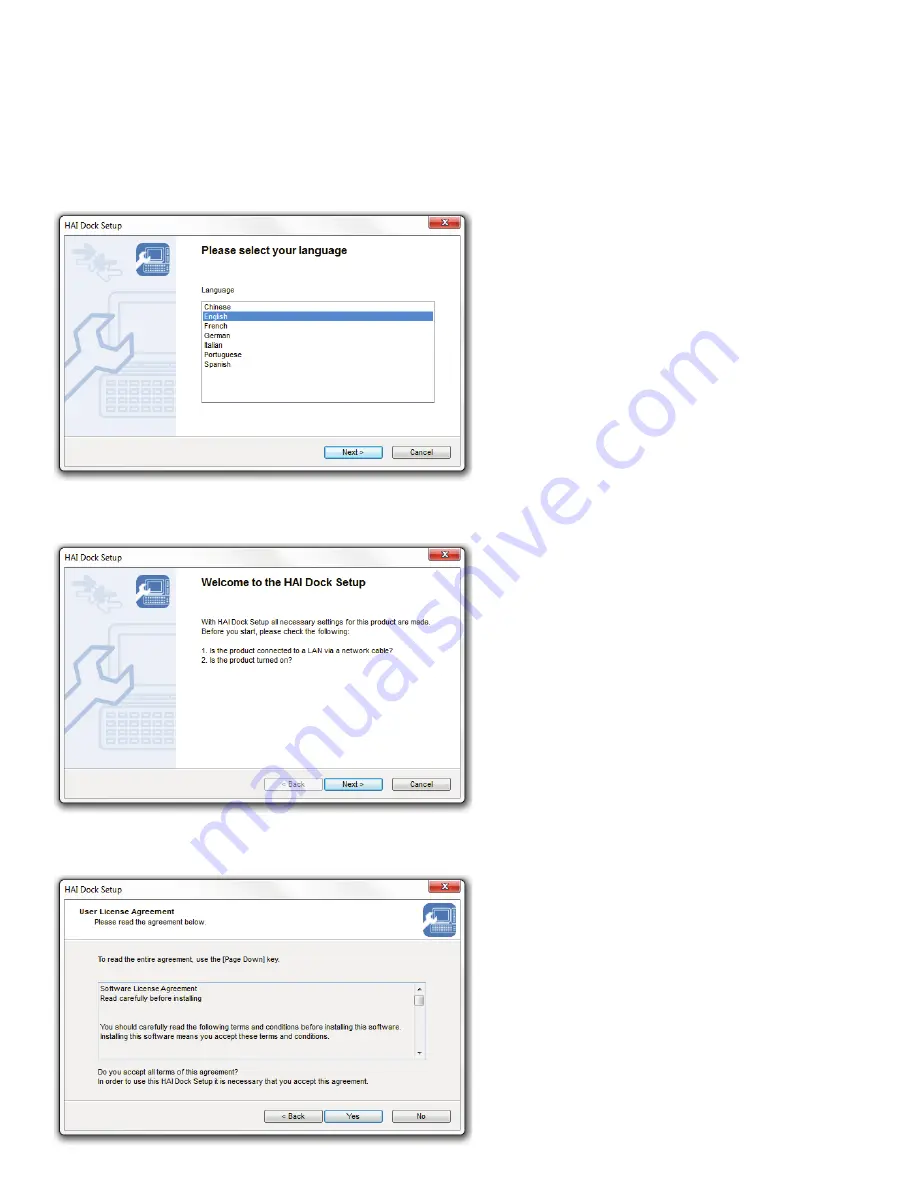
3. Read the Software License Agreement: 


Read the Software License Agreement and 

then click 

Yes

  to accept the terms and 

proceed. 

Содержание HAI Dock

Страница 1: ...HAI Dock Operation Manual ...

Страница 2: ...Pod iTunes AirMac AirPort Macintosh MacOS and Safari are either registered trademarks or trademarks of Apple Computer Inc in the United States and or other countries Other brand or product names are registered trademarks or trademarks of their respective owners Document Number 96I00 1 Rev A August 2011 Copyright 2011 Home Automation Inc All Rights Reserved ...

Страница 3: ...ct the interference by one or more of the following measures Reorient or relocate the receiving antenna Increase the separation between the equipment and receiver Connect the equipment into an outlet on a circuit different from that to which the receiver is connected Consult the dealer or an experienced radio TV technician for assistance This device complies with Part 15 of the FCC Rules Operation...

Страница 4: ...Doing so may cause damage or an electric shock Refer all servicing to qualified personnel Do not use water thinner or organic solvent for cleaning the product exterior Doing so may cause damage or an electric shock Use a dry cloth instead and turn off the power before cleaning Disclaimer While every effort has been made to ensure that the information contained in this guide is accurate and complet...

Страница 5: ...Dock Operation 13 Operation Modes 14 Playing Music 14 Inserting and Removing an iPod 15 Accessing the Web Server 15 Status 16 Configuration 17 System Information 17 Reset to Factory Default 18 Interfacing with the HAI Dock 19 Enabling the HAI Dock 19 Creating a New Project with the HAI Dock 19 Adding Touchscreens to the Project 20 Adding the HAI Dock to an Existing Design 22 Importing the HAI Dock...

Страница 6: ...iv Accessing Your Music 30 Browse the Media Library 31 Selecting a new Music Source 32 Selecting a New Audio Zone 33 Specifications 34 ...

Страница 7: ...n HAI controller and supported audio distribution system e g HAI Hi Fi or Hi Fi2 NuVo Russound Xantech Speakercraft or Proficient Works standalone with Hi Fi2 audio distribution systems VSC keypads will display iPod metadata artist album and track and allows for control commands play pause next track and previous track at the VSC keypad HAI Dock sends iPod metadata and album artwork to IP enabled ...

Страница 8: ... HAI Dock CD Setup Utility and Manual o Getting Started Guide Supported Operating Systems oWindows 7 Windows Vista Windows XP Windows 2000 oMac OS X 10 2 7 to 10 4 x PPC version oMac OS X 10 4 3 or later Intel version Supported iPod Models oiPod classic oiPod Nano 3G 4G 5G 6G oiPod touch 1st 2G 3G 4G oiPhone 1st 3G 3GS 4G ...

Страница 9: ...and can be controlled via IP enabled devices The Operation Mode LED is off when the HAI Dock is in Standby Mode In Standby Mode the USB controller Ethernet PHY and the wireless radio if applicable is disabled 3 iPod Connector Connects the iPod to the HAI Dock 4 Operation Mode Button When is Standby Mode press this button to start the unit in Network Mode When in Network Mode press and hold for 2 s...

Страница 10: ...upplied 3 5mm male stereo patch cable between the Audio Output on the HAI Dock and an audio input on Hi Fi2 or other audio distribution system 3 5mm male to 2 RCA male stereo patch cable can be used to connect HAI Dock to audio equipment which requires RCA audio inputs Bottom View 11 Ethernet Address The Ethernet MAC Address of the HAI Dock is found on the label on the bottom of the unit The last ...

Страница 11: ...ork cable to the Network Port on the HAI Dock and connect the other end of the network cable to a router hub or network switch on the local network To router hub or network switch Connecting the Power Connect the supplied AC power supply to the Power Jack on the HAI Dock Plug the power cord into an outlet Make sure that the Operation Mode LED is illuminated ...

Страница 12: ...emote Input Module Hi Fi RIM AUDIO IN IR OUT Connecting the Audio Output Connect the HAI Dock to an audio system using the Audio Output jack on the HAI Dock using a 3 5mm male stereo patch cable supplied AUDIO ...

Страница 13: ...Configuring the HAI Dock To configure the HAI Dock using the HAI Dock Setup Utility 1 Ensure that the HAI Dock is connected to the local network 2 Ensure that the AC power supply is connected to the HAI Dock 3 Ensure that the HAI Dock is in Network Mode the Operation Mode LED is illuminated 4 Insert the HAI Dock Setup Utility CD HAI Part Number 96A02 1 into your PC and run the utility Setup exe ...

Страница 14: ... prompted to select your language Select your language and then click Next 2 Verify that the HAI Dock is connected to the network with a network cable and is turned on Verify that the HAI Dock is connected to the network and is turned on and then click Next 3 Read the Software License Agreement Read the Software License Agreement and then click Yes to accept the terms and proceed ...

Страница 15: ...settings with the Get an IP Address Automatically radio button selected click Next If DHCP is disabled on the router and there is no other DHCP server on the network you can manually assign a static IP address The IP address of the HAI Dock must be compatible with your existing network To manually assign a static IP address to the HAI Dock a Select the Assign IP Address radio button b Enter the de...

Страница 16: ... UDP Port This is the port that Hi Fi2 uses to connect to the HAI Dock Source ID This setting identifies which source input the HAI Dock is connected to on the audio system When complete click Next If this is a wireless version of the HAI Dock the following setup screens will be displayed Otherwise confirm configuration parameters and complete Setup see Step 9 7 The HAI Dock will search for wirele...

Страница 17: ...configure each setting If you are going to use the HAI Dock with a network cable instead of wirelessly check Skip wireless configuration and then click Next complete Setup 9 Confirm configuration parameters and save the settings in the HAI Dock View and confirm the configuration parameters and then click Execute If any changes need to be made click Back and make the necessary modifications The new...

Страница 18: ...I Dock The HAI Dock must be rebooted for the new settings to take effect If wireless has been configured first unplug the network cable before rebooting the HAI Dock To reboot the HAI Dock disconnect the power cable momentarily and then reconnect the power cable ...

Страница 19: ...and can be controlled locally 1 The HAI Dock does not charge the battery in the docked iPod 2 In this mode the USB controller Ethernet PHY and the wireless radio if applicable is disabled 3 This mode complies with the European Power Regulations The Network LED indicators green and orange on the back of the unit indicate the network connection status Status LED Description Wired LAN Green Blink Ora...

Страница 20: ...ock To play music while in Standby Mode 1 Insert the iPod into the HAI Dock 2 Press the Operation Mode Button for 2 seconds so that the Operation Mode LED goes off 3 Start a Playlist Song Podcast or Audiobook on the iPod 4 The selected music will play over the connected audio system To play music while in Network Mode 1 Start a Playlist Song Podcast or Audiobook on the iPod 2 Verify that the HAI D...

Страница 21: ...en HAI Dock Mom can then dock her iPod in the Kitchen When controlling the HAI Dock using IP devices the name of the iPod is displayed as the audio source so that there s no guessing to whose iPod is currently docked Accessing the Web Server The HAI Dock has a built in web server that can be used for configuring modifying and monitoring the status of the HAI Dock and docked iPod Status Displays iP...

Страница 22: ...stem Information settings are protected with a user name and password When the screen below is displayed type a user name root and click OK Item Description Factory default Password Configure the password within 7 characters This is used as the authentication password for configuration changes via the web interface Blank The default username is root By default there is no password ...

Страница 23: ...d Wireless Settings Click the item you wish to configure Select or enter a value for the appropriate item then click Submit System Information Select between System Information Password Reset or Firmware Upgrade and follow the instructions on the screen ...

Страница 24: ...able 2 Press and hold the Operation Mode Button on the front of the HAI Dock and reconnect the AC power cable Keep holding the Operation Mode Button to start the factory default configuration 3 The factory default configuration is complete when the orange Network LED is turned on 4 Release the Operation Mode LED Button ...

Страница 25: ...tionality was added to Automation Studio in Version 1 0 2 167 If you have a touchscreen design that was created in Automation Studio prior to Version 1 0 2 167 you must import the HAI Dock pages as described under Adding the HAI Dock to an Existing Design in this document If you are adding the HAI Dock functionality to an existing project skip Creating a New Project with the HAI Dock and Adding To...

Страница 26: ...d For example it the touchscreen is installed in the kitchen the touchscreen and the design should be named Kitchen 1 In Project Explorer click on the touchscreen that was added 2 Select the Properties tab Give a name to the touchscreen next to Name under Misc 3 In Project Explorer click on the design under the touchscreen that was just named 4 Select the Properties tab Give a name to the design n...

Страница 27: ...tab Give a name to the touchscreen next to Name under Design 9 In Project Explorer right click on the touchscreen that was added and select Add Design 10 From the Add Design dialog select OmniTouch_57e as the Template and give a name the design next to Theme Name under Name 11 Repeat for each touchscreen installed 12 When complete skip to the section entitled Discovering the Touchscreens in this d...

Страница 28: ... functionality in an Automation Studio design that was created in a version of Automation Studio prior to Version 1 0 2 167 you must import the HAI Dock pages using the Add Modules feature in Automation Studio 1 In Project Explorer open the canvas a touchscreen design by double clicking on the touchscreen design 2 From the Menu Bar in Automation Studio select Project 3 From the Project menu select...

Страница 29: ...s 7 Repeat this process for each touchscreen design under Project Explorer Discovering Touchscreens You must use Automation Studio to discover each touchscreen in the project To discover a touchscreen 1 In Project Explorer right click on a touchscreen and select Discover 2 In the Discovery Touchscreens dialog select the respective touchscreen from the list and then click Select 3 Repeat this proce...

Страница 30: ...ct Add Device from the menu 2 From the Add Device dialog select HAI Controller from the Controllers list Then select the PC Access account file that will be used with the touchscreen Adding the HAI Dock to the Design When an HAI Dock is added to the project Automation Studio will guide you through the steps to configure it Add the HAI Dock to the project as follows 1 In Project Explorer right clic...

Страница 31: ...added you will be prompted to discover it as follows In the Discover HAI Docks dialog select the discovered HAI Dock and then press the Select button to save the network settings with the design Note An HAI Dock can be rediscovered at any time by right clicking on HAI Dock and select Discover from the menu in Project Explorer ...

Страница 32: ...tem where the audio will be routed for the Media Source Audio Output of the HAI Dock 2 When complete click the OK button Note At any time the Media Source can be remapped to the Media Input as follows a In Project Explorer expand the HAI Dock device to display the Media Sources folder b Expand the Media Sources folder to display Channel 1 audio output c Right click on one of Channel 1 and select A...

Страница 33: ...displayed 1 Click on the drop down under Pages next to HAI Dock and select Dock Now Playing 2 Click on the drop down under Pages next to Supported WHA and select Dock Now Playing Note At any time the Pages can be remapped as follows a In Project Explorer expand the HAI Dock device to display the Media Services folder b Expand the Media Services folder to display the available Services c Right clic...

Страница 34: ...een using Automation Studio To update the touchscreens 1 Click the Update icon on the toolbar 2 If the project has not been saved you will be prompted to save 3 To save the project and continue with the update click OK 4 All discovered touchscreens are displayed in the Update Touchscreens dialog ...

Страница 35: ...ck in the boxes under Update to select which touchscreens will be updated 6 Click the Update button to update the selected touchscreens 7 After the update is complete the touchscreens will have HAI Dock functionality ...

Страница 36: ...en you can browse and make music selections by Playlists Artists Albums Songs Podcasts Genres Composers and Audiobooks From the Menu Bar on an OmniTouch 5 7e 10p or 10pe Touchscreen select the Media icon When the media button is selected the HAI Dock media page is displayed ...

Страница 37: ...ton to display the available media 2 You are able to browse your media by Playlists Artists Albums Songs Podcasts Genres Composers and Audiobooks 3 Select the desired method to browse the media For example if Artists was selected a list of artists will be displayed 4 Select the item in the list to drill down to the music in the selected category ...

Страница 38: ...ce button to display the available music sources 2 Select the audio output for the iPod that you want to listen to or select from one of the other available sources Notes 1 When controlling the HAI Dock using an OmniTouch Touchscreen the name of the iPod is displayed as the audio source so that there s no guessing to whose iPod is currently docked 2 When an iPod is not currently docked in an HAI D...

Страница 39: ...ing a New Audio Zone To select a new audio zone to control with the touchscreen 1 Press the Zone button to display the available audio zones 2 Select the audio zone that you want to control with the touchscreen ...

Страница 40: ...022 EN55024 CPU 32bit RISC CPU Memory RAM 8MByte FlashROM 2MByte Wired network interface 10BASE T 100BASE TX 1 port automatic detection Wireless network interface IEEE802 11b Frequency 2 4GHz Transmission system DS SS Transmission speed 1M 2M 5 5M 11M Automatic detection Channel US 1 11ch EU 1 13ch IEEE802 11g Frequency 2 4GHz Transmission system OFDM Transmission speed 6M 9M 12M 18M 24M 36M 48M 5...

Страница 41: ......

Страница 42: ......

Отзывы: