


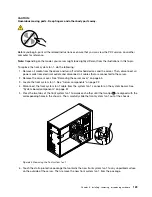


9. Do one of the following:
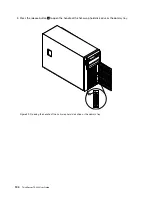
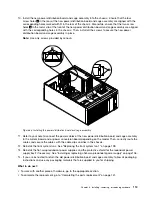
• For the backplane for server models with 3.5-inch hard disk drive bays, remove the four screws that
secure the backplane, and then remove the backplane from the hard disk drive cage.
Figure 70. Removing the backplane for server models with 3.5-inch hard disk drive bays
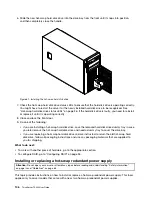
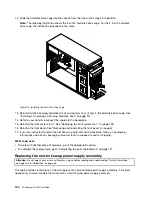
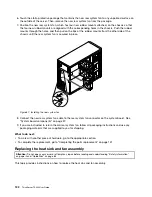
• For the backplane for server models with 2.5-inch hard disk drive bays, remove the six screws or
three screws that secure the backplane depending on the type of the backplane. Then, remove
the backplane from the hard disk drive cage.
Figure 71. Removing the backplane for server models with 2.5-inch hard disk drive bays
10. Touch the static-protective package that contains the new hot-swap hard disk drive backplane to any
unpainted surface on the outside of the server. Then, remove the new backplane from the package.
Note:
Carefully handle the backplane by its edges.
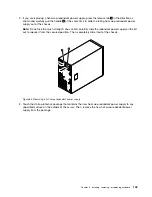
11. Position the new backplane on the hard disk drive cage so that the screw holes in the new backplane
are aligned with the corresponding holes in the hard disk drive cage. Then, do one of the following
depending on the hard disk drive cage:
118
ThinkServer TS440 User Guide
Содержание ThinkServer TS440
Страница 1: ...ThinkServer TS440 User Guide Machine Types 70AL 70AM 70AN and 70AQ ...
Страница 16: ...4 ThinkServer TS440 User Guide ...
Страница 18: ...6 ThinkServer TS440 User Guide ...
Страница 56: ...44 ThinkServer TS440 User Guide ...
Страница 74: ...62 ThinkServer TS440 User Guide ...
Страница 166: ...154 ThinkServer TS440 User Guide ...
Страница 176: ...164 ThinkServer TS440 User Guide ...
Страница 181: ......
Страница 182: ......


