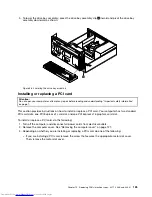


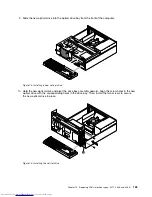

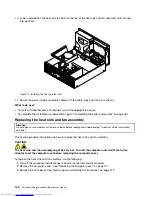

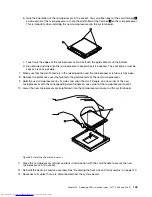


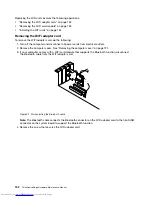


8. Install the new power supply assembly into the chassis so that the screw holes in the new power supply
assembly are aligned with the corresponding holes in the rear of the chassis. Then, install the three
screws to secure the new power supply assembly in place.
Note:
Use only screws provided by Lenovo.
3
4
5
6
7
8
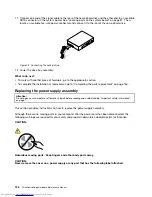
Figure 78. Installing the power supply assembly
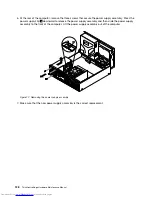
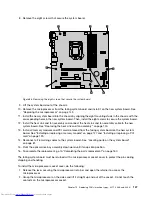
9. Connect the new power supply assembly cables to all drives and the system board. See “Locating
parts on the system board” on page 81.
Chapter 10
.
Replacing FRUs (machine types: 3377, 3386, and 3388)
139
Содержание ThinkCentre Edge 92
Страница 1: ...ThinkCentre Edge Hardware Maintenance Manual Machine Types 3376 3377 3378 3386 3387 and 3388 ...
Страница 6: ...2 ThinkCentre Edge Hardware Maintenance Manual ...
Страница 13: ...Chapter 2 Safety information 9 ...
Страница 14: ... 18 kg 37 lb 32 kg 70 5 lb 55 kg 121 2 lb 10 ThinkCentre Edge Hardware Maintenance Manual ...
Страница 18: ...14 ThinkCentre Edge Hardware Maintenance Manual ...
Страница 19: ...1 2 Chapter 2 Safety information 15 ...
Страница 20: ...1 2 16 ThinkCentre Edge Hardware Maintenance Manual ...
Страница 26: ...22 ThinkCentre Edge Hardware Maintenance Manual ...
Страница 27: ...1 2 Chapter 2 Safety information 23 ...
Страница 31: ...Chapter 2 Safety information 27 ...
Страница 32: ...1 2 28 ThinkCentre Edge Hardware Maintenance Manual ...
Страница 36: ...32 ThinkCentre Edge Hardware Maintenance Manual ...
Страница 124: ...120 ThinkCentre Edge Hardware Maintenance Manual ...
Страница 166: ...162 ThinkCentre Edge Hardware Maintenance Manual ...
Страница 170: ...166 ThinkCentre Edge Hardware Maintenance Manual ...
Страница 175: ......
Страница 176: ...Part Number Printed in USA 1P P N 1P ...