


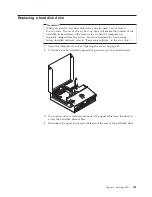


7.
To
install
the
new
drive
into
the
blue
bracket,
flex
the
bracket,
and
align
the
pins
1
through
4
on
the
bracket
with
the
holes
in
the
hard
disk
drive.
Do
not
touch
the
circuit
board
5
on
the
bottom
of
the
hard
disk
drive.
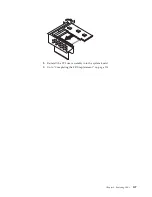
8.
Install
the
hard
disk
drive
and
bracket
into
the
drive
bay.
9.
Pivot
the
drive
and
bracket
towards
the
front
of
the
computer
and
snap
it
into
position.
10.
Connect
the
signal
and
power
cables
to
the
rear
of
the
new
hard
disk
drive.
11.
Go
to
“Completing
the
FRU
replacement”
on
page
114.
Chapter
8.
Replacing
FRUs
103
Содержание ThinkCentre A55
Страница 1: ...Hardware Maintenance Manual Types 9636 9638 9640 9641 9642 9643 9644 9645 ...
Страница 2: ......
Страница 3: ...Hardware Maintenance Manual ...
Страница 6: ...Appendix Notices 201 Television output notice 202 Trademarks 202 iv Hardware Maintenance Manual ...
Страница 16: ...10 Hardware Maintenance Manual ...
Страница 17: ...Chapter 2 Safety information 11 ...
Страница 18: ... 18 kg 37 lbs 32 kg 70 5 lbs 55 kg 121 2 lbs 1 2 12 Hardware Maintenance Manual ...
Страница 22: ...16 Hardware Maintenance Manual ...
Страница 23: ...1 2 Chapter 2 Safety information 17 ...
Страница 24: ...18 Hardware Maintenance Manual ...
Страница 25: ...1 2 Chapter 2 Safety information 19 ...
Страница 32: ...26 Hardware Maintenance Manual ...
Страница 33: ...Chapter 2 Safety information 27 ...
Страница 34: ...1 2 28 Hardware Maintenance Manual ...
Страница 38: ...32 Hardware Maintenance Manual ...
Страница 39: ...1 2 Chapter 2 Safety information 33 ...
Страница 54: ...48 Hardware Maintenance Manual ...
Страница 102: ...96 Hardware Maintenance Manual ...
Страница 115: ...Chapter 8 Replacing FRUs 109 ...
Страница 122: ...116 Hardware Maintenance Manual ...
Страница 206: ...200 Hardware Maintenance Manual ...
Страница 209: ......
Страница 210: ...Part Number 42Y4652 Printed in USA 1P P N 42Y4652 ...


