8
Play Deck Model 5010 • 09-1209
Items needed for this phase:
Hardware needed for this phase:
Spike T-Nut * 5/16" * 16 Req
Hex Bolt * 5/16" x 2" * 14 Req
Fender Washer * 5/16" x 11/16" * 16 Req
Internal Tooth Lock Washer * 5/16" – 19/32" OD * 16 Req
Hex Bolt * 5/16" x 3/4" * 2 Req
E2 * Fort Leg * 2 Req
N3 * Top Rail-MB * 1 Req
N6 * Wall Rail * 1 Req
P5 * Wall Rail * 1 Req
N7 * Base Board * 1 Req
Note: When assembling the fort, position the boards
so that the stamps are hidden.
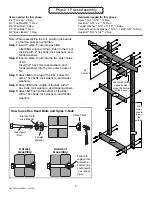
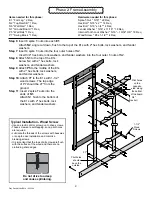
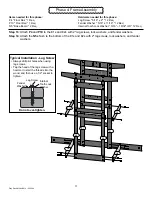
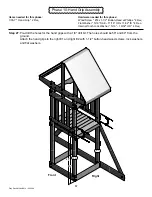
Step 1
: Insert 7 spike T-nuts into each
E2
.
Attach
N3
, angle cut down, fl ush to the top of
the E2s with 2" hex bolts, lock washers, and
fender washers.
Step 2
: Insert 2 spike T-nuts into the two outer holes
of N3.
Insert 3/4" hex bolts, lock washers, and
fender washers into the two outer T-nuts of
N3.
Step 3
: Attach
N6
to the top of the E2s, below N3,
with 2" hex bolts, lock washers, and fender
washers.
Step 4
: Attach
P5
to the middle of the E2s with 2"
hex bolts, lock washers, and fender washers.
Step 5
: Attach
N7
fl ush to the bottom of the E2s
with 2" hex bolts, lock washers, and fender
washers.
Phase 1: Frame Assembly
ex Bolt * 5/16" x 3/4" * 2 Req
E2
N7
P5
N6
N3
Correct
Assembly
How to use Hex Head Bolts and Spike T-Nuts
Internal Tooth
Lock Washer
Hex Head
Bolt
Fender
Washer
Spike T-Nut
Incorrect
Assembly
Failure to
replace this
bolt with a
shorter one
could result
in personal
injury.
3/4"
Hex bolt
E2
Pilot
holes
should
be on
the
outside.
Pilot holes on the
opposite side,
along the bottom
of the board.


