Leightronix IncodeX One Скачать руководство пользователя страница 12

Page 8

2018-05-18

IncodeX One Point-to-Point

Broadcasting Solution

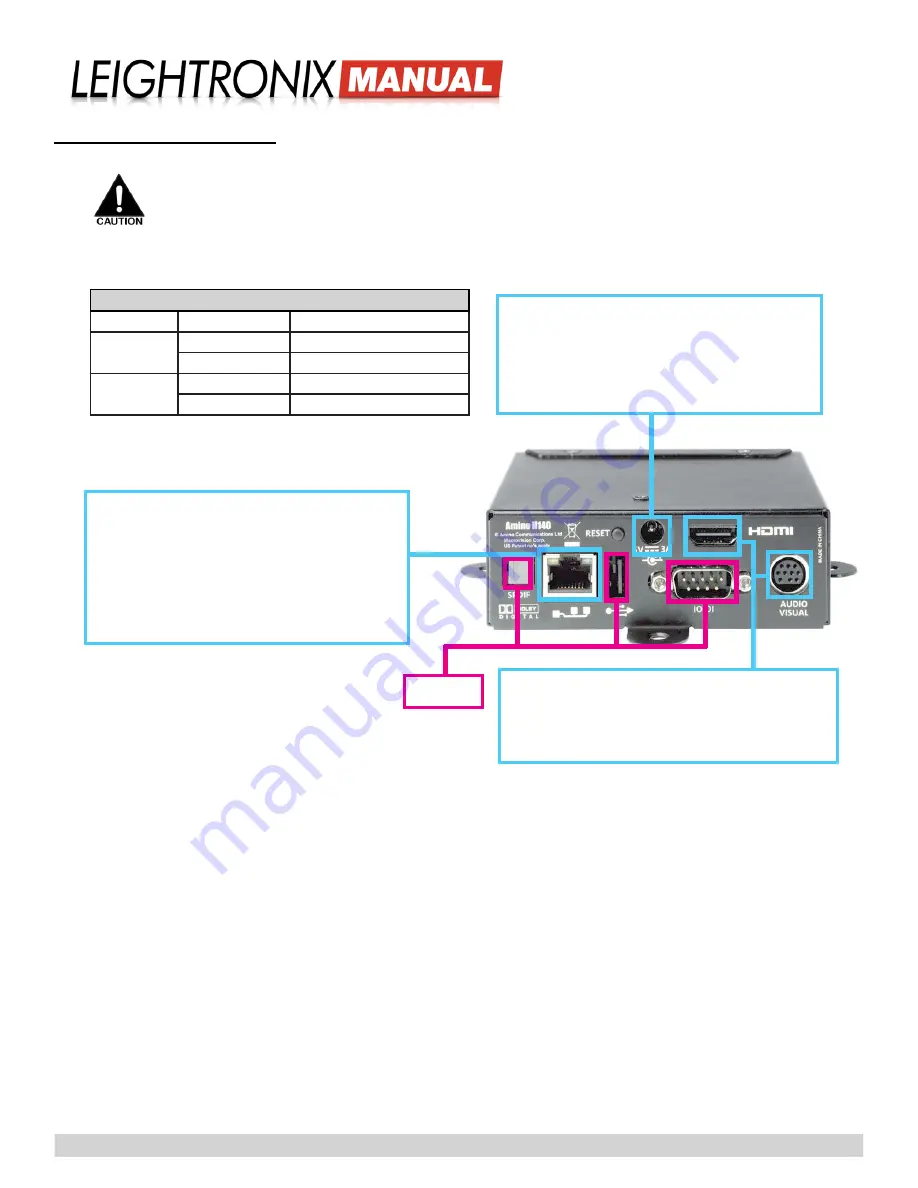
Using the included straight-through RJ-45 

Ethernet cable, connect the decoder’s 

Ether-

net port directly to a cable or DSL modem or 

to a 10/100 BASE-T switch on your TCP/IP 

network.

  To check your network connection, 

look at the Ethernet LEDs above the Ethernet 

port and compare to the table above. 

Decoder Ethernet LED Indicators

LED Position

State

Description

Left

Off

Connection speed is 10Mb/s

Blinking amber

Connection speed is 100Mb/s

Right

Off

Ethernet link not established

Steady on green

Ethernet link established. 

Connect the included power cable to the pow-

er cord connector and then plug the other end 

into an AC power source.  The decoder will 

automatically power on into standby mode, as 

indicated by the red LED on the front panel.

INSTALLING THE DECODER

1. 

The decoder may be left as a standalone, tabletop unit or secure to a flat surface with its three metal mounting tabs.

Do not block ventilation openings or stack electronic equipment on top of decoder.

2. 

Attach your network, power, and signal wiring to the decoder according to the instructions below:

Attach a display monitor to the HDMI port using 

the included cable, or, if using an analog moni-

tor, use the included break-out cable to connect 

the monitor to the “Audio/Visual” port. 

Not used

IMPORTANT NOTE! 

To display the incoming video stream on the monitor/display 

device attached to your decoder, press the “STB” button twice on the decoder’s 

included remote control.

Содержание IncodeX One

Страница 1: ...PRODUCT MANUAL Installation Configuration and Operation Instructions END TO END Solutions for Broadcast Streaming...

Страница 2: ...Support At LEIGHTRONIX every customer of our standard product line receives technical support at no extra charge There are no service contracts no annual renewals no allowances no deductibles and no...

Страница 3: ...Settings into the Decoder 9 FIREWALL CONFIGURATION 10 INCODEX ONE INTERFACE SETTINGS 11 Opening and Logging into the IncodeX One Interface 11 Saving Changing Encoding and Output Settings 11 Stopping...

Страница 4: ......

Страница 5: ...ding type plug A grounding type plug has two blades and a third grounding prong The third prong is provided for your safety If the provided plug does not fit into your outlet consult an electrician fo...

Страница 6: ...ected to a power source and turned on The green Actvity light turns on when the IncodeX One is encoding FRONT PANELS DECODER FRONT PANEL The decoder s front panel includes an infrared sensor for recei...

Страница 7: ...udes from left to right top to bottom On Off Switch To turn on power to the IncodeX One press the symbol on the switch upward The IncodeX One s encoder starts encoding when the device is powered on To...

Страница 8: ...ON If using connect your analog audio source to the audio inputs LEIGHTRONIX strongly recommends the use of an uninterruptible power supply UPS with the IncodeX One Damage from power loss or spikes is...

Страница 9: ...f your IncodeX One s serial number from the sticker on the encoder s back panel b Next convert these four characters from their hexadecimal format into the decimal format used in your Inco deX One s t...

Страница 10: ...ticker Click Ok to open the IncodeX One interface in your Internet browser window see Illustration 2 4 Obtain an IP address and port number for your decoder from your network administrator and then en...

Страница 11: ...3 on page 7 6 If you wish to keep your IncodeX One in static network mode you will need to obtain a static IP and subnet mask address for your IncodeX One from your network administrator On the netwo...

Страница 12: ...or and then plug the other end into an AC power source The decoder will automatically power on into standby mode as indicated by the red LED on the front panel INSTALLING THE DECODER 1 The decoder may...

Страница 13: ...ideo settings Perform the following a Use the up down arrow keys to navigate to the UDP end timeout field b Press the Enter key to access the setting and then use the right left arrow keys to change t...

Страница 14: ...ill need to open the decoder s UDP port on your firewall between your IncodeX One s media access control MAC address and the IP address of your destination device This will allow your decoder to recei...

Страница 15: ...ed to enter a user name and password 4 Enter admin into the User Name field and the last six characters of your IncodeX One s serial number as the pass word this can be found on the encoder s back pan...

Страница 16: ...om Analog Jacks If you are choosing to encode a source connected to the HD SD SDI video input you may select Analog Jacks to encode analog audio along with it or if there is audio embedded in your dig...

Страница 17: ...However more features mean more complex encoding and decoding is required for the higher level profiles When choosing an H 264 profile the main thing to consider is the devices your viewers will be us...

Страница 18: ...e over head data in your outgoing stream 2 Click the Save User button to save the change s in your user profile 3 Apply your changes by clicking the Restart Encoder button CHANGING NETWORK SETTINGS Yo...

Страница 19: ...en on page 6 to access the IncodeX One s firmware update button 2 Click the UPDATE button 3 Click the Choose file button see Illustration 8 and navigate to the location on your computer where you save...

Страница 20: ...formation Video Inputs The IncodeX One provides the two following video inputs 1 BNC female composite video input terminated 75 ohms 1 BNC female HD SD SDI video input SMPTE 259M C with support for 2...

Страница 21: ...the encoder must have stable sync The IncodeX One encoder supports the following HD Video Encoding H 264 High Main and Baseline profiles 1080i and 720p video resolutions 128 kb s 10 Mb s variable and...

Страница 22: ...Memory 128MB Flash 256MB RAM Input 1 Ethernet 10 100 BASE T via RJ 45 shielded connector Outputs HDMI 1 3a with HDCP and CEC 10 way Mini DIN for Composite video Component YPrPb RGB S Video and analog...

Страница 23: ...iable for any injury loss or damage direct or consequential arising out of the use of or the inability to use the product Before using the user shall determine the suitability of the product for his h...

Отзывы: