background image

EN

85

Playback/Review mode

 DISPLAYS IN PLAYBACK/REVIEW MODE

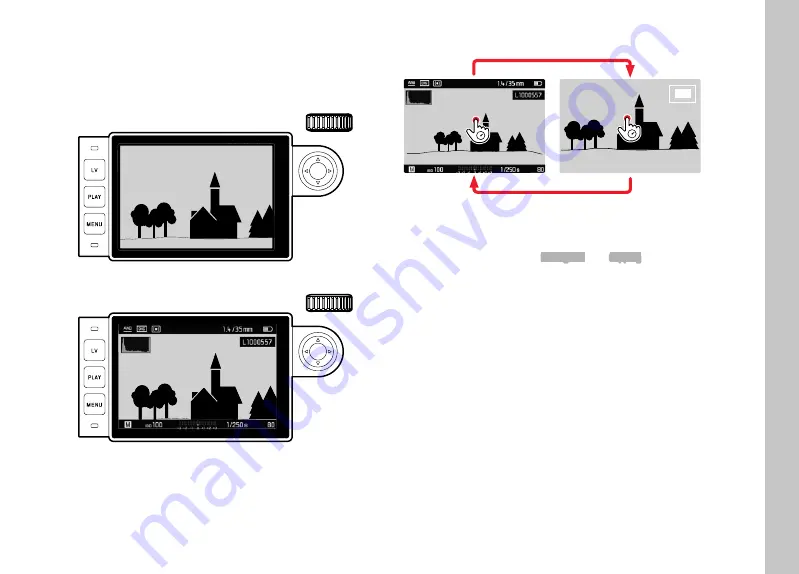
With the factory settings in place, the shot will be displayed in 

review mode without the information in the header and footer lines 

to allow an unobstructed view of the entire image.

22:45 

PM 

22.02.2012

999-9000

8234/9999

12

MP

2.8

F

1/8000

12500

ISO 

EV 

INFO

You can call up the header and footer lines at any time.

22:45 

PM 

22.02.2012

999-9000

8234/9999

12

MP

2.8

F

1/8000

12500

ISO 

EV 

INFO

Using gesture control

Using


button control


Press the center button

• Where the functions 

Histogram

 and 

Clipping

 are activated, 

these displays will appear as well.

Notes

• The histogram and the clipping indicators are available when 

viewing both the entire picture and a section of it, but not when 

simultaneously viewing 12 or 20 reduced pictures.

• The histogram and clipping displays always refer to the currently 

shown picture section.

Содержание M10- P ASC 100 Edition

Страница 1: ...LEICA M10 P Instruction manual ...

Страница 2: ...Leica Camera AG SCOPE OF DELIVERY Before using your camera for the first time please check that the accessories supplied are complete Leica M10 P Camera bayonet cover Lithium ion battery Leica BP SCL 5 Battery charger Leica BC SCL 5 incl mains cable and in car charger cable Carry strap Drawstring pouch for battery charger and cables Manual this book Test certificate Registration card Subject to ch...

Страница 3: ...its external viewfinders and the hand grip Only the accessories specified and described in this manual or by Leica Camera AG must be used with the camera battery charger mains plug mains cable etc These accessories should only be used with this product Third party accessories may result in malfunctions or damage to the product Please make sure to read the chapters Legal information Safety remarks ...

Страница 4: ...thin the scope of personal use and or which the consumer has received from the provider who is in possession of a license to offer AVC Video No license is granted or implied for any other use Any other use specifical ly the provision of AVC video in exchange for remuneration may require a separate license agreement with MPEG LA L L C Please visit the MPEG LA L L C website at www mpegla com for mor...

Страница 5: ...a recycling collection point provided by your local authority This service is free of charge Any standard or rechargeable batteries used in this device must be removed and disposed of separately in accordance with local regulations Please contact your local authorities waste disposal collection point or the retailer from whom you purchased the device for more information on correct waste disposal ...

Страница 6: ...ith the GPS antenna pointing straight upwards Make sure not to cover the GPS antenna with your hand or any object specifically metallic objects Perfect signal reception from GPS satellites may be impossible in the following locations or under the circumstances listed below Geo location may then be impossible or erratic at best in enclosed spaces underground under trees in a moving vehicle in the v...

Страница 7: ...relessly communicated data We highly recommend that you activate encryption in the wireless access point settings to ensure data safety Avoid using the camera in areas where it can be exposed to magnetic fields static electricity or other interferences e g near a microwave oven RF transmissions may otherwise not reach the camera Using the camera near devices like microwave ovens or wireless phones...

Страница 8: ...h shoe Take care not to soil or scratch the sensor for lens detection in the bayonet You must similarly prevent direct contact of the bayonet with grains of sand or similar particles as these could cause irreparable damage This camera component must only be cleaned with a dry cloth Use a cotton or linen cloth instead of an optical micro fiber cloth synthetic Before touching the contacts you can ma...

Страница 9: ...an get very hot and cause severe burns When a battery is accidentally dropped make sure to check the housing and the contacts immediately for any damage A damaged battery can damage the camera In case of noise discoloration deformation overheating or leaking fluid the battery must be removed from the camera or charger immediately and replaced Continued use of the battery may result in overheating ...

Страница 10: ...d must never be connected while the charger is connected to mains electricity MEMORY CARD Never remove the memory card during a datasave or card reading process The camera must not be switched off or be subjected to impact or vibrations while working Do not open the cover remove the memory card or the battery while the status LED is lit which indicates memory access Data on the card may otherwise ...

Страница 11: ...se on a camera or on binoculars Any other use poses the risk of injury and may possibly result in damage to the carry strap and is therefore not permitted Carry straps should also not be used for cameras binoculars during sports activities with a high risk of getting entangled in the carry strap e g mountain climbing and similar outdoor activities Please read the section about Care Maintenance for...

Страница 12: ...ium ion batteries can be charged at any time regardless of their current charge level A partially charged battery will charge to full capacity faster than a fully discharged one The rechargeable batteries come only partly charged ex works and should therefore be charged fully before their first use A new battery only reaches its full capacity after it has been fully charged and by using it in the ...

Страница 13: ... proper recycling You will find the date of manufacture on the battery itself The date format is week year MEMORY CARD The range of available SD SDHC SDXC cards on the market is too extensive for Leica Camera AG to test all types for compati bility and quality Generally any type of memory card may be used without any damage to the camera or memory card As some no name cards may not fully comply wi...

Страница 14: ...tions that are controlled electronically improvements and enhancements to the functions can be installed on the camera at a later date Leica releases what are known as firmware updates at irregular intervals Cameras are always supplied from the factory with the latest firmware Otherwise you can download it from our website yourself and transfer it to your camera If you register as an owner on the ...

Страница 15: ...marks in this manual Note Additional information Important Failure to observe the instructions may result in damage to the camera the accessories or the pictures Attention Failure to observe this information can result in personal injury ...

Страница 16: ... DESIGNATIONS 20 CAMERA 20 LENS 22 DISPLAYS 23 VIEWFINDER 23 LCD PANEL 24 WHEN TAKING A PICTURE 24 REVIEW MODE 25 PREPARATIONS 26 ATTACHING THE CARRYING STRAP 26 PREPARING THE CHARGER 26 CHARGING THE BATTERY 27 INSERTING THE BATTERY IN THE CHARGER 27 CHARGE STATUS DISPLAYS ON THE CHARGER UNIT 27 INSERTING REMOVING THE BATTERY 28 CHARGE STATUS INDICATOR ON THE LCD PANEL 29 MEMORY CARD INSERTION REM...

Страница 17: ...TINGS 48 LCD PANEL SETTINGS 48 BRIGHTNESS 48 INFORMATION DISPLAYS 49 BASIC PICTURE SETTINGS 50 FILE FORMAT 50 IMAGE PROPERTIES 50 JPG RESOLUTION 50 JPG SETTINGS 50 LENS DETECTION 52 USING A LEICA M LENS WITH 6 BIT ENCODING 52 USING A LEICA M LENS WITHOUT 6 BIT ENCODING 52 USING A LEICA R LENS 53 PICTURE MODE 54 IMAGE TYPES 54 USING THE RANGEFINDER 54 LIVE VIEW MODE 56 FOCUSING 56 DISTANCE METERING...

Страница 18: ...0 DELETING INDIVIDUAL PICTURES 91 DELETING MULTIPLE ALL PICTURES 91 OTHER FUNCTIONS 92 USER PROFILES 92 SAVE CURRENT SETTING AS USER PROFILE 92 APPLY ACTIVATE PROFILE 93 EXPORTING IMPORTING PROFILES TO FROM THE MEMORY CARD 93 DATA MANAGEMENT 94 DATA STRUCTURE ON THE MEMORY CARD 94 CHANGING FILE NAMES 95 CREATING A NEW FOLDER 95 RESETING IMAGE NUMBERING 96 COPYRIGHT MARK 96 RECORDING THE PICTURE LO...

Страница 19: ...EN 19 ...

Страница 20: ...ets 6 Accessory shoe Front view 7 Lens release button 8 Focus button 9 Bayonet 10 Sensor 11 Rangefinder viewing window 12 Brightness sensor1 13 Self timer LED 14 Viewfinder viewing window 15 6 bit encoding sensor for lens detection 16 Image field selector 17 Bottom cover locking point 1 Leica M lenses with viewfinder attachment cover the brightness sensor Please read the sections Displays viewfind...

Страница 21: ...nel 26 Brightness sensor for LCD panel 27 Picture Recording Datasave LED Bottom view bottom cover fitted 28 Bottom cover 29 Locking toggle for bottom cover 30 Tripod thread A DIN 4503 Bottom cover removed 31 Memory card slot 32 Battery compartment 33 Battery locking latch 34 Latch for bottom cover 18 19 20 21 22 23 24 26 27 22 25 28 29 30 31 32 33 34 ...

Страница 22: ... with scale a Index for aperture values 37 Focus ring a Focus tab 38 Fixed ring a Focusing Index b Depth of field scale c Index button for lens replacement 39 6 bit encoding sensor for lens detection Representative image Technical features may vary depending on model Part Designations ...

Страница 23: ...ng the shutter button Notification regarding temporarily full cache Message No memory card Sd Message Memory card full full b top Indicates when lit that saved metering values are being used c bottom Indicates flashing that exposure compensation is being used d For manual exposure setting Concurrently as light balance for exposure compensation The triangular LEDs give the direction of rotation of ...

Страница 24: ...CD PANEL WHEN TAKING A PICTURE All displays values refer to actual settings In Live View mode 1 2 7 10 11 8 9 18 17 16 14 13 12 15 3 4 5 6 When using the viewfinder 6 13 14 15 16 20 3 4 2 1 5 18 12 18 Displays ...

Страница 25: ...sections red 9 Identification of in focus edges in the subject Focus peaking 10 Spot exposure metering field only if the metering method is switched on 11 Grid lines choice of 2 variants 12 Exposure mode 13 ISO Sensitivity 14 Light balance 15 Exposure compensation scale 16 Shutter speed 17 Exposure simulation 18 Remaining number of pictures incl trend detection by means of bar charts 19 Display of...

Страница 26: ...hed the carry strap please make sure that the clips are mounted correctly to prevent the camera from falling PREPARING THE CHARGER Use the mains cable with the matching regional plug to connect the charger to mains electricity Note The charger will automatically adapt to local mains voltage ...

Страница 27: ...UNIT The status LED indicates a correct charging process Display Charge status Charge time CHARGE flashes green battery is charging 80 lights up orange 80 approx 2 h CHARGE continuous green light 100 approx 3 h Disconnect the charger from mains electricity when the charging process is complete There is no risk of overcharging for a completely discharged battery ...

Страница 28: ...that the camera is switched OFF see p 34 OPENING THE BOTTOM COVER CLOSING THE BOTTOM COVER Insert the bottom cover Fig 1 3 Turn the locking toggle in clockwise direction Click down the locking toggle Check that the bottom cover was inserted and closed correctly ...

Страница 29: ...efore switching on the camera CHARGE STATUS INDICATOR ON THE LCD PANEL You can see the charge level of the battery on the display if you press the center button Display Charge status approx 88 100 approx 63 87 approx 47 62 approx 36 46 approx 26 35 approx 0 25 Battery needs to be replaced or charged ...

Страница 30: ...ported Memory cards with capacities between 1GB and 2GB must be formated before first use Make sure the memory card is correctly aligned if you are having difficulties inserting it into the camera Removing the bottom cover or the memory card while the camera is switched on or switching on the camera while the bottom cover is not attached will trigger the following warning message on the display Bo...

Страница 31: ...red to in this process which enable precise focusing of every camera lens combination in photographic practice If wide aperture lenses 1 4 are used with an open aperture the then sometimes resulting very low depth of field and inaccuracies in focusing with the rangefinder may lead to setting errors resulting from the added overall toler ance of the camera and lens It can therefore not be ruled out...

Страница 32: ... tripod mount on relevantly equipped lenses COMPATIBLE BUT EXACT FOCUSING IS LIMITED Despite the high precision of the rangefinder on the camera exact focusing with 135 mm lenses with an open aperture cannot be guaranteed due to the very low depth of field We therefore recommend stopping down by at least 2 steps Live View mode on the other hand plus the various setting aids provided allow unrestri...

Страница 33: ...the release button on the camera housing Attach the lens in this position Turn the lens clockwise until you hear and feel it click into place REMOVAL Make sure that the camera is switched OFF Hold the lens on the fixed ring Press and hold the release button on the camera housing Turn the lens counter clockwise until the alignment button is opposite the release button Remove the lens ...

Страница 34: ... approx 1 s Once switching on the LED lights up briefly and the displays in the viewfinder appear SWITCHING THE CAMERA OFF Off Note The function Auto Power Saving see p 47 deactivates the camera automatically if no operation occurs within a preset time Use the main switch to deactivate the camera if this function is Off to prevent inadvertent exposures and battery discharge when the camera is not ...

Страница 35: ...emory card Notes Press down the shutter button in a smooth motion until you hear the click of the shutter This will prevent camera shake The shutter button remains locked if the internal buffer memory is temporarily full e g after a series of 16 pictures if the memory card inserted and the internal buffer memory are temporarily full if the battery has exceeded its performance limits capacity tempe...

Страница 36: ... exposure settings A Aperture priority mode automatic shutter speed control 4000 8s Fixed shutter speed of 1 4000 s to 8 s with intermediate values clicking in increments B Long term exposure bulb The shortest possible sync speed of 1 180 s for flash mode ISO SETTING WHEEL A Automatic ISO sensitivity control 100 6400 Fixed ISO values M Manual ISO sensitivity control Fig 2 Push the ISO setting whee...

Страница 37: ...gh the picture memory DIRECTIONAL PAD CENTER BUTTON DIRECTIONAL PAD for menu navigation for menu item function selection for scrolling through the picture memory for controlling the selected image section when using Greycard CENTER BUTTON for the status display for applying menu settings for display of settings data when taking a picture for display of picture data during picture review ...

Страница 38: ...AIN MENU submenu TOUCH SCREEN GESTURE CONTROL Tap briefly Tap twice horizontal vertical Swipe Two finger pinch spread In Picture mode Live View to select the exposure metering field position tap the desired on screen location once to select an image area for viewfinder live zoom tap twice In Playback Review mode to view display information tap once to scroll through the picture memory swipe to zoo...

Страница 39: ...S menu your custom list see p 44 for details on how to manage this list Note No favorites menu will be displayed if no menu item is assigned to it CONTROL ELEMENTS The following elements are used for menu control 18 15 16 17 19 20 18 LV button 15 Thumbwheel 19 PLAY button 16 Directional pad 20 MENU button 17 Center button ...

Страница 40: ...f the menu item 40 Setting of the menu item 41 Reference to the submenu 42 Scrollbar current position in the menu list SUBMENU 43 44 45 43 Current menu item 44 Submenu item 45 Reference to further submenus Notes In some cases an additional scale will be available where values can be set or function options can be selected ...

Страница 41: ...the MENU button 1x The FAVORITES menu appears To get back to the main menu from the favorites menu if the favorites menu consists of one page Press the MENU button 1x if the favorites menu consists of 2 pages Press the MENU button 2x or Select Main Menu last item in the favorites menu In Playback Review mode Tap the shutter button back to picture mode Press the MENU button The Home screen is displ...

Страница 42: ...cific circumstances Please read the relevant manual sections for more information The text in the relevant line is displayed in gray to signify the existence of a submenu CONFIRM SELECTION Press the center button The screen image changes back to the active menu item The set function variant is shown on the right in the relevant menu line Note No confirmation is needed for the selection of On or Of...

Страница 43: ...les upper lower case F Changing the character type G Number pad To move left or right Press the directional pad right left To go up or down Press the directional pad up down To toggle between upper and lower case letters Use the directional pad to select Shift E Press the center button To change the character type letters numerals Use the directional pad to select the F key Press the center button...

Страница 44: ...dit Favorites in the submenu Select the desired menu item Select On or Off A warning message appears when the favorites menu has reached the maximum of 15 items Note The favorites menu will be deleted completely if all menu items are set to Off DIRECT ACCESS TO MENU FUNCTION Assign a menu function to the thumbwheel for extra quick operation Exp Compensation or LV Zoom Select Custom Settings in the...

Страница 45: ...EN 45 Camera operation ...

Страница 46: ...u Select your language Aside from a few exceptions button names short names the language will be changed for all information DATE TIME DATE You can choose one of 3 options Select Date Time in the main menu Select Date Setting in the submenu Select the desired date format Day Month Year Month Day Year Year Month Day Set the date TIME Select Date Time in the main menu Select Time Setting in the subm...

Страница 47: ...Select On or Off Notes Auto GPS Time is available only if the GPS function is set to ON Time Zone and Daylight Saving Time are available only if the GPS function is set to OFF AUTO POWER SAVING STANDBY MODE The camera will switch to the power saving standby mode after a preset time to extend battery life if this function is activated Select Auto Power Saving in the main menu Select the desired set...

Страница 48: ...ed data and information When using the rangefinder you can press the Center button to call up the INFO screen to display a selection of settings see p 49 BRIGHTNESS RANGEFINDER The brightness sensor 10 automatically adjusts rangefinder brightness Note This automatic control is not available for Leica M lenses with viewfinder attachments as they cover the brightness sensor that supplies the require...

Страница 49: ...nformation displays in the default setting Tap the shutter button The footer appears Press the center button Header and footer are activated permanently Both lines disappear when you tap the shutter button You can select a number of other displays in addition to the standard information contained in the header and footer to adapt the image in picture and review mode to your needs These include ass...

Страница 50: ...he subject very fine image structures result in higher data quantities while homogeneous surfaces mean less data IMAGE PROPERTIES JPG RESOLUTION The JPG format setting offers 3 resolution number of pixels options L JPG 24 MP M JPG 12 MP and S JPG 6 MP MP megapixel You can therefore adjust your settings to the intended use and to the available memory card capacity Select JPG Settings in the main me...

Страница 51: ...in the picture Expanding or reducing these areas will therefore change the impression of sharpness COLOR SATURATION The saturation factor in color images determines whether colors in the picture appear pale and pastel like or bright and colorful While you can t do anything about weather conditions clear misty you can change the way an image is rendered Select JPG Settings in the main menu Select S...

Страница 52: ...which is calculated individually using the exposure metering system This is done whether or not an encoded or unencoded lens or a non M lens is attached via adapter and also whether or not the lens type was entered in the menu USING A LEICA M LENS WITH 6 BIT ENCODING The camera will automatically set the correct lens type when a Leica M lens with 6 bit encoding is used No manual setting will be re...

Страница 53: ...or mechanical transmission of the set focal length to the camera need for mirroring the correct bright line frame in the viewfinder The focal length is scanned by the camera electronics and the information is used for focal length specific corrections Due to space limitations the menu only contains an item number 11 625 The two other variants 11 890 and 11 894 can of course be used as well and the...

Страница 54: ...hen focusing due to the changing draw out i e the distance of the lens system to the sensor level When the set distance is below infinity and the draw out accordingly greater the actual view angle also decreases the lens captures less of the image object The view angle differences at greater focal lengths also tend to be larger due to the greater draw out 22 45PM 22 02 2012 999 9000 8234 9999 12MP...

Страница 55: ...ocal length of 28 Elmarit as of serial number 2 411 001 35 50 75 90 and 135 mm are used 35 mm 135 mm 22 45PM 22 02 2012 999 9000 8234 9999 12MP 2 8 F 1 8000 12500 ISO EV INFO 50 mm 75 mm 22 45PM 22 02 2012 999 9000 8234 9999 12MP 2 8 F 1 8000 12500 ISO EV INFO 28 mm 90 mm 22 45PM 22 02 2012 999 9000 8234 9999 12MP 2 8 F 1 8000 12500 ISO EV INFO ...

Страница 56: ...ht sources This may result in a flickering of the Live View screen image due to the sensitivity and scan rate of the image sensors This will not impact on the picture quality The effect can be avoided by selecting a slower shutter speed FOCUSING Various assist functions are provided for focusing depending on whether you use the camera s rangefinder or Live View mode DISTANCE METERING METHODS USING...

Страница 57: ... of field The metering field 2 of the rangefinder is displayed as a bright sharp edges rectangle in both methods The position of the metering field cannot be changed It will always be at the center of the viewfinder DISTANCE METERING METHODS IN LIVE VIEW MODE You can set the image sharpness in Live View mode via the screen image it will show the image subject at the exact sharpness as it is render...

Страница 58: ... the desired parts of the image subject Tap and hold the shutter button Turn the focus ring to sharpen the desired parts of the image subject Via the thumbwheel Select Custom Settings in the main menu Select Customize Wheel in the submenu Select LV Zoom Turn the thumbwheel to magnify the desired parts of the image subject Turn the focus ring to sharpen the desired parts of the image subject Notes ...

Страница 59: ...Turn the focus ring to mark the desired image subject compo nents All image components that are rendered in focus with the selected distance setting are marked with a silhouette in the selected color 22 45PM 22 02 2012 999 9000 8234 9999 12MP 2 8 F 1 8000 12500 ISO EV INFO Important This function relies on focus peaking i e differences between bright and dark This is why subjects that are not in f...

Страница 60: ...setting e g for reasons of picture composition Note When high ISO values are used or the image is edited later image noise as well as vertical and horizontal stripes may become visible particularly in front of larger evenly lit areas of the image subject Choose a click values engraved on the ISO setting wheel or the positions A for automatic setting values between ISO 200 and 50000 will be used 10...

Страница 61: ...re you select the highest sensitivity value You can allow the camera to ensure blur safe exposure times in the submenu Maximum Exposure Time by choosing one of the three focal length specific settings 1 f 1 2f 1 4f 1 or you can specify the greatest focal length manually between 1 2s and 1 500s In the focal length specific settings the camera will only switch to a higher sensitivity if the shutter ...

Страница 62: ...rm light similar to incandescent light at approx 3700 K1 Fluorescent Cool for indoor shoots using predominantly cool light from fluorescent tubes e g in work environments Select White Balance Select a setting 1 All color temperatures are stated in Kelvin MANUAL SETTING AFTER MEASUREMENT Greycard Select White Balance in the main menu Select Greycard in the submenu A message appears on the display P...

Страница 63: ...ing DIRECT SETTING OF THE COLOR TEMPERATURE You can directly set values between 2000 and 13100 K from 2000 to 5000 K in increments of 100 from 5000 to 8000 K in incre ments of 200 and from 8000 to 13100 K in increments of 300 That gives you a very wide range to choose from covering virtually all color temperatures that can occur in real life and within which you can adapt color rendering to any li...

Страница 64: ...View mode is used various metering methods are available When using the rangefinder Mostly center weighted metering The light reflected by the light colored shutter blades is captured and measured by a photodiode When the metering range of the exposure meter is undercut in a manual setting and very low light density then the triangular LED in the viewfinder will flash as a warning analogously the ...

Страница 65: ...left of the light balance will flash in the display if the metering range is undercut overshot When the shutter button is released without activating the shutter the relevant LED s will remain lit until the camera powers down au tomatically The exposure meter is disabled when the shutter speed setting wheel is set to B Select Exp Metering in the main menu Select a metering method The set metering ...

Страница 66: ...art from 19 Under extreme lighting condi tions and based on all the parameters the exposure meter may generate a shutter speed that is outside the working range i e brightness values that would require shorter exposures than 1 4000 s or longer than 4 min If that is the case then the camera will use the stated min or max shutter speeds and these values will flash as a warning in the viewfinder Note...

Страница 67: ...emaining exposure time after shutter release is counted down in seconds on the display for shutter speeds greater than 2 s EXPOSURE CONTROL FUNCTIONS WITH AUTOMATIC EXPOSURE EXPOSURE SIMULATION You can now assess the effect of the relevant exposure setting on the image before taking the picture There are two assessment methods available Release button half pressed Permanent With Release half press...

Страница 68: ...conjunction with exposure lock Live View also offers an exposure simulation feature see S 67 Aim at the important image component using the metering field for spot metering or alternatively at another detail with average brightness Tap the shutter button The measurement is taken and saved As long as the shutter button is held at the half way mark a small red dot will appear in the viewfinder at th...

Страница 69: ...ired value using the thumbwheel Using menu control Select Exposure Compensation in the main menu A scale appears as a submenu item Set the desired value Notes In case of A the compensation value is displayed in the viewfinder for example 1 0 0 3 temporary display instead of the shutter speed Then the compensation value is shown in the form of changed shutter speeds and a flashing dot at the bottom...

Страница 70: ...se relevant picture editing software to calculate an image with a particularly broad contrast spectrum HDR You can choose from 5 graduations 0 3EV 0 7EV 1EV 2EV 3EV and 3 or 5 pictures per series Select Drive Mode in the main menu Select Exp Bracketing in the submenu Select the desired number of pictures in the submenu under Frames Select the desired exposure offset in the submenu under F Stops Se...

Страница 71: ...l also be applied to all other pictures in a series i e the ISO value will not change during bracketing This may mean that the slowest shutter speed specified under Maximum Exposure Time is exceeded The focus range for automatic bracketing may be limited depending on the originally set shutter speed The specified numbers of pictures will be taken regardless Several pictures in a series may consequ...

Страница 72: ... if B is set and the self timer is also activated by tapping the shutter button It will then remain open without having to hold down the shutter button until the shutter button is tapped again This allows you to prevent any blurring for long exposures when the shutter button is pressed In each of these cases the exposure meter remains deactivated after shutter release however the digital number di...

Страница 73: ...menu Select Histogram in the submenu Function activation On or deactivation Off Notes The histogram will only appear when the shutter button is tapped if the function Exposure Simulation is set to Release button half pressed see p 67 The histogram is always based on the brightness displayed i e depending on the settings used it may not represent the final exposure In picture mode the histogram sho...

Страница 74: ...o adjust these displays to specific conditions or your compositional ideas you can specify limit values i e the level of over underexposure at which they appear The Clipping display therefore offers a very simple and exact means for checking and adjusting your exposure settings Select Capture Assistants in the main menu Select Exposure Clipping in the submenu Activate the function On or deactivate...

Страница 75: ...ss of how many pictures were taken in a series the last picture in the series or the last picture in the series or the last picture saved on the memory card while the saving process is ongoing will be displayed first i both review modes INTERVAL SHOOTING This camera allows you to capture motion sequences over extended periods of time automatically using the interval shooting function You must spec...

Страница 76: ...harged battery Interrupted or canceled interval shooting an be resumed by switching the camera off replacing the battery or memory card as needed and then switching the camera back on The pictures taken after function interruption will be stored in a separate group The interval function remains active after a picture series is completed and also after the camera is switched off and on again You wi...

Страница 77: ...d not when the shutter button is pressed FLASH PHOTOGRAPHY The camera determines the necessary flash intensity by firing one or more ranging flashes fractions of a second before taking the actual picture The main flash fires immediately after to enable exposure All factors influencing the exposure e g filters aperture settings distance to the main subject reflective ceilings etc are automatically ...

Страница 78: ... sync time of 1 180 s would result in overexposure then only a HSS compatible flash unit will fire in aperture priority mode Where that is the case the shut ter speed will be controlled in accordance with ambient light condi tions and displayed in the viewfinder In aperture priority mode and with manual setting the camera also allows the use of additional flash techniques like flash synchroniza ti...

Страница 79: ...f the TTL flash exposure metering in flash mode parallel or opposed Exception On the Leica SF 26 corrections must be set on the camera via menu control Please read the relevant instructions provided with the device for more information about flash use and the various available flash modes when using flash units that are not designed specifically for this camera FLASH MODES AUTOMATIC A Switch on th...

Страница 80: ...lash operation sync time an unneces sary more or less severe underexposure of all subject elements not correctly lit by the flash will occur in most situations The Leica M10 P allows you to fine tune the shutter speed used in flash mode in combination with Aperture Priority depending on the conditions of the subject or your own picture composition ideas Select Flash Settings in the main menu Selec...

Страница 81: ...e greater the difference between the two superimposed partial images The conventional time for firing the flash is at the start of exposure right after the 1 shutter curtain has completely opened the image window This may result in apparent contradictions e g the pic ture of a vehicle being overtaken by its own light trail The Leica M10 P allows you to select the time of the flash either at the st...

Страница 82: ... a correction set via EV X1 Notes The menu item Flash Exposure Compensation can only be used in conjunction with flash units on which the correction value cannot be set manually e g Leica SF 26 The settings on the scale in the camera menu can therefore only be confirmed if a suitable flash unit is connected and switched on A brighter flash illumination with Plus correction will require a stronger ...

Страница 83: ... mode must be set on the flash unit or an HSS com patible flash unit must be connected flashes slowly before the picture is taken 2 Hz The flash unit is not yet ready for use lights up before the picture is taken The flash unit is ready for use remains continuous ly lit after firing The flash is still ready flashes rapidly after taking the picture 4 Hz Successful flash photography The flash unit i...

Страница 84: ...view each picture right after it was taken That allows you to check whether the shot was successful or should be taken again The function additionally allows possibly in conjunction with the shutter button to set the length of time the picture will be displayed Select Auto Review in the main menu Select the desired function or the duration Off 1s 3s 5s Permanent in the submenu Note The picture wil...

Страница 85: ...header and footer lines at any time 22 45PM 22 02 2012 999 9000 8234 9999 12MP 2 8 F 1 8000 12500 ISO EV INFO Using gesture control Using button control Press the center button Where the functions Histogram and Clipping are activated these displays will appear as well Notes The histogram and the clipping indicators are available when viewing both the entire picture and a section of it but not when...

Страница 86: ...same commands to the left will play back the lower number pictures The pictures recordings are displayed in an endless loop in either direction Once the last picture recording is reached the first will appear again ENLARGED CROPPED SECTION You can enlarge a cropped section of a picture anywhere in the frame for closer inspection Magnifications up to 1 1 are available i e 1 pixel of the picture ren...

Страница 87: ...d section anywhere in the image The rectangle within the frame in the bottom left corner represents the magnified section as well as its position in the image Note You can move directly from one picture to the next in magnification mode with the next image shown at the same magnification Simply press the direction pad to the left or right while holding down the PLAY button ...

Страница 88: ...get an overview or to find a specific picture Using gesture control Using thumbwheel control Turn the thumbwheel to the left 12 pictures are shown at the same time Another turn on the thumwhell increases the number of pictures to 20 A C B A Picture B Image number of the currently viewed picture red C Scrollbar ...

Страница 89: ...w blocks of 20 pictures Turn the thumbwheel to the left until the entire field is framed in red This function speeds up scrolling PICTURE MARKING UNMARKING Any picture can be marked to e g find it again quicker or to facilitate a simultaneous deletion of multiple pictures see next section Marking can be done directly or via menu control MARKING A PICTURE Using button control Press the directional ...

Страница 90: ... operation Press the center button DELETING A PICTURE When reviewing a picture you have the option to delete it immediately This can be useful e g if the picture was already saved to other media if you no longer want it or if you need to free up space on the memory card You can optionally delete one several or all pictures simultaneously marked pictures cannot be deleted Press the MENU button The ...

Страница 91: ... picture appears once deletion is complete The following message appears if no other pictures are saved on the card No media file to display Notes Marking and deletion is only possible in PLAY review mode The processes are however not affected by whether a picture is displayed in standard size or if several pictures are shown as thumbnails that doesn t apply if the red frame encompasses the entire...

Страница 92: ...an be saved to a memory card for use on other cameras Similarly profiles saved on a memory card can be transferred to the camera SAVE CURRENT SETTING AS USER PROFILE CREATING PROFILES Saving settings Creating a profile Create custom settings for the desired functions via menu control Select User Profiles in the main menu Select Save as User Profile in the submenu Select a memory slot Confirm the s...

Страница 93: ...appear in the original menu list instead of the name of the profile used if you change one of the settings for the profile currently in use EXPORTING IMPORTING PROFILES TO FROM THE MEMORY CARD Select User Profiles in the main menu Select Export to Card or Import from Card in the submenu Confirm the selection Note During profile imports exports all 4 memory slots are transferred to from the memory ...

Страница 94: ...000001 XXX the second L1000002 XXX etc L stands for the camera brand you can change the next three characters at any time numerals or letters can be used The second group of numbers is the file number XXX stands for the file format DNG or JPG If the folder currently in use contains file number 9999 then a new folder is created in which the file numbering begins at 0001 again Notes When using memor...

Страница 95: ...see previous page When all user affected changes are reset then the file name will once again be L100XXXX XXX CREATING A NEW FOLDER Select Image Numbering in the main menu Select New Folder in the assocoated submenu A keyboard submenu is displayed The input line contains the full folder name The five white characters can be modified Delete the five selected characters Enter a name of your choice C...

Страница 96: ...anged The file numbers in the folder will start again at 0001 COPYRIGHT MARK This camera allows you to enter letters and other characters as a copyright mark for your picture files You can enter up to 20 characters of information under 2 headings per picture Select Camera Information in the main menu Select Copyright Information in the submenu Activate the Copyright function On Select Information ...

Страница 97: ...S in the main menu Function activation On or deactivation Off The satellite icon in the top display indicates the current status most recent geolocation max 6 min ago most recent geolocation max 24 hrs ago no geolocation data available FORMATTING A MEMORY CARD Memory cards that have already been in use with this camera will usually not require formatting An unformatted memory card that is inserted...

Страница 98: ...s saved will actually be irretrievable Make sure to reformat the memory card in your camera if it was originally formatted in another device e g a computer Contact your retailer or Leica Customer Care if the memory card cannot be formatted overwritten DATA TRANSFER The picture data on a memory card can be transferred to a computer via a card reader for SD SDHC SDXC cards WORKING WITH RAW DATA DNG ...

Страница 99: ...amera Since many camera functions are entirely controlled by software some of these improvements and additions to the functional scope can be installed in retrospect Leica offers firmware updates at irregular intervals which you can download from our website Leica will notify you of any new updates once you have registered your camera Find out which firmware version is currently installed Select C...

Страница 100: ...lly deactivates after 2 mins if no connection is established with the Leica app or the router or 30 s after the app is deactivated ABOUT JOINING A WLAN Join WLAN Access to the available Wifi networks is possible with this function When using this method the camera and the smartphone tablet PC will be registered on the same WLAN network Select WLAN in the main menu Activate ON Function in the subme...

Страница 101: ...te WLAN CREATE PERSONAL PASSWORD For security reasons you should change the predefined password for the connection to your Leica M10 P The data is encrypted with the WPA2 standard during the data exchange Select WLAN in the main menu Select Configuration in the submenu Enter the desired Password The keyboard submenu is displayed Confirm CHANGE DEVICE NAME SSID You can change the device name SSID o...

Страница 102: ...d period of time We also recommend repeated adjustment and use of all the other operating elements When using your camera in tropical climates make sure to expose the equipment to sunlight and fresh air as much as possible to prevent fungal growth Storage in airtight containers or cases is recommended only in conjunction with a desiccant like silica gel LENS A soft bristle brush will usually suffi...

Страница 103: ... reached room temperature RECHARGEABLE BATTERY Remove the rechargeable battery if the camera will not be used for an extended period of time as the date and time setting will be lost latest after 2 months Lithium ion rechargeable batteries should only be stored partially charged i e not fully depleted or fully charged The camera LCD panel will show the current charge level of the battery Charge th...

Страница 104: ...fter a few seconds Repeat the process as needed SENSOR CLEANING Any inspection or cleaning of the sensor should be done in an environment that is as much as possible dust free to prevent further contamination Use clean possibly ionized gases like air or nitrogen to blow loose dust from the cover glass of the sensor We recommend using rubber bellows without a brush Some specialist low pressure clea...

Страница 105: ...will appear if the battery capacity is lower to indicate that the function is currently not available and Yes cannot be selected Clean the sensor Make sure you follow the instructions below Switch off the camera after you finish cleaning The shutter will remain open for another 10 s for safety reasons A message appears on the display Please stop sensor cleaning immediately Important Leica Camera A...

Страница 106: ...e visible condensation This may occur when the camera is moved directly from a cold environment into heat Wait for the camera to acclimatize and the condensation will disappear The date and time display is incorrect or not shown The camera hasn t been in use for an extended period of time and no battery was inserted Insert a fully charged battery Set the date and time RECHARGEABLE BATTERY CHARGER ...

Страница 107: ...l Delete some pictures before taking new ones No memory card is inserted and the cache is full The memory card is write protected or defective Deactivate the protection or insert another memory card Image numbering has reached its limit Reset the image numbering The sensor is overheating Allow the camera to cool down The picture won t save Have you inserted a memory card The memory card is full De...

Страница 108: ...e 64 Exposure compensation 69 Exposure metering methods 64 Exposure setting 66 Exposure simulation 67 Exposure manual 67 FAQ 106 Favorites menu 39 44 File name 95 Firmware 99 Focal length 54 Focus assist 58 Focus peaking 59 Focusing 56 Focusing manual in Live View mode 57 Focusing manual in the viewfinder 56 Folders 94 Format 50 Formatting 97 General notes 12 Greycard 62 Grid lines 74 Histogram 73...

Страница 109: ...cope of delivery 2 SD SDHC SDXC card 30 98 Self timer 77 Sensor 104 112 Sensor cleaning 104 Sharpness image properties 51 Sharpness setting focusing 56 Short cut 44 Shutter 20 Shutter button 35 Shutter release 35 Shutter speed 36 Shutter speed setting 36 Shutter speed setting wheel 36 Split image method 57 Spot metering exposure 64 Standby mode 47 Storage 102 Submenu 40 Superimposed image method 5...

Страница 110: ... Compensation l l Flash Settings l l ISO Setup l l M ISO also available White Balance l l File Format l l JPG Settings l l JPG resolution also available Auto Review l Capture Assistants l EVF Display Control l User Profiles l Load Profile also available Customize Control l Display Brightness l EVF Brightness l Auto Power Saving l WLAN l ...

Страница 111: ...TES Available for FAVORITES GPS1 l Date Time l Language l Reset Camera l Format SD card l Image Numbering l Sensor Cleaning l Camera Information l 1 This menu item is only available if the Leica Visoflex viewfinder is attached optional accessory ...

Страница 112: ...and Playback Review mode displays Switching the camera on off Via main switch on camera top panel optional automatic deactivation of the electronic camera components after around 2 5 10 minutes reactivation via a tap on the shutter button Lens mount Leica M bayonet with additional sensor for 6 bit encoding Compatible lenses Leica M lenses Leica R lenses via adapter see p 31 Menu languages English ...

Страница 113: ...9 x 35 8 mm at infinity depending on focal length approx 7 3 28 mm to 18 135 mm less than 2 m less than sensor size Magnification x0 73 all lenses Large base rangefinder Split or superimposed image rangefinder shown as a bright field at the center of the viewfinder image Actual metering basis 50 6 mm 69 31 mm mechanical metering basis x x0 73 viewfinder magnification Shutter Shutter type Metal bla...

Страница 114: ...ith manual aperture preselection Manual Manual settings for shutter speed and aperture Flash exposure control Flash unit connector Via accessory shoe with central and control contacts Synchronization Optionally at the 1 or 2 shutter curtain Flash sync time 1 180 s slower shutter speeds available automatic changeover to TTL linear flash mode with HSS compatible Leica system flash units if sync time...

Страница 115: ...rass black or silver chrome plated finish Interfaces ISO accessory shoe with additional control contacts for Leica flash units and Leica Visoflex viewfinder optional accessory Tripod thread A 1 4 DIN 4503 1 4 made of stainless steel in the base Operating conditions 0 40 C Dimensions WxHxD 139 x 38 5 x 80 mm Weight approx 675 g with battery ...

Страница 116: ...ice regarding Leica products and how to order them You can also contact the Customer Care department or the repair service provided by your regional Leica subsidiary for repairs or warranty claims Leica Camera AG Leica Customer Care Am Leitz Park 5 35578 Wetzlar Germany Phone 49 0 6441 2080 189 Fax 49 0 6441 2080 339 Email customer care leica camera com www leica camera com ...

Отзывы: