background image

38

HDS6000

Setting Up the Instrument

2.5

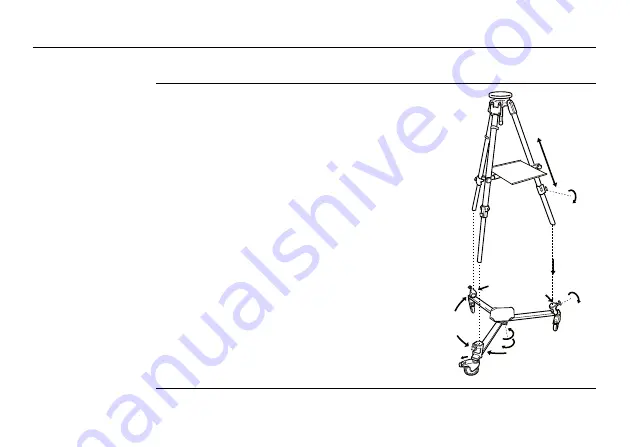
Setting Up the Instrument with the Dolly

Set up the tripod 
with the dolly

1. Unscrew the knobs in the middle of the 

dolly.

2. Position the legs into the seat.
3. Screw the knobs.
4. Lock the brakes.
5. Unscrew and extend each leg to the 

desired height.

6. Fasten the screws at the desired height.
7. Place each tripod leg in a pocket of the 

dolly.

8. Tighten the screws of each pocket.

)

The dolly is available as an optional 
accessory and not part of the 
standard scope of delivery.

HDS6000_060

1

2

4

5

7

6

2

2

3

8

Содержание HDS6000

Страница 1: ...Leica HDS6000 User Manual Version 1 1 English ...

Страница 2: ...forma tion Read carefully through the User Manual before you switch on the product Product identification The type and the serial number of your product are indicated on the type plate Enter the model and serial number in your manual and always refer to this informa tion when you need to contact your agency or Leica Geosystems authorized service workshop Type _______________ Serial No ____________...

Страница 3: ... situation which if not avoided will result in death or serious injury Warning Indicates a potentially hazardous situation or an unintended use which if not avoided could result in death or serious injury Caution Indicates a potentially hazardous situation or an unintended use which if not avoided may result in minor or moderate injury and or appreciable material financial and environmental damage...

Страница 4: ... Battery Charger AC power supply 20 1 2 3 Operate the HDS6000 with the External Battery 22 1 3 Field of View FOV 27 1 4 HDS Cyclone Software Suite 28 2 Setting Up the Instrument 31 2 1 General Information 31 2 2 Scanner Setup on Tripod 32 2 3 Setup the HDS6000 Over a Benchmark 34 2 4 Instrument Height 37 2 5 Setting Up the Instrument with the Dolly 38 3 Preparing to Scan 41 3 1 Switch On Off the S...

Страница 5: ...71 3 10 Network 72 3 10 1 Connecting the HDS6000 by Cable to the Network 73 3 10 2 Connecting the HDS6000 to a Notebook 75 3 11 Operating the HDS6000 using a Web Browser 77 3 12 HDS6000 and WLAN Connection 82 4 Troubleshooting 84 5 Care and Transport 87 5 1 Check Adjust 87 5 2 Transport 88 5 3 Storage 89 5 4 Cleaning and Drying 90 5 5 Window Cleaning Procedure 91 5 6 Adjustment of the Circular Lev...

Страница 6: ...zards of Use 103 6 7 Laser Classification Scanner Visible Laser 111 6 8 Electromagnetic Compatibility EMC 117 6 9 FCC Statement Applicable in U S 120 7 Technical Data 126 7 1 General Technical Data of the Instrument 126 7 2 System Performance 127 7 3 Laser Scanning System 129 7 4 Electrical 132 7 5 Environmental 133 7 6 Physical 135 7 7 Accessories 135 7 8 WLAN 140 7 9 Conformity to National Regul...

Страница 7: ...be used c Tribach d Tripod e Cleaning kit f Carrying straps g Transport box for power supply h Transport box for HDS6000 i Ethernet cable j HDS6000 power supply cable k Charging cable optional l Battery charger power cable m KNL 24 battery charger AC power supply battery charger will be used n Charging cradle 24V 6 3 AM i j k l m n a b c d f e g h HDS6000_001 ...

Страница 8: ...tery TRAPP 15 24 HDS6000 scan targets and target accessories Dolly Transport box for power supply a Battery charger b Battery c Charging cradle d Charging cable e Battery charger power cable three different types delivered f Battery 24V 6 3 AM HDS6000_007 d e a b c f ...

Страница 9: ...Description of the System HDS6000 9 Transport box for HDS6000 a HDS6000 b Manuals c Carrying straps d HDS6000 power supply cable e Ethernet cable HDS6000_007a c d e a b ...

Страница 10: ...Laser exit c Laser active light flashes while scanning d Circular level e Antenna f Display g USB Connectors P1 P2 h Lemo Connectors not supported P3 P4 i ON OFF button j Keyboard k Ethernet connector l Connector for power supply a b c e d g h j k l i f HDS6000_002 ...

Страница 11: ...radle Use the SupD 9 plug only for connecting to the battery a Battery b Charging cradle c Battery status indicators d Connector for power supply e Power indicator LED f Error LED g SupD 9 plug connects battery and charging cradle a b c d e f g HDS6000_003 ERR ...

Страница 12: ...f the System Battery charger a Air inlet b Mains switch c Fuse d Mains plug e Fan f Fuse g Green LED showing battery is fully charged h Yellow LED i Power indicator LED j Power output HDS6000_066 24V 6 3 AM a b c d f g h i j e ...

Страница 13: ... HDS6000 13 External battery TRAPP 15 24 a Main switch b Battery status indicators c Output additional voltage not used d Fuse for additional voltage 3 15 AM e Main output f Fuse for main output 6 3 AFF HDS6000_067 b a e f d c ...

Страница 14: ...rate the HDS6000 with the Battery Change the battery A battery should always be attached to ensure the optimum weight balance for the HDS6000 1 Hold the battery with both hands and press the fixing clips 2 Pull the battery carefully downwards HDS6000_021 1 1 2 ...

Страница 15: ... charge discharge cycle For Li Ion batteries a single discharging and charging cycle is sufficient We recommend carrying out the process when the battery capacity indicated on the charger or on a Leica Geosystems product deviates significantly from the actual battery capacity available The permissible temperature range for charging is between 0 C to 40 C 32 F to 104 F For best results the recommen...

Страница 16: ...he System Operation Discharging The batteries can be operated from 0 C to 40 C 32 F to 104 F Low operating temperatures reduce the capacity that can be drawn very high operating temperatures reduce the service life of the battery ...

Страница 17: ... charging cable connect the charging cradle and the battery charger 4 Place the battery onto the charging cradle 5 Turn on the battery charger Its power indi cator LED switches on 6 After 30sec initialization the charging cradle s battery status indicators will indicate the current battery charging status 7 After charging the battery turn off the battery charger 8 Disconnect the cables HDS6000_004...

Страница 18: ...n the charging cradle The overall charging capacity of the battery is divided into quarters Each LED corresponds to a quarter If the battery charge state is low the appropriate LED flashes slowly The LED flashes faster as the charge state improves If an LED illuminates constantly the battery has reached the appropriate level of charge When all four LEDs illuminate constantly the battery is 100 cha...

Страница 19: ...cautions To avoid electric shock power cable and power outlet must be grounded Error LED The red LED illuminates if there is a fault in the electricity supply Please refer to HDS6000 Battery in 4 Trouble shooting Power indicator LED The green power indicator LED illuminates if the charging cradle is under voltage Laite on liitettävä suojamaadoituskoskettimilla varustettuun pistorasiaan Apparatet m...

Страница 20: ...with the battery charger 1 Verify that the battery charger is off 2 Connect the battery charger power cable 3 Connect the HDS6000 and the battery charger with the HDS6000 power supply cable 4 Turn on the battery charger a HDS6000 power supply cable b Battery charger c Battery charger power cable HDS6000_005 24V 6 3 AM c b a ...

Страница 21: ...is not permitted Precautions Use the battery charger in dry indoor environments only Danger Death or serious injury can occur if product is not connected to ground Precautions To avoid electric shock power cable and power outlet must be grounded Laite on liitettävä suojamaadoituskoskettimilla varustettuun pistorasiaan Apparatet må tillkoples jordet stikkontakt Apparaten skall anslutas till jordat ...

Страница 22: ... external battery is turned on and not connected to the scanner a Green LED b Yellow LED c Red LED Green LED External battery is fully charged and ready to use Yellow LED External battery is empty and must be recharged before use Red LED External battery is completely empty and must be recharged immediately to avoid battery damage HDS6000_068 a b c ...

Страница 23: ...n off the external battery and the battery charger 2 Connect the battery charger power cable 3 Connect the charging cable to the Main Output of the external battery 4 Connect the charging cable to the output of the battery charger 5 Turn on the battery charger 6 A yellow battery charger LED means that the battery is being charged 7 A green battery charger LED means that the battery is fully charge...

Страница 24: ... and power outlet must be grounded Period of use life span of the external battery Understand the external batteries period of use and life span The period of use ranges from 2 5 to 6 hours and depends on the electrical load temperature and usage cycles After 200 to 300 cycles consider contacting Leica Geosystems or your distributor to replace the battery Laite on liitettävä suojamaadoituskosketti...

Страница 25: ...ing it to the HDS6000 Precautions 1 Verify that the external battery is off 2 Connect the HDS6000 power supply cable to the HDS6000 and the external battery Before storing the external battery for a longer period of time recharge it to avoid shortening the life span Before storage turn off the external battery a HDS6000 power supply cable HDS6000_069 a ...

Страница 26: ...s turned off while scanning the software can fail and you can lose data 4 To turn on the external battery after it has automatically turned off turn the switch from the On position to the Off position and back again to the On position In addition to the battery indicator of the external battery the remaining power is also displayed by the software when connected This display is an approximation an...

Страница 27: ...Description of the System HDS6000 27 1 3 Field of View FOV Field of view The HDS6000 has a rotating mirror system that covers a 360 x 310 degree field of view HDS6000_008 25 25 310 360 ...

Страница 28: ...r Cyclone Register allows the user to register multiple Scans together or to Geo reference the point cloud Cyclone Survey gives the user basic functionality to extract and measure information from the rich point cloud Cyclone Model gives the user the full functionality of Cyclone The user is able to extract and measure features and to create a 3D Model out of the PointCloud Cyclone PUBLISHER allow...

Страница 29: ...rd General Operating Principles Download Cyclone Software as well as important Support documentation can be down loaded from the Leica Geosystems HDS Website http www leica geosystems com hds en lgs_27048 htm The User must create an account before the download section is accessible Installation You must use a Windows account with administrator privileges to install or upgrade Cyclone CloudWorx for...

Страница 30: ...ng or upgrading A install Windows 2000 Service Pack 3 or Service Pack 4 with all avail able security updates recommended or B install the Microsoft hotfix for KB816542 download and unzip the file then run Windows2000 KB816542 x86 ENU exe to install the hotfix 1 Download the Cyclone Installshield from the website specified above 2 Run the Installation file 3 Follow the onscreen instructions and sel...

Страница 31: ...up on its tripod Using the tripod delivered with the scanning system guarantees a maximum of stability during scanning operations It is always recommended to shield the instrument from direct sunlight and avoid uneven temperatures around the instrument A battery should always be attached to ensure the optimum weight balance for the HDS6000 ...

Страница 32: ...ng Up the Instrument 2 2 Scanner Setup on Tripod Setup step by step Step Description Shield the instrument from direct sunlight and avoid uneven temperatures around the instrument HDS6000_009 1 1 1 4 5 4 4 3 3 3 2 6 2 ...

Страница 33: ...ons The index finger of your right hand indi cates the direction in which the bubble should move Now use the third foot screw to centre the bubble 6 Place the instrument on the tribrach and secure it with the tribrach s locking knob Make sure that the instrument is levelled by checking the built in circular level The instrument must be levelled before it is switched ON If not levelled using the tr...

Страница 34: ...a known or assumed control point with optional target extraction to set the azimuth direction and establishing a local or global coordinate system HDS6000 allows you to traverse resection or free station Known azimuth or known backsight measurements can be observed It is always possible to set up the instrument without the need for a marked ground point ...

Страница 35: ...ment from direct sunlight and avoid uneven temperatures around the instrument 1 Extend the tripod legs to allow for a comfortable working posture Position the tripod approximately over the marked ground point 2 Fasten the tribrach onto the tripod HDS6000_064 1 1 1 6 6 6 4 4 4 2 3 7 2 5 5 6 5 ...

Страница 36: ...irmly into the ground 5 Look through the optical plummet and turn the tribrach s foot screws so that the optical plummet is centered on the ground point 6 Adjust the tripod legs to level the circular level 7 Place the instrument on the tribrach and secure it with the tribrach s locking knob Make sure that the instrument is levelled by checking the built in circular level Please see also the Scanni...

Страница 37: ... measurement tape and read height using bottom line on unit as shown Do not reduce the instru ment height reading to its vertical value The instrument height entered in Cyclone is automatically computed and reduced to its vertical value Take care to use a 1 1 measure not a special tape that is scaled differently used for common surveying instruments HDS6000_075 149 148 150 151 152 153 2 3 1 ...

Страница 38: ...tion the legs into the seat 3 Screw the knobs 4 Lock the brakes 5 Unscrew and extend each leg to the desired height 6 Fasten the screws at the desired height 7 Place each tripod leg in a pocket of the dolly 8 Tighten the screws of each pocket The dolly is available as an optional accessory and not part of the standard scope of delivery HDS6000_060 1 2 4 5 7 6 2 2 3 8 ...

Страница 39: ...three legs to the same length and then do one of the following Set the lock to the LOCKED position The spread is limited to a 30 degree angle OR Unlock the legs and then adjust their angle Assemble the chain with the chain clips on the clamps Setup step by step HDS6000_061 1 1 1 4 5 2 ...

Страница 40: ...e foot screws together in opposite directions The index finger of your right hand indi cates the direction in which the bubble should move Now use the third foot screw to centre the bubble 5 Place the instrument on the tribrach and secure it with the tribrach s locking knob Make sure that the instrument is levelled by checking the built in circular level The instrument must be levelled before it i...

Страница 41: ...mum one second The power up process starts and requires approximately 20 sec to complete During the power up process the vertical mirror will spin The display shows the system menu An audible signal sounds Switch off proce dure Press and hold the ON OFF button for minimum one second The display shows DEVICE IS SWITCHING OFF In the event of a system crash press the On Off button for at least 5 seco...

Страница 42: ...r scan For best results use the 6 Leica grey and white tilt and turn targets Position the HDS6000 Position the HDS6000 in the center of the target field The angle of incidence is smaller the more perpendicular the surface is to you so the angle of incidence should be smaller than 45 degrees see following illus tration The recommended distance of the targets to the scanner depends on the scan resol...

Страница 43: ... HDS6000 43 Resolution Recommended target distance at angle of incident approx 90 Maximum target distance Medium 1 10 m 15 m High 1 15 m 20 m Super High 1 20 m 25 m Ultra High 1 25 m 30 m Target distance HDS6000_010 45 ...

Страница 44: ...or example a person is detected within the monitored area As soon as laser safety is activated the laser will turn off and the Scanner will keep continue to turn After 4 degrees of rotation the laser turns back on If an object is still in the way the laser will immediatly turn off again and the scanner will turn another 4 degrees This function avoids the exposure of people who are accidentally loo...

Страница 45: ...s now hardly greater than the housing of the HDS6000 Measurement noise Measurement noise scatter of measured values relative to a mean or reference value The option low for the resolution level reduces measurement noise This option increases measurement time Measurements should be made basically in the mode FAR particularly if the object range is large because the mode CLOSE has the following diff...

Страница 46: ...faces before scanning Rain snow or fog cause poor measurements so it is not possible to survey during these conditions Surfaces that are directly illuminated by the sun have an increased range noise and therefore a larger measurement uncertainty If some objects are scanned against the sunlight or a bright spotlight the optical receiver of the HDS6000 can be dazzled so heavily that in this area no ...

Страница 47: ...it is exceeded Precaution Cool down the HDS6000 in a cold place If the HDS6000 is brought from a cold environment e g from storage into a warm and humid environment the glass window at the mirror or in extreme case even the interior optics can fog up This causes measure ment errors Precaution Avoid large temperature differences give the HDS6000 time to acclimate Soiling at the glass pane of the mi...

Страница 48: ...allows point cloud visualization and measurement Keep field notes containing Target positions relative to the HDS6000 Position of the HDS6000 within the measured area such as the factory or shed plan Refer to the Cyclone help system for information about the connection of the HDS6000 to Cyclone and further scanning operations ...

Страница 49: ... 49 3 4 HDS6000 Controls 3 4 1 HDS6000 Control Buttons HDS6000 Control Buttons Select a main menu Select a sub menu Increase a parameter Reduce a parameter Confirm your selection Start stop a scan direct access to the scan menu ...

Страница 50: ...main menus Info Status Tilt Sensor Scanning Scanmanagement Example display The top line indicates the menu currently in use by the HDS6000 When a appears in the bottom line you can page through the submenu using You can change values and parameters using and Info Leica 01 09 2008 12 00 00 No 729 050811 IP 172 20 1 125 ...

Страница 51: ...es An audible signal sounds if you press for more than five seconds The menu expands to show the following functions Manual operation Settings Firmwareupdate Press once more for five seconds to return to the main menu Settings Date Time Language ...

Страница 52: ...nal information 01 09 2008 12 00 00 Date and time display The current date is set under Settings Date The time is set under Settings Time No 729 050811 Serial number of the HDS6000 IP 172 20 1 125 IP address of the HDS6000 01 09 2008 12 00 00 No 729 050811 IP 172 20 1 125 Ver 7 3 0 1796 305 HDS6000 Hard Im1 0 P1 3 0 P ...

Страница 53: ... The firmware can be updated under Firmware Update HDS6000 Model designation Hard 1 0 Im Hardware implementa tion Content of display Meaning Additional information to page through further settings Status Batt 71 AC HDD 85 free Ready ok to scan Justification 64 of 130 days ...

Страница 54: ...harger or external battery XX AC Battery connected battery charge state power supply by battery charger active XX 1 Battery connected battery charge state power supply by first battery cell active XX 2 Battery connected battery charge state power supply by second battery cell active HDD 85 free Free space on the internal hard disk drive ...

Страница 55: ...ng process cannot be started warm up the HDS6000 Temp high Scanning process cannot be started cool down the HDS6000 Batt empty Empty battery replace battery HDD full Hard disk full release additional disk space Just 64 of 130 days Scanning days since the last check of the HDS6000 Internal settings should be checked every 130 days The counter is increased by one day if three or more scans per day a...

Страница 56: ...56 HDS6000 Preparing to Scan Tilt Sensor For further information about levelling the HDS6000 see 2 Setting Up the Instru ment Levelling indicator of the HDS6000 Tilt Sensor X 0 0000 Y 0 0000 ...

Страница 57: ...can HDS6000 57 3 5 Scanning Scan settings changes from any menu directly into the scanning menu for paging through further settings Parameters can be set using Scanning Medium High power V 0 360 H from 0 0 H to 182 0 ...

Страница 58: ...nt noise is reduced Resolution level Ultra High Highest High Middle Preview1 Increments H 0 009 V 0 009 H 0 018 V 0 018 H 0 036 V 0 036 H 0 072 V 0 072 H 0 228 V 0 228 Point spacing over 25 m H 3 9 mm V 3 9 mm H 7 9 mm V 7 9 mm H 15 9 mm V 15 9 mm H 31 4 mm V 31 4 mm H 125 7 mm V 125 7 mm Pixel line 40 000 20 000 10 000 5 000 1 250 Lines 20 000 10 000 5 000 2 500 625 Data file size for HDS6000 com...

Страница 59: ...rama scan with the previously defined scan reso lution and laser power Press for paging through further settings The following ranges are predefined in this submenu V 0 360 Definition of the vertical scan range Selection Full 0 360 No Top 25 160 200 335 HDS6000_011 360 HDS6000_012 335 160 ...

Страница 60: ...60 HDS6000 Preparing to Scan Visible 25 335 Left 25 180 Right 180 335 Top 100 260 HDS6000_013 335 HDS6000_014 180 HDS6000_015 335 HDS6000_016 260 ...

Страница 61: ...nge can be defined separately Defining vertical scan range sepa rately The display changes V 0 0 Definition of the vertical range The first value is the start position Use to change to the second value end posi tion Press to increase decrease the values by 5 Press again to return to the predefined vertical scan ranges For example V 45 135 HDS6000_017 135 45 ...

Страница 62: ... hand into the desired end position Press to confirm the position Press to start the scanning process Scanning with Tilt Senor This option enables or disables the tilt sensor Press to turn on or off If the sensor is turned on the Scanner will inform the user during the scan if the Scanner moved operation The HDS6000 must be upright and leveled with the external bubble level in order to use this fu...

Страница 63: ...e The supported file systems are FAT32 ext2 and ext3 1 Connect the external hard drive by USB to the HDS6000 2 Switch on the external hard drive 3 Select Copy or Move from the submenu 4 Press to start the data transfer For information on USB 2 0 interface see USB Connectors P1 P2 page 10 USB stick can be removed as soon as data transfer is completed Scanmanagement HardDisk ...

Страница 64: ...wing settings Use to page through the submenus The various settings are explained in the following sections Language Language DHCP Client1 Cmd Port1 Locale DHCP Server1 HTTP Server1 Time IP1 WLAN1 Date Netmask1 1 The HDS6000 must be restarted after a change of settings The supported languages are German English French Portuguese and Dutch Select using Settings 1 Language english ...

Страница 65: ...s German de and English en Select using This also sets the number and date format used Settings 2 Locale en Change the value using Move to the next value using Settings 3 Time 13 50 15 Change the value using Move to the next value using Settings 4 Date 01 08 06 ...

Страница 66: ...00 starts If the option no is active the previously assigned IP address is used DHCP Server If the option yes is active the DHCP server HDS6000 can assign a dynamic IP address to the notebook If the option no is active then no IP address is assigned Change the value using Settings 5 DHCP Client yes Change the value using Settings 6 DHCP Server no ...

Страница 67: ...n the standard format Netmask Standard 255 255 0 0 The Netmask should not be altered for standard applications Cmd Port Change the value using Move to the next value using Settings 7 IP 172 20 0 251 Change the value using Move to the next value using Settings 8 Netmask 255 255 0 0 Change the value using Settings 9 Cmd Port 6100 ...

Страница 68: ...munications port 6100 should not be altered for standard applications HTTP Server If the option yes is active the HDS6000 can be operated directly from a web browser This option is activated as default Change the value using Settings 10 HTTP Server yes ...

Страница 69: ... is active a Bluetooth connection can be established with a note book PDA WLAN If the option yes is active a WLAN connection can be established with a note book PDA Change the value using Settings 11 Bluetooth yes Change the value using Settings 12 WLAN yes ...

Страница 70: ...ks for a new firmware on a USB stick or drive Check for new starts checking and installation of a firmware upgrade Updating the firmware takes a few minutes Do not turn off the HDS6000 during this operation If the update is incomplete or installed incorrectly the scanner can become inoperable Firmwareupdate Ver 7 3 0 1796 USB check for new ...

Страница 71: ... IP address the device can also be controlled over the Internet as well as have its firmware updated The collected data is stored on the HDS6000 s internal hard drive The internal hard drive has a minimum capacity of 60 GB and can store data from up to two days of continuous scanning The data on the internal hard drive can be transferred to a notebook PC by ethernet cable or transferred to an exte...

Страница 72: ...mic Host Configuration Protocol If the automatic reference to an IP address is set at the client DHCP client the HDS6000 can be included in any network without further configuration A DHCP server on the network automatically assigns an IP address to the DHCP client HDS6000 If the HDS6000 is connected by a ethernet cable only to a notebook without a wider network structure then the HDS6000 is a DHC...

Страница 73: ...ess the ON OFF button for 0 3 sec Expand the main menu Press for 5 sec after system start up Select Settings in the main menu using Select yes in the DHCP Client submenu Confirm with Select yes in the DHCP Server submenu Confirm with Select yes in the HTTP Server submenu Confirm with Reboot the HDS6000 3 Settings in your web browser Open the web browser on your notebooks PC Select Tools Internet O...

Страница 74: ...74 HDS6000 Preparing to Scan Enter the IP address of the HDS6000 into your web browser For example http 172 20 0 251 Confirm all alterations in your web browser ...

Страница 75: ...and open the attributes In attributes the fields source IP address automatically and source DNS address automatically should be checked 2 Settings on the HDS6000 Switch on the HDS6000 press the ON OFF button for 0 3 sec Expand the main menu Press for 5 sec after system start up Select Settings in the main menu using Then select yes in the DHCP Client submenu Confirm with Select yes in the DHCP Ser...

Страница 76: ...ly at the FTP client FTP client requires user password user scans password blank The scanning data files on the HDS6000 s hard drive are listed in their subfolders in the web browser FTP client When using the web browser a preview of every scan is shown You can open the scanning data files or download them on to your notebook ...

Страница 77: ...ctly using a web browser Enter the IP address of the HDS6000 into the address field of your web browser Refer to IP address under 3 7 Settings The functions of the main menu are displayed For example http 172 20 1 125 The buttons on the left side of the screen guide directly to the following menu items Info Status Scan Scanmanagement Help ...

Страница 78: ... IP address is extended to show the menu s shortcut commands you can go directly to the desired page For example http 172 20 1 125 info home debug camera digital info config password protected camera ueye status report scan firmware systemtest scanmanagement streulicht statistik ...

Страница 79: ...Preparing to Scan HDS6000 79 Scan menu in Web browser For example http 172 20 1 125 scan ...

Страница 80: ... the project are administered in an XML file Choose a name for the project before you carry out the first scan Each subsequent scan is assigned to the created project and saved in the project Scanner position Every scan is assigned a viewpoint location of the HDS6000 If more than one scan is carried out from a single viewpoint then they are all assigned the same viewpoint As the transformation equ...

Страница 81: ... User defined scan range Manual entry of the vertical scan range H Selection Selecting the horizontal scan range Tilt Sensor If the option is active the scans are referenced to the horizontal datum by an internal bubble Additional Entry of additional parameters Start Scan Starts a scan using the selected settings Preview Scan Starts a scan with Preview settings Use default settings Restores the de...

Страница 82: ...tton takes about 20 seconds Expand the main menu Press for 5 sec after system start up Select Settings in the main menu using Select yes in the WLAN submenu Confirm with Restart the HDS6000 Configuration of the laptop Start System Network Connections Select and open Wireless Network Connection In the Wireless Network Connection list the HDS is listed as hds6000 xxx with xxx serial number if scanne...

Страница 83: ... field enter the WLAN IP address http 192 168 3 1 In WLAN mode the general IP address 192 168 3 1 is used instead of the unique scanner IP address Further details of WLAN connection to the HDS6000 with a PDA can be found in the download area http www leica geosystems com hds en lgs_27048 htm ...

Страница 84: ... Safety scan is 30 cm Cyclone reports that the temperature is too low Temperature is too low Start scanning e g perform some preview scans as the activity helps warm the HDS6000 Cyclone reports that the temperature is too high Temperature is too high Leave the HDS6000 powered Wait until the active cooling in the scanner stops before resuming scan ning Problem Possible Cause s Suggested Remedies Cy...

Страница 85: ...battery switches off automatically Capacity of battery is too low Recharge or change battery When switching on the HDS6000 or starting a scan the battery switches off automatically even though it was totally recharged Battery charger is defective Check the function of the battery charger Please note the charging status displayed on the battery charger Charging cradle is defective Check the functio...

Страница 86: ...laced Only use supplied power cords Battery is used up After about 600 800 cycles the battery is used up and has lost most of its capacity The battery needs to be replaced External battery is used up After about 200 300 cycles the external battery is used up and has lost most of its capacity The external battery needs to be replaced Problem Possible Cause s Suggested Remedies ...

Страница 87: ...1 Check Adjust Caution Units that are exposed to high mechanical forces e g through frequent transport or rough handling it is recommended to carry out a check and adjust twice a year by the manufacturer respectively just after such a high stress exposure ...

Страница 88: ... by shock and vibration Always carry the product in its transport container and secure it Shipping When transporting the product by rail air or sea always use the complete original Leica Geosystems packaging transport container and cardboard box or its equiva lent to protect against shock and vibration Shipping transport of batteries When transporting or shipping batteries the person in charge of ...

Страница 89: ...formation about storage temperature range A storage temperature range of 0 C to 30C 32 F to 86 F in a dry environ ment is recommended to minimize self discharging of the battery At the recommended storage temperature range batteries containing a 10 to 50 charge can be stored for up to one year After this storage period the batteries must be recharged The batteries have to be recharged after maximu...

Страница 90: ...olymer components Blow dust off glass windows Never touch the glass with your fingers Never clean glass with paper towels or similar as they will scratch the coating on the windows Damp products Dry the product the transport container the foam inserts and the accessories at a temperature not greater than 40 C 104 F and clean them Do not repack until everything is completely dry Cables and plugs Ke...

Страница 91: ...s Precautions Before cleaning windows ensure the instrument is switched off Window Cleaning Kit can be ordered through your local Leica Geosystems dealer Dust and debris removal Using a compressed gas duster e g UltraJet 2000 Gas Duster or UltraJet Compressed CO2 Duster remove dust and debris from surface of scanner windows Never rub off dust or debris as this will scratch the windows and so possi...

Страница 92: ...order to avoid grease on the cleaning tissue Better use gloves to avoid finger oil on the glass Then use the lens tissue for wiping circularly from the center to the edge until there is only a thin film of detergent visible Use a new lens tissue for drying the pane wipe circularly If any smears from cleaning are visible against back light repeat the procedure Do not touch the side of the paper tha...

Страница 93: ... level functionality in Cyclone assuming that the instrument is correctly adjusted 2 The bubble must be centered If it extends beyond the circle use an allen key to center it with the adjustment screws Turn the instrument slowly 200 gon 180 Repeat the adjustment procedure if the bubble does not stay centered After the adjustment no screw shall be loose HDS6000_018 ...

Страница 94: ...re level funtionality in Cyclone assuming that the instrument is correctly adjusted Remove the instrument from the tribrach 2 The bubble of the tribrach must be centered If it extends beyond the circle use the adjusting pin in conjunction with the two cross headed adjustment screws to centre it After the adjustment no screw shall be loose HDS6000_070 ...

Страница 95: ...ions between timber and metal must be firm and tight 1 Moderately tighten the allen screws 1 with the allen key supplied with the tripod 2 Tighten articulated joints just enough to keep the tripod legs open when lifting the tripod off the ground 2 3 Tighten the allen screws of the tripod legs 3 1 2 3 HDS6000_071 ...

Страница 96: ...on The following directions should enable the person responsible for the product and the person who actually uses the equipment to anticipate and avoid operational hazards The person responsible for the product must ensure that all users understand these directions and adhere to them ...

Страница 97: ... related data Remote control of product Data communication with external appliances Adverse use Use of the product without instruction Use outside of the intended limits Disabling safety systems Removal of hazard notices Opening the product using tools for example screwdriver unless this is specifi cally permitted for certain functions Modification or conversion of the product Use after misappropr...

Страница 98: ...dazzling of third parties Controlling of machines moving objects or similar monitoring application without additional control and safety installations Warning Adverse use can lead to injury malfunction and damage It is the task of the person responsible for the equipment to inform the user about hazards and how to counteract them The product is not to be operated until the user has been instructed...

Страница 99: ... for permanent human habitation not suitable for use in aggressive or explosive environments Danger Local safety authorities and safety experts must be contacted before working in hazardous areas or in close proximity to electrical installations or similar situations by the person in charge of the product ...

Страница 100: ...se safety concepts in combination with the Leica Geosystems product Person in charge of the product The person in charge of the product has the following duties To understand the safety instructions on the product and the instructions in the user manual To be familiar with local regulations relating to safety and accident prevention To inform Leica Geosystems immediately if the product and the app...

Страница 101: ...carrier medium or that can be downloaded by you online pursuant to prior authorization from Leica Geosystems Such software is protected by copy right and other laws and its use is defined and regulated by the Leica Geosystems Licence Agreement which covers aspects such as but not limited to Scope of the Licence Warranty Intellectual Property Rights Limitation of Liability Exclusion of other Assura...

Страница 102: ... to be an acceptance of all the terms and conditions of such licence agreement If you do not agree to all or some of the terms of such licence agreement you may not download install or use the software and you must return the unused software together with its accompanying documen tation and the purchase receipt to the dealer from whom you purchased the product within ten 10 days of purchase to obt...

Страница 103: ...le for the product Caution Watch out for erroneous measurement results if the product has been dropped or has been misused modified stored for long periods or transported Precautions Periodically carry out test measurements and perform the field adjustments indicated in the user manual particularly after the product has been subjected to abnormal use and before and after important measurements Cau...

Страница 104: ...orities responsible for the electrical instal lations and follow their instructions Warning By working during a thunderstorm you are at risk from lightning Precautions Do not carry out field surveys during thunderstorms Warning During dynamic applications for example stakeout procedures there is a danger of accidents occurring if the user does not pay attention to the environmental condi tions aro...

Страница 105: ...re to the instructions given by the computer manufacturer with regard to field use in conjunction with Leica Geosystems products Caution If the accessories used with the product are not properly secured and the product is subjected to mechanical shock for example blows or falling the product may be damaged or people may sustain injury Precautions When setting up the product make sure that the acce...

Страница 106: ... cause you to receive an electric shock Precautions Use the product only in dry environments for example in buildings or vehicles Protect the product against humidity If the product becomes humid it must not be used Warning If you open the product either of the following actions may cause you to receive an electric shock Touching live components Using the product after incorrect attempts were made...

Страница 107: ...anger Death or serious injury can occur if product is not connected to ground Precautions To avoid electric shock power cable and power outlet must be grounded Warning High mechanical stress high ambient temperatures or immersion into fluids can cause leackage fire or explosions of the batteries Precautions Protect the batteries from mechanical influences and high ambient temperatures Do not drop ...

Страница 108: ...cautions During outdoor use keep the battery in an against rain protected place Caution Long term storage may reduce lifetime or damage the battery Precautions During long term storage maintain battery life by periodic re charge Warning During usage charging and or disposal one of the following can occur with impact to humans and environment Explosion hazard A highly explosive oxyhydrogen gas mixt...

Страница 109: ...g contact your local passenger or freight transport company Warning Charging or operating the battery at temperatures below 0 C or above 40 C is not allowed since it may damage the battery Precautions Only charge the battery in well ventilated areas because it can produce explosive gases Connect the battery to the battery charger only when the charger is turned off Fire smoking and sparking near t...

Страница 110: ...ions exposing themselves and third parties to the risk of severe injury and rendering the environment liable to contamination Improper disposal of silicone oil may cause environmental contamination Precautions Product specific treatment and waste management information can be downloaded from the Leica Geosystems home page at http www leica geosystems com treatment or received from your Leica Geosy...

Страница 111: ... 1 1994 A11 1996 A2 2001 Safety of Laser Products Class 3R Laser Products For safety aspects direct intrabeam viewing should be considered always as hazardous Avoid direct eye exposure The accessible emission limit is within five times the acces sible emission limits of Class 2 in the wavelength range from 400 nm to 700 nm Description Value Maximum average radiant power 4 75 mW Maximum peak radian...

Страница 112: ... unex pectedly for example prisms mirrors metallic surfaces or windows Precautions Do not aim at areas that are essentially reflective such as a mirror or which could emit unwanted reflections Warning The use of Laser Class 3R equipment can be dangerous Precautions To counteract hazards it is essential for every user to respect the safety precautions and control measures specified in the standard ...

Страница 113: ...at the end of its useful beam path and should in all cases be terminated if the hazardous beam path extends beyond the limit hazard distance of the area in which the presence and activities of personnel are monitored for reasons of protection from laser radiation 4 The laser beam path should be located well above or below eye level wherever practicable 5 When not in use the Laser Product should be...

Страница 114: ...hazard distance is the distance from the laser at which beam irradiance or radiant exposure equals the maximum permissible value to which personnel may be exposed without being exposed to a health risk This hazard distance is 20 m 66 ft ...

Страница 115: ...afety Directions HDS6000 115 Labelling a Laser beam HDS6000_019 Laser Radiation Avoid direct eye exposure Class 3R Laser Product according to IEC 60825 1 2001 08 Po 4 75 mW λ 650 690 nm Laser Aperture a ...

Страница 116: ... Laser Notice No 50 dated July 26 2001 This device complies with part 15 of the FCC Rules Operation is subject to the following two conditions 1 This device may not cause harmful interference and 2 this device must accept any interference received including interference that may cause undesired operation HDS6000_020 ...

Страница 117: ...ce in this respect Leica Geosystems cannot completely exclude the possibility that other equipment may be disturbed Caution There is a risk that disturbances may be caused in other equipment if the product is used in conjunction with accessories from other manufacturers for example field computers personal computers two way radios non standard cables or external batteries Precautions Use only the ...

Страница 118: ...ir two ends for example external supply cables interface cables the permitted level of electromagnetic radiation may be exceeded and the correct functioning of other products may be impaired Precautions While the product is in use connecting cables for example product to external battery product to computer must be connected at both ends Warning Electromagnetic radiation can cause disturbances in ...

Страница 119: ...cinity of filling stations or chemical installations or in other areas where an explosion hazard exists Do not operate the product with radio or digital cellular phone devices near to medical equipment Do not operate the product with radio or digital cellular phone devices in aircraft Do not operate the product with radio or digital cellular phone devices for long periods immediately next to your ...

Страница 120: ... energy and if not installed and used in accordance with the instructions may cause harmful interfer ence to radio communications However there is no guarantee that interference will not occur in a particular installation If this equipment does cause harmful interference to radio or television reception which can be determined by turning the equipment off and on the user is encour aged to try to c...

Страница 121: ...t No S No Complies with 21 CFR 1040 10 and 1040 11 except for deviations pursuant to Laser Notice No 50 dated July 26 2001 This device complies with part 15 of the FCC Rules Operation is subject to the following two conditions 1 This device may not cause harmful interference and 2 this device must accept any interference received including interference that may cause undesired operation HDS6000_02...

Страница 122: ...eosystems AG CH 9435 Heerbrugg Manufactured Made in Germany S No This device complies with part 15 of the FCC Rules Operation is subject to the following two conditions 1 This device may not cause harmful interference and 2 this device must accept any interference received including interference that may cause undesired operation ERR ...

Страница 123: ... CH 9435 Heerbrugg Manufactured Made in Germany S No This device complies with part 15 of the FCC Rules Operation is subject to the following two conditions 1 This device may not cause harmful interference and 2 this device must accept any interference received including interference that may cause undesired operation 60 C ...

Страница 124: ...UTPUT 28V 5 2A Leica Geosystems AG CH 9435 Heerbrugg Manufactured Made in Germany S No This device complies with part 15 of the FCC Rules Operation is subject to the following two conditions 1 This device may not cause harmful interference and 2 this device must accept any interference received including interference that may cause undesired operation ...

Страница 125: ... TRAPP 15 24 HDS6000_073 Type TRAPP 15 24 Art No Non Spillable Lead Battery 24V 6 3A Leica Geosystems AG CH 9435 Heerbrugg Manufactured Made in Germany S No Pb Non Spillable Battery UN ID Nr 2800 Class 8 Batteries wet non spillable electric storage ...

Страница 126: ...General Technical Data of the Instrument Instrument Compact phase based dual axis sensing ultra high speed laser scanner with survey grade accuracy and full field of view User interface Onboard touch panel Notebook PC or PDA Scanner drive Servo motor ...

Страница 127: ...ingle measurement Position 6 mm 1 m to 25 m range 10 mm 50 m range Distance At 1 m to 50 m range one sigma Angle Up to 25 m Up to 50 m 4 mm 90 albedo 5 mm 90 albedo 5 mm 18 albedo 6 mm 18 albedo Angle Accuracy Horizontal 125 micro radians Vertical 125 micro radians ...

Страница 128: ...ation algorithmic fit to planar HDS grey white target Dual axis sensor Selectable on off Resolution 3 6 dynamic range 2 0 Data integrity monitoring Self check at startup optional checks using Cyclone SCAN Reflectivity Accuracy at 25 m Accuracy at 50 m 18 dark grey δ 3 mm δ 7 mm 90 white δ 2 mm δ 4 mm ...

Страница 129: ...te Average time see Selectability Table below Scan density reso lution Selectability 5 pre set resolutions 79 m ambiguity interval 79 m 90 albedo 50 m 18 albedo Pre set resolution Pts 360 vertical horizontal Scan time full dome Preview 1 250 25 sec Middle 4x 5 000 1 min 40 sec High 8x 10 000 3 min 22 sec Highest 16x 20 000 6 min 44 sec Ultra High 32x 40 000 26 min 40 sec ...

Страница 130: ...3 mm at exit based on Gaussian definition 0 22 mrad divergence 8 mm 25 m 14 mm 50 m Horizontal 360º maximum Vertical 310º maximum Resolution at 10 m at 25 m at 50 m Preview 50 6 x 50 6 mm 125 x 125 mm 250 x 250 mm 4X Middle 12 6 x 12 6 mm 31 4 x 31 4 mm 62 x 62 mm 8X High 6 3 x 6 3 mm 15 7 x 15 7 mm 31 4 x 31 4 mm 16X Highest 3 1 x 3 1 mm 7 9 x 7 9 mm 15 8 x 15 8 mm 32X Ultra High 1 6 x 1 6 mm 3 9...

Страница 131: ...a HDS6000 131 Status indicators 4 line alphanumeric display for laser status system power and system status 1 LED for Laser active status Level indicator External bubble digital readout on touch panel or via laptop ...

Страница 132: ...W Battery type Operating time typical Batteries 24 V DC power supply Battery charger 90 260 V AC External Battery 24 V DC Battery Integrated Li ion External battery Sealed lead acid non spillable Battery up to 2 5 hours room temperature External battery 4 hours room temperature ...

Страница 133: ...0 C to 30 C Protection against water dust and sand Type Operating temperature C Storage temperature C HDS6000 0 to 40 20 to 50 Battery charger 0 to 40 20 to 50 Battery 0 to 40 0 to 50 2 External battery 0 to 40 1 0 to 50 Type Protection HDS6000 IP50 IEC 60529 with additional USB connector side cover Battery charger IP20 IEC 60529 External battery IP20 IEC 60529 ...

Страница 134: ...134 HDS6000 Technical Data Humidity Max 95 non condensing Lighting Fully operational from bright sunlight to complete darkness ...

Страница 135: ...ase Accessory carrying case Additional battery Battery charger Charging cradle for battery Charging Power cable A C cable Cleaning kit CycloneTM SCAN software Instrument Dimensions mm D x W x H Weight kg Scanner with battery 190 x 294 x 351 5 14 Battery charger 241 x 127 x 152 4 2 5 External battery 240 x 260 x 300 17 ...

Страница 136: ...tended warranty for Leica HDS6000 Power cable Notebook PC for scanning Component Minimum requirements Processor 1 7 GHz Pentium M or greater Sytem memory RAM 1 024 MB or greater SDRAM 2 GB for Windows Vista Hard Disk 40 GB or greater 5 400 RPM or faster Network connection Ethernet modem combination Data connection Ethernet Display SXGA 64 MB or greater video RAM recommended ...

Страница 137: ...ndows Vista 32 or 64 File System NTFS Power Additional battery two preferred Minimum requirements for modeling operations are different Please refer to Cyclone datasheet for specifications available at your Leica Geosystems dealer Notebook PC does not record any data Data can be transferred automatically after scan process Component Minimum requirements ...

Страница 138: ...viewing and interaction of selected regions Targeted single shot pre scan ranging Target height input during data capture Scan filtering to optionally exclude data based on Area of interest via rectangular areas Range Return intensity Pre set drop down list or custom settings User defined quality of fit checks Measure dimension point clouds and models Slope distances ΔX ΔY ΔZ distances Create and ...

Страница 139: ...Technical Data HDS6000 139 Environmental lighting Save restore views Save screen image as image file Undo redo support Scanner command scripting Environmental lighting SmartScanTM Technology feature ...

Страница 140: ...140 HDS6000 Technical Data 7 8 WLAN WLAN technical data Standard IEEE 802 11b g Frequency band 2412 MHz 2462 MHz channel 1 11 Output power 100 mW FCC IC M4Y AG623C ...

Страница 141: ...ted at http www leica geosys tems com ce Class 2 equipment according European Directive 1999 5 EC R TTE for which following EEA Member States apply restrictions on the placing on the market or on the putting into service or require author ization for use France Italy Norway if used in the geographical area within a radius of 20km from the centre of Ny Ålesund The conformity for countries with othe...

Страница 142: ...8 Best results 42 C Charging the battery 17 Connection Network 71 USB 71 WLAN 71 Control Buttons 49 D Dual axis sensor 128 E External battery 13 22 F Field of View 27 G Grey and white tilt and turn targets 42 H HDS Cyclone Software Suite 28 HDS6000 Main parts 10 Transport box 9 Horizontal scan range 62 I Info 50 52 Instrument height 37 M Main menu 50 Measurement noise 45 ...

Страница 143: ...ion 58 Set up the tripod 32 35 With the dolly 38 Without the dolly 39 Settings 64 Status 50 53 Supported languages 64 Switch on procedure 41 T Targets 42 Temperature Operating 133 Operation Discharging 16 Permissible temperature 15 Storage 133 Tilt Sensor 50 56 Tripod service of 95 Type of Connection 71 U Unfavorable surfaces 46 Unfavourable weather conditions 46 USB interface 63 V Vertical scan r...

Страница 144: ... 1 0en Original text Printed in Switzerland 2008 Leica Geosystems AG Heerbrugg Switzerland Leica Geosystems AG Heinrich Wild Strasse CH 9435 Heerbrugg Switzerland Phone 41 71 727 31 31 www leica geosystems com ...

Отзывы: