3
Setup
The setup procedure of the DSX consists of the following steps:
•
Unfolding and adjusting the handle (refer to "3.1 Unfolding and Adjusting
•
Inserting the battery (refer to "3.3 Inserting the Battery")
•
Attaching and connecting the CT1000 tablet (refer to "3.2 Attaching and
Connecting the Laptop or Tablet")
•
Mounting the pole support (optional; refer to "3.4 Mounting the Pole Sup-
•
Calibrating the encoders (refer to "3.6 Calibrating the Encoders")
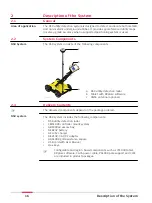
3.1
Unfolding and Adjusting the Handle
0019569_001
1
2
3
4
1.
Release inner cam levers and unfold upper handle legs .
2.
Lock inner cam levers until the visual markers are aligned.
3.
Release outer cam levers and raise entire handle assembly until the
visual markers are aligned.
4.
Loosen the knobs to extend the upper handles, and then tighten
them.
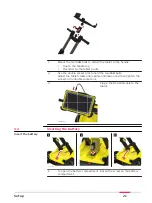
3.2
Attaching and Connecting the Laptop or Tablet
☞
The support is designed to hold a CT1000 tablet.
0019586_001
☞
The support includes the tablet cradle to hold the tablet, two RAM
balls (one attached to the cart handles and the other to the cradle).
Also it includes a double socket arm which holds together the RAM
balls.
Procedure for setting
up the DSX
Unfold and adjust the
handle
Attach and connect
the tablet
20
Setup
Содержание DSX
Страница 1: ...Leica DSX User Manual Version 1 1 English ...
Страница 51: ...6 The Home screen appears with the GNSS icon in green Procedures for Working with the DSX 51 ...
Страница 53: ...Wet connectors must be dry before attaching the dust cap Connectors with dust caps Care and Transport 53 ...
Страница 57: ......

