


41
More features are available if you connect Raritan's or third-party external
equipment to your PX3TS.
In This Chapter
Connecting Raritan Environmental Sensor Packages ......................................... 41
Before Connecting Equipment to Feature Port .................................................. 62
Connecting Asset Management Strips ................................................................ 62
Connecting a Logitech Webcam ......................................................................... 72
Connecting a GSM Modem ................................................................................. 73
Connecting an Analog Modem ........................................................................... 73
Connecting an External Beeper .......................................................................... 74
Connecting a Schroff LHX/SHX Heat Exchanger.................................................. 74
Connecting Raritan Environmental Sensor Packages
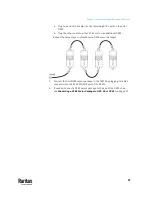
PX3TS supports all types of Raritan environmental sensor packages, including
DPX, DPX2, DPX3, DX and DX2 sensor packages. DPX series is the first
generation while DX2 series is the latest generation.
For detailed information on each sensor package, refer to the Environmental
Sensors and Actuators Guide (or Online Help) on Raritan website's
Support
page
http://www.raritan.com/support/
).
An environmental sensor package may comprise sensors only or a combination
of sensors and actuators.
PX3TS can manage a maximum of 32 sensors and/or actuators. The supported
maximum cabling distance is 98 feet (30 meters), except for DPX sensor
packages.
For information on connecting different types of sensor packages, see:
•
DX2 Sensor Packages
(on page 43)
•
DX Sensor Packages
(on page 45)
•
DPX3 Sensor Packages
(on page 46)
•
DPX2 Sensor Packages
(on page 48)
•
DPX Sensor Packages
(on page 51)
Chapter 4
Connecting External Equipment
(Optional)
Содержание Raritan PX3TS
Страница 4: ......
Страница 6: ......
Страница 20: ......
Страница 52: ...Chapter 3 Initial Installation and Configuration 32 Number Device role Master device Slave 1 Slave 2 Slave 3...
Страница 80: ...Chapter 4 Connecting External Equipment Optional 60...
Страница 109: ...Chapter 5 PDU Linking 89...
Страница 117: ...Chapter 5 PDU Linking 97...
Страница 440: ...Chapter 7 Using the Web Interface 420 If wanted you can customize the subject and content of this email in this action...
Страница 441: ...Chapter 7 Using the Web Interface 421...
Страница 464: ...Chapter 7 Using the Web Interface 444...
Страница 465: ...Chapter 7 Using the Web Interface 445 Continued...
Страница 746: ...Appendix A Specifications 726...
Страница 823: ...Appendix I RADIUS Configuration Illustration 803 Note If your PX3TS uses PAP then select PAP...
Страница 824: ...Appendix I RADIUS Configuration Illustration 804 10 Select Standard to the left of the dialog and then click Add...
Страница 825: ...Appendix I RADIUS Configuration Illustration 805 11 Select Filter Id from the list of attributes and click Add...
Страница 828: ...Appendix I RADIUS Configuration Illustration 808 14 The new attribute is added Click OK...
Страница 829: ...Appendix I RADIUS Configuration Illustration 809 15 Click Next to continue...
Страница 860: ...Appendix J Additional PX3TS Information 840...
Страница 890: ...Appendix K Integration 870 3 Click OK...
Страница 900: ......


