


Chapter 4: Connecting External Equipment (Optional)
73
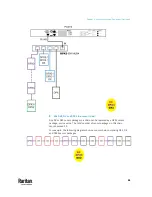
Connecting a GSM Modem
The following Cinterion
®
GSM modems can be connected to the PX3TS in order
to send SMS messages containing event information.
•
MC52iT
•
MC55iT
•
EHS6T
See
Available Actions
(on page 394) for more information on SMS messages.
Note: PX3TS cannot receive SMS messages.
To connect the GSM modem:
1.
Connect the GSM modem to the serial port labeled CONSOLE / MODEM on
the PX3TS.
▪
A third party RJ-45 to "DB9 male" adapter/cable is required for this
connection. See
RJ45-to-DB9 Cable Requirements for Modem
Connections
(on page 830).
2.
Configure the GSM modem as needed. See the supporting GSM modem
help for information on configuring the GSM modem.
3.
Configure the GSM modem settings in the PX3TS to specify the modem's
SIM PIN number and the recipient phone number. See
Configuring the
Serial Port
(on page 455).
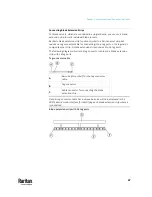
Connecting an Analog Modem
The PX3TS supports remote dial-in communications to access the CLI through
an analog modem. This dial-in feature provides an additional alternative to
access the PX3TS when the LAN access is not available. To dial in to the PX3TS,
the remote computer must have a modem connected and dial the correct
phone number.
Below are the analog modems that the PX3TS supports for sure:
•
NETCOMM IG6000 Industrial Grade SmartModem
•
US Robotics 56K modem
The PX3TS may also support other analog modems which Raritan did not test.
Note that the PX3TS does NOT support dial-out or dial-back operations via the
modem.
To connect an analog modem:
1.
Plug a telephone cord into the phone jack of the supported modem.
2.
Plug the modem's RS-232 cable into the serial port labeled CONSOLE /
MODEM on the PX3TS.
Содержание Raritan PX3TS
Страница 4: ......
Страница 6: ......
Страница 20: ......
Страница 52: ...Chapter 3 Initial Installation and Configuration 32 Number Device role Master device Slave 1 Slave 2 Slave 3...
Страница 80: ...Chapter 4 Connecting External Equipment Optional 60...
Страница 109: ...Chapter 5 PDU Linking 89...
Страница 117: ...Chapter 5 PDU Linking 97...
Страница 440: ...Chapter 7 Using the Web Interface 420 If wanted you can customize the subject and content of this email in this action...
Страница 441: ...Chapter 7 Using the Web Interface 421...
Страница 464: ...Chapter 7 Using the Web Interface 444...
Страница 465: ...Chapter 7 Using the Web Interface 445 Continued...
Страница 746: ...Appendix A Specifications 726...
Страница 823: ...Appendix I RADIUS Configuration Illustration 803 Note If your PX3TS uses PAP then select PAP...
Страница 824: ...Appendix I RADIUS Configuration Illustration 804 10 Select Standard to the left of the dialog and then click Add...
Страница 825: ...Appendix I RADIUS Configuration Illustration 805 11 Select Filter Id from the list of attributes and click Add...
Страница 828: ...Appendix I RADIUS Configuration Illustration 808 14 The new attribute is added Click OK...
Страница 829: ...Appendix I RADIUS Configuration Illustration 809 15 Click Next to continue...
Страница 860: ...Appendix J Additional PX3TS Information 840...
Страница 890: ...Appendix K Integration 870 3 Click OK...
Страница 900: ......


