Installation Instructions
TILD1X05US / TILD1X1US / TILD1X2US / TILVAB2
7
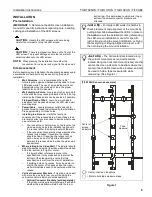
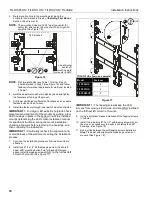
Figure 5
Figure 6
(OPTIONAL) Adding Vertical Connector Kit (Sold
Separately)
NOTE:
If more LED screens will need to be added to the top or
bottom of the screen configuration, add TILVABPT
vertical connector kit to top or bottom of wall mount
using the following instructions. If you are NOT adding
the TILVABPT connector kit, proceed to
Installing
First Mount
section.
IMPORTANT ! :
It is easier to install the vertical
connector kit BEFORE the mounts are attached to the
wall. However, it can also be installed after the mounts
are attached to the wall.
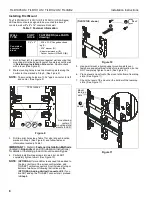
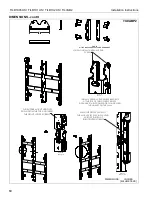
1.
Add the vertical connector (K) to the top or bottom of the
mount, and fasten with four 1/4-20 x 1/2" Phillips pan head
screws (J) per vertical connector (K). (See Figure 7)
2.
Partially install two 1/4-20 x 1/2" Phillips pan head screws
(J) into top or bottom screw holes on connectors (K). (See
Figure 7)
3.
Connect another wall mount to the other end of the vertical
connector (K) by placing open slot over partially installed
screws (J). (See Figure 7) and (See Figure 8)
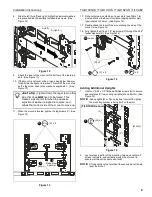
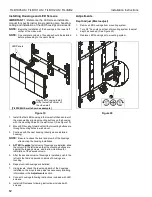
4.
Install two 1/4-20 x 1/2" Phillips pan head machine screws
(J) into inside holes on connectors (K). (See Figure 8)
5.
Tighten screws partially installed in Step 2 to secure mount
to connectors (K). (See Figure 8)
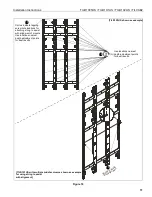
Figure 7
NOTE:
When connecting a mount to the bottom of an
installed
mount, the lower mount may be hung by its open slot
on the partially installed Phillips head screw (J) before
tightening the connection. (See Figure 8)
NOTE:
When connecting a mount above an already installed
mount, the upper mount may be slid down and
attached to the connector in the top of the already
installed mount.
Figure 8
Location for top left corner of LED wall
1
2
5.25"
3
5.25”
5.25”
[TILD1X05US shown as example]
3
Mounting slot
center line
1
(J) x 4
(K) x 2
2
(J) x 2
3
(J) x 2
Top
mount
Lower
mount
place open slot
both screws (J).
screw (J) and tighten
installed Phillips head
over partially
4


