background image


IMPORTANT SAFETY INSTRUCTIONS    

READ AND FOLLOW ALL INSTRUCTIONS 

EQUIPMENT RELATED, INSTALLATION AND GENERAL USE 

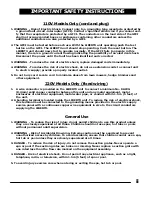
Installation of all LIBERTO models 

When installing and using the LIBERTO unit, basic safety precautions must always be followed, 

including the following: 

1.


Follow all aspects of the local and National Electrical Code (s) when installing the  LIBERTO 
unit. 

2. During installation, mount the LIBERTO unit to ensure the least amount of direct exposure to 

rain, garden sprinkler water, direct sunlight or any corrosive environment. 

3. WARNING - Risk of electrical shock. Install at least 1.5m(5 feet) from the inside wall of the 

pool or spa using non-metallic plumbing. 

4. WARNING - Do not use spas, hot tubs or pools unless all suction grates are installed to pre-

vent body and hair entrapment. 

5. DANGER  - To reduce the risk of drowning from hair and body entrapment, install suction fit  

      ting(s) with a marked flow rate that equals or exceeds the flow rate on the equipment  

      assembly. 

6. WARNING - Install blower no less than 30cm (1 foot) above the maximum water level to pre 
      vent water from contacting electrical equipment. 

7. Do not install the LIBERTO unit within an outer enclosure or beneath the skirt of a hot  
      tub or spa.  

8. CAUTION  - Maintain water chemistry in accordance with manufacturer's instructions. 

9. All field -installed metal components such as rails, ladders, drains, or other similar hardware 

within 3m (10 feet) of the  spa or hot tub shall be bonded to the equipment grounding bus 

with copper conductors not smaller than No. 8 AWG in the U.S.A. and No. 6 AWG in Canada.  


Содержание 27315

Страница 1: ...P5 REGISTRATION NUMBER 27318 PEST CONTROL PRODUCTS ACT PLEASE RETAIN OWNER S MANUAL FOR FUTURE REFERENCE IMPORTANT READ THE LABEL AND THIS MANUAL BEFORE INSTALLING OPERATING Lectranator Systems Inc 2770 24 Ave N E Calgary Ab T1Y 6V7 L I B E R T O C Cubby Cristal Magic English April 2003 TEMP by Lectranator Systems Inc 2007 6222 26 OCT 2007 ...

Страница 2: ...ion 2 Plumbing Requirements 2a Material Requirements for Installation 7 2b Cell Installation Pool Diagrams 8 9 Section 3 Control Panel Mounting Wiring 3a Wiring 10 3b General Information 11 Section 4 Start Up Operation 4a Control Panel Indicators 12 13 4b Start Up Sequence 13 Section 5 Trouble Shooting 5a Trouble Shooting Models CP3 CP5 14 15 Appendix Above Ground Installation Locations 16 17 18 S...

Страница 3: ...t use spas hot tubs or pools unless all suction grates are installed to pre vent body and hair entrapment 5 DANGER To reduce the risk of drowning from hair and body entrapment install suction fit ting s with a marked flow rate that equals or exceeds the flow rate on the equipment assembly 6 WARNING Install blower no less than 30cm 1 foot above the maximum water level to pre vent water from contact...

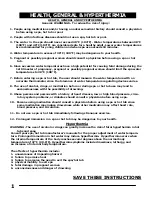
Страница 4: ...to connect a minimum No 8 AWG 8 4mm solid copper conductor between this unit and any metal equipment metal enclosures of electrical equipment metal water pipe or conduit within 1 5 m 5 feet of the unit 2 A bonding terminal is located inside the LIBERTO unit To reduce the risk of electrical shock this terminal must be connected to the grounding means provided in the electric supply service panel wi...

Страница 5: ...sness with the possibility of drowning 9 Obese persons and persons with a history of heart disease low or high blood pressure circu latory system problems or diabetes should consult a physician before using a spa 10 Persons using medication should consult a physician before using a spa or hot tub since some medication may induce drowsiness while other medication may affect heart rate blood pressur...

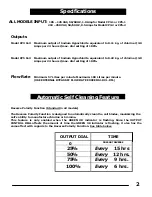
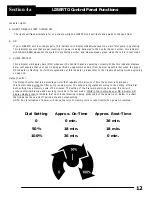
Страница 6: ...ll models The Reverse Polarity Function is designed to automatically clean the cell blades maximizing the cell s ability to manufacture chlorine or bromine This feature is only enabled when the GREEN OK indicator is flashing Since the OUTPUT CONTROL DIAL affects the amount of time the GREEN OK indicator is flashing it also has the same effect with regards to the Reverse Polarity Function See table...

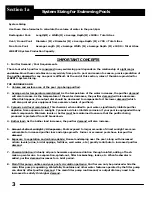
Страница 7: ...ric acid level maintained This chemical when added to pool water significantly inhibits purifier depletion from exposure to sunlight Cyanuric acid also inhibits corrosion if your pool is equipped with any metal components Minimum levels or better must be maintained to ensure that the purifier being produced is protected from UV breakdown 4 Bather load As the bather load increases the purifier dema...

Страница 8: ...l operated at maximum output 3 0 Amps at 3000 ppm salt residual will produce Sodium Hypochlorite equivalent to 0 22 kg of chlorine in 24 hours of continuous operation This amount of chlorine could satisfy up to 57 000 L of pool water depending on the 8 demand variables for purifier NOTE Residual salt levels must be maintained above 2800 ppm and below 3200 ppm Do not exceed 3200 ppm salt residual i...

Страница 9: ...CHECK SYSTEM light and stop purifier generation The amount of salt required depends on the size of the pool Use the chart on the next page to determine the amount of salt to add in pounds or kilograms for a new pool start up Also test your make up water for its level of salt and compare it with the charts on the next page Before adding salt to a pool for the first time turn your LIBERTO unit OFF o...

Страница 10: ...by sunlight and inhibits the corrosive effects of chlorine and bromine Regulations may exist regarding use of Cyanuric acid in public pools please consult your pool professional Use the chart below to determine the amount of Cyanuric acid needed Test water with a test kit that includes CYA testing then use the chart below to determine the amount to add KILOGRAMS OF CYANURIC ACID NEEDED FOR 75 PPM ...

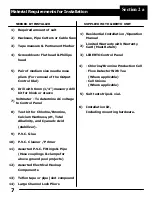
Страница 11: ...t Where applicable Control Dial Cell Unions Where applicable 6 Drill with 6mm 1 4 masonry drill bit for block or stucco 5 Salt test strips vial 7 Voltmeter To determine AC voltage to Control Panel 6 Installation kit 8 Test kit for Chlorine Bromine Including mounting hardware Calcium Hardness pH Total Alkalinity and Cyanuric Acid stabilizer 9 P V C Glue 10 P V C Cleaner Primer 11 Assorted P V C Fit...

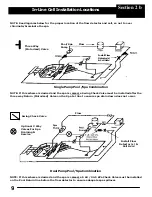
Страница 12: ...s will void the WARRANTY CAUTION YOU MUST REMOVE THE OUTPUT CONTROL DIAL BEFORE ATTEMPTING TO REMOVE THE COVER FIRST PRY OFF THE CAP AT THE TOP OF THE KNOB WHICH WILL REVEAL THE HEX NUT LOOSEN THE NUT AND LIFT OFF THE KNOB Typical In Line Equipment Power Connection 220V NOTE 1 FOR 24 HOUR OPERATION AS A CONVECTION STYLE INSTALLATION SEE APPENDIX PAGE 18 NOTE 2 IF YOU NEED A TIME CLOCK FOR CONTROL ...

Страница 13: ... the three way Return Motorized Valve on the Spa Jet line to ensure spa drain down does not occur Swing Check Valve Optional 2 Way Valves For Spa Draining Service Flow Dual Pump Pool Spa Combination NOTE If this scheme is desired an d the spa is raised a 5 LB 34 5 kPa Check Valve must be installed on the Pool Return line before the flow detector to ensure adequate spa spillover Install Flow Detect...

Страница 14: ...g the LIBERTO unit into a G F C I Ground Fault Circuit Interrupter protected outlet or timer STEP 2 Plug the 110V filter pump into the LIBERTO unit AC outlet WARNING This AC outlet is intended ONLY for the filter pump DO NOT use for any other purpose Each LIBERTO Automatic Sanitizing System consists of three 3 main components The CONTROL PANEL converts incoming AC power to a Low Voltage DC current...

Страница 15: ... is a 2 amp power fuse labeled FS1 for the 110V unit and a 1 amp fuse for the 220V unit This fuse protects the Control Panel and cell from voltage spikes If no lights display inspection and possible replacement of this fuse may be necessary The output control dial and cover must be removed from the unit to access this fuse UNION LIBERTO CONTROL PANEL FLOW DETECTOR R e q u i r e d S a l t L e v e l...

Страница 16: ...or further explanation of this indicator please refer to the Trouble Shooting Guide beginning on page 14 Output Control The Output Control Dial is a percentage timer that regulates the amount of time the system is to produce chlorine bromine during the filter pump running cycle The output is regulated according to the setting of this dial Each setting has a memory cycle of 36 minutes The setting o...

Страница 17: ...er sufficient flow is detected greater than 56LPM the green OK indicator should flash If this sequence does not occur or any red indicators display please refer to the Trouble Shooting Guide starting on page 14 for further assistance NOTE Be sure to test the chlorine bromine level for the next few days and properly adjust the chlorine bromine output dial DO NOT EXCEED RECOMMENDED CHLORINE OR BROMI...

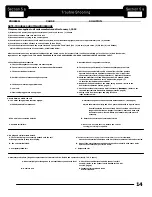
Страница 18: ...tch the cell terminal s with epoxy putty and leave the filter pump off for 24 hours C Completely failed cell C Replace the cell 1 Disconnect AC power unplug the control panel and let sit for one 1 minute 2 Set the percentage feed rate dial to 100 4 Control panel will start its self test mode Green Red Green Red flashing lights and run for approximately two 2 minutes NOTE TROUBLE SHOOTING PROCEDURE...

Страница 19: ......

Страница 20: ...water This occurs when excessive calcium hardness is present in the Monitor the pH and adjust if necessary water being purified This should cease after a few days Refer to the Pool Water Preparation section page 5 6 No OK light A Incoming AC power for the main filter pump is not present A Ensure that the main filter pump circuit breaker is set to ON B Power fuse blown B Remove the knob and cover r...

Страница 21: ...mp runs at low speed a situation when the pool or spa is not normally in use This mode of operation prevents overdosing yet provides a purifier boost when the pool or spa is in use or the filter pump is operating in high speed mode 2 CONVECTION APPLICATIONS See Configurations 1 2 on pages 17 18 Many above ground pools benefit from continuous purification at a reduced rate when the pump is not run ...

Страница 22: ...our LIBERTO Unit Control Panel Read and follow warnings Avoid traffic lawn mowers and sprinklers Take both 3 ft 1 m aluminum angle stakes and drive into ground approximately 12 31 cm deep to the width of the LIBERTO Unit Control Panel 8 1 8 21 cm Use a 2 X 4 5 cm x 10 cm block and hammer STEP 2 Slide the LIBERTOUnit Control Panel over the angle stakes and screw into the predrilled holes CAUTION DO...

Страница 23: ...ically with unobstructed free flow through the discharge outlet This allows complete disbursement of gas bubbles generated during purifier production 2 Convection illustration depicts a vertical cell see sketch above immediately adjacent to the discharge supplied by a direct bypass to avoid the flow restrictions of the circulation system 3 The flow induced by the rising bubbles disperses the purif...

Страница 24: ...ard as proof of purchase Warranty service cannot be performed without this documentation LIBERTO DEALER WHEN CALLING FOR SERVICE Please have the following information ready 1 Control Panel Model _________________________________________ 2 Chlorine Cell Serial Number ___________________________________ Located on top of cell stamped in plastic 3 Installation Date MM ___________DD _________YY ______...

Страница 25: ...DEL CP3 Maximum output of Sodium Hypochlorite equivalent to 0 11 kg of chlorine per day WARNING Operating the LIBERTO Model CP3 without water flow through the cell can cause a build up of flammable gases which can result in FIRE OR EXPLOSION DOMESTIC READ THE LABEL AND THE INSTRUCTION MANUAL BEFORE USING 2007 6222 26 OCT 2007 ...

Страница 26: ...formation This service and this information do not replace the official hard copy label The PMRA does not provide any guarantee or assurance that the information obtained through this service is accurate current or correct and is therefore not liable for any loss resulting directly or indirectly from reliance upon this service ...

Отзывы: