UK
Congratulations for buying our LAZER Bayamo helmet!
ADvICES
WARNING
No helmet can protect the wearer against all possible
impacts.
For maximum protection, the helmet must fit firmly on
the head, and all retention straps must be securely
fastened. With the chinstrap comfortably but firmly
adjusted, it should not be possible, in most cases, for
the helmet to be removed from the head when pulled
at the rear in an upward direction.
The helmet is designed to be retained by a strap
under the chin.
The helmet may be used with glasses.
No attachments should be made to the helmet except
those recommended by the helmet manufacturer. Do
not drill or cut the shell.
The helmet is designed to absorb shock by partial
destruction of the shell and liner. This damage may
not be visible. Therefore if it subjected to a severe
blow, the helmet should be replaced even if it is
apparently undamaged.
The liner is essential to the intended performance of
the helmet.
The helmet may be damaged and rendered
ineffective by petroleum products, cleaning agents,
paints, adhesives, etc., without the damage being
visible to the user. Use only warm soapy water to clean
the helmet surface.
VISION
When riding a motorcycle, your life could depend on
a clear vision. Keep it unhindered by observing theses
basic rules:
• Use only genuine face shields
• Tinted face shields are for daytime use only
• Always keep your face shield clean scratch free
• Always keep your field of vision unobstructed
FASTENING
Your helmet will be useless if it’s too big or not properly
fastened. Always buy a helmet to your exact size and
always fasten it properly.
MOdIFICATIONS
Never modify your helmet in any way. Modifications
could result in lowering the effectiveness of your
helmet.
dAMAGEd HELMET
When your helmet sustains a severe shock, part of its
structure and lining may have been deteriorated by
absorbing the energy of the impact. These damages
may not be visible to the eye. In this case, do not
hesitate to replace it.
CARE ANd MAINTENANCE
Clean the outside and inside of your helmet regularly.
Use a soft cloth and warm or slightly soapy water.
NEVER USE GAS OIL, SOLVENTS, PETROL OR OTHER
AGGRESSIVE PRODUCTS.
The padding is removable to make it easy to clean.
Again, only use warm or slightly soapy water. Hand
wash and drip dry.
To clean the visor (shield), dip it in lukewarm soapy
water. Wipe it in a lint free cloth from the top to the
bottom avoiding any circular motion.
After correctly cleaning the vents and the visor
mechanism, it is a good idea to lubricate them from
time to time with white or silicone grease to maximize
their durability.
STORAGE
After washing your helmet, store it inside a bag, in a
dry temperate place. Avoid storing your helmet for an
extended period in a place exposed to strong light.
- 6 -
dURABILITY
As time goes by, some wearing marks can appear
on safety elements of your helmet, such as: wearing
or fraying of the strap, malfunction of the buckle,
cracking or crumbling of the inner liner, cracking of
the shell,… In this case, contact your dealer to check
or replace your helmet.
AdJUSTING ANd USING
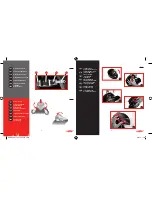
THE MICROMETRIC BUCKLE (fig. 1)
1.
First, adjust the length of the strap by rolling it
through the plastic adjustable strap (A)
2. To close the buckle, insert the ratcheted tongue
(B) into the casing (C). When you hear a “click”,
the buckle is closed. The multi-notching allows
for minute adjustments in order to obtain perfect
comfort and fit with the buckle
3. If necessary, go back and repeat Step 1
4. To open the buckle, pull on the red strap (D) and
draw back the ratcheted tongue using your other
hand
WILL IT STAY ON? (fig. 2)
You want to know the helmet you buy will stay firmly on
your head in a crash. Make sure the chinstrap is done
up and tilt your head forward. Ask someone to try and
roll the helmet off your head by carefully pushing up
from the rear of the helmet at its base. If you can roll
it off in the showroom, then it’s sure to come off in a
crash.
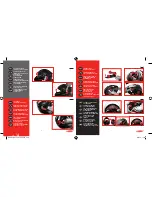
HOW TO REMOVE ANd REpLACE
THE MAIN VISOR (fig. 3)
• Lift the visor to the upper position (E)
• On the right hand side, with 2 fingers, turn the button
into the anticlockwise till it stops and release the 2
springs sliders (F); maintain in this position: the visor’s
side is supposed to come out; if not pull it out firmly
(G)
• On the left hand side, turn the button clockwise (H)
and proceed as above
To replace:
• Present the visor in its raised position in front of the
right hand side button, turn into the anticlockwise
rotation and push the visor into place making sure
that two clicks were heard (I)
• Present the visor in its raised position in front of the
left hand side button, turn into the clockwise rotation
and push the visor into place making sure that two
clicks were heard
• Lift the visor down then up and repeat couple of time
to ensure the visor correctly fitted to the helmet
HOW TO USE THE INTERNAL SUN VISOR
ON YOUR HELMET (fig. 4)
• The control button for the internal sun visor is located
on the left hand side of the helmet, behind the visor’s
plate. Only use this button when you are stationary
and always use your left hand
• To lower the internal sun visor, push the control
button up until it stops (J)
• To raise the internal sun visor, push the control button
down until it stops (K)
Warning: never drive with the internal sun visor in the
lowered position at night or in case of poor visibility.
Always remember to raise the internal sun visor early
enough before entering a tunnel or on a dark or shady
road.
HOW TO CHANGE THE INTERNAL SUN VISOR
ON YOUR HELMET (fig. 5)
• The main visor must be in the open position (fig. 3E)
• The sun visor’s button must be in the upper position
(fig. 4J)
• Hold the internal sun visor on one side and pull
hard to extract the visor of its fixation (L). Repeat the
operation on the other side
To replace the visor:
• Hold the main visor in the open position (fig. 3E)
• The sun visor’s button must be in the upper position
(fig. 4J)
- 7 -
MEG Bayamo bichro DEF.indd 6-7
5/09/12 14:22


