


m.
Install, in this order, the rubber washer, the
metal washer, and the 3/4" lock nut.
n.
Insert the release handle through the
driver's side guide hole in the top plate, from
the outside to the inside.
o.
Inspect the cam plate for burrs or rough
edges in the cam profile. Remove any that
you find.
p.
Lubricate the cam profile and the pivot holes
with a multi-purpose light grease.
q.
Insert the "S" end of the release handle
through the small hole in the cam.
r.
Lay the cam on the top plate so that the
cam profile is over the hole in the yoke and
the large hole is over the lub in the top plate
opposite the release handle.
s.
Slide a 9/16 flat washer between the top
plate lug and the cam with the rounded edge
of the washer towards the cam.
IMPORTANT
WHEN ASSEMBLING ANY WASHERS TO THE
CAM, THE ROUNDED EDGE OF THE WASHER
SHOULD FACE THE CAM.
t.
Install the 1/2" roller in the large hole of the
cam and place a second 1/2 flat washer over
the roller. Make sure the rounded edge is
against the cam.
u.
Insert the 1/2 bolt through the washers, the
roller, the cam, and the top plate lug and se-
cure with a 1/2 lock nut. Check the cam to be
sure it can move freely.
v.
Place a 5/8 flat washer between the yoke
and the cam with the round edge of the
washer against the cam.
w.
Insert the 5/8 roller in the cam opening and
lay the second 5/8 washer on top of the roller
with the rounded edge against the cam.
x.
Insert a 5/8 bolt through the washers, roller,
and cam, and into the yoke shank. Tighten
the bolt securely and determine that the top
washer still rotates freely.
y.
Tighten the nut on the yoke shank until the
yoke just begins to move.
z.
Check the plug in the lock jaws. It should be
tight, but still be able to rotate when some
force is applied.
aa.
To install the secondary lock, start a roll pin
into the top plate lug hole that was not used
by the cam.
ab.
Assemble the torsion spring to the second-
ary lock and place the assembly between the
top plate lug and the face of the top plate. Be
sure the open end of the spring faces the rib
of the lug. Drive the roll pin in the rest of the
way.
ac.
Test the gooseneck lock mechanism with a
fifth wheel lock tester before using the
semitrailer.
4-13
Содержание 325C
Страница 2: ......
Страница 8: ......
Страница 12: ......
Страница 36: ......
Страница 44: ...4 8 Figure 4 3 Models 325 326 327 329C Wiring Diagram...
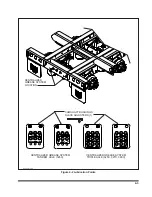
Страница 54: ...4 18 Figure 4 13 Checking Axle Alignment Figure 4 14 Examples of Camber...
Страница 59: ...4 23 Figure 4 17 Axle and Brake Assembly...
Страница 68: ......
Страница 78: ...NOTES 5 10...
Страница 79: ......


