17
Maintenance
solenoid valve functions properly is recommended.
This can be done by operating the machine and
checking to see that when the spray gun is in the OFF
position the burner is not firing.
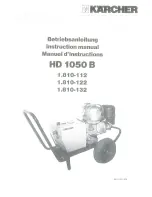
Fuel Pressure Adjustment
To adjust fuel pressure, turn the adjusting screw
(located at the regulator port) clockwise to increase,
counterclockwise to decrease. Do not exceed 200 psi.
NOTE: When changing fuel pump, a by-pass plug
must be installed in return line port or fuel pump
will not prime.
Air Adjustment
The oil burner on this machine is preset for operation
altitudes below 1000 feet. If operated at higher alti-
tudes, it may be necessary to adjust the air band
setting. Adjust air band for a #1 or #2 smoke spot on
the Bacharach scale.
If a smoky or eye-burning exhaust is being emitted from
the stack, two things should be checked. First, check
the fuel to be certain that kerosene or No. 1 home
heating fuel is being used. Next, check the air adjust-
ment on the burner. An oily, black, smoky fire indicates
a lack of air and the air band should be moved to allow
the air to flow through the burner. Sharp eye-burning
white fumes indicate too much air flowing through the
combustion chamber. The air band should be moved to
allow less air to flow through the burner.
To Adjust:
Start machine and turn burner ON. Loosen
two locking screws found in the air shutter openings
(refer to illustration) and close air shutter until black
smoke appears from burner exhaust vent. Note air
band position. Next, slowly open the air shutter until
white smoke just starts to appear. Turn air shutter
halfway back to the black smoke position previously
noted. Tighten locking screws.
If the desired position cannot be obtained using only
the air shutter, lock the air shutter in as close a position
as can be obtained, then repeat the above procedure
on the air band setting.
Initial Air Adjustments:
Allow sufficient air to obtain a
clean burning flame by loosening the lock screws and
moving the air shutter and if necessary the bulk air
band.
Reduce the air supply until the flame tips appear
slightly smoky, then increase the air just enough to
cause the flame tips to appear absolutely clean.
Removal of Soot and Heating Coil
In the heating process, fuel residue in the form of soot
deposits may develop between the heating coil pipe
and block air flow which will affect burner combustion.
When soot has been detected on visual observation,
the soot on the coil must be washed off. Follow these
steps to remove the coil.
1. Disconnect hose from pump to inlet side of the coil.
2. Disconnect electrical connection to the thermostat.
3. Remove quick coupler from inlet and discharge
side of coil.
4. Remove burner assembly from combustion
chamber.
5. Remove the 3-3/8” bolts from each side of coil and
tank assembly (these bolts are used to fasten tank
and handles to chassis).
6. Disconnect 1/2” pipe nipples from inlet and
discharge side of coil.
7. Remove top tank wrap exposing insulation and coil
and fold back insulation.
8. Remove bolts that hold down coil to bottom wrap.
9. Remove coil.
10. Replace or repair any insulation found to be torn or
broken.
Coil Reinstallation
Reinstall new or cleaned coil by reversing Steps 9
through 1 above.
Landa HOT Series Operator’s Manual 8.917-208.0 - B
Air
Band
Fuel
Pump
Air Adjustment
Screw
Air Shutter
Locking Screws