manualshive.com logo in svg
background image

10

Check/Adjust Flavor Shots - Self Serve


Flavor shots should be adjusted so that approximately 

10 ml of syrup pours each time the button is pushed. 

NOTE

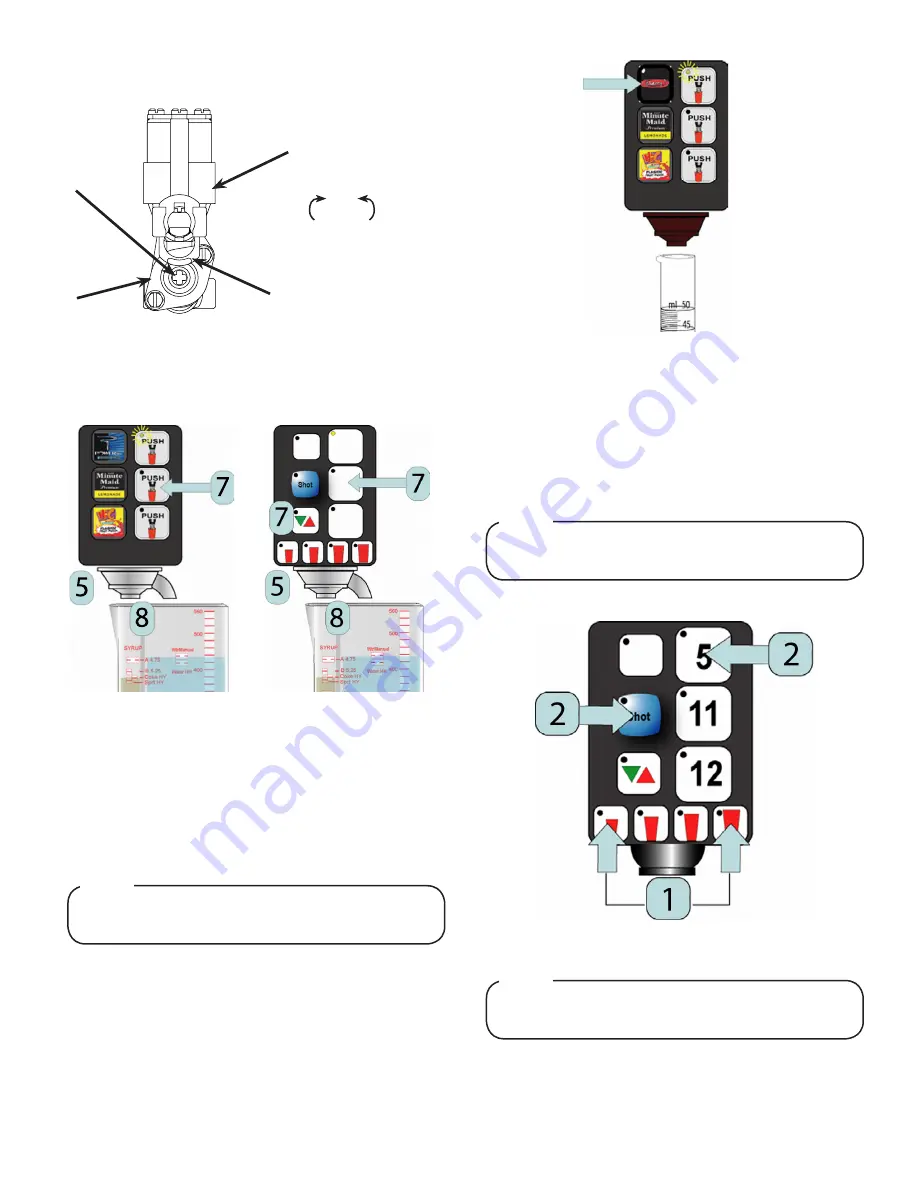
1.  Place a 50 ml graduated cylinder under the MVU nozzle. 
2.  Press the Flavor Shot button one time to collect a sample.

3.  Approximately 10 ml should dispense, if not, use a screw 

driver to adjust the appropriate flow control. 

A

B

C

D

Increase

Decrease

A. Flow Control

B. Valve Retainer 

C. Solenoid

D. Valve Body

4.  Using the Lancer ratio cup, verify that 10 oz. of water was 

dispensed. Use screwdriver to adjust appropriate LFCV if 

needed.

5.  Remove nozzle and install MVU syrup separator in place of 

nozzle.

6.  Activate valve to purge syrup until steady flow is achieved.
7.  Position the ratio cup below the MVU valve and push a 

brand button to capture a sample. 

Self-Serve

Crew-Serve

8.  Verify that the syrup level is even with the water level. Use 

screwdriver to adjust appropriate LFCV if necessary.

9.  Repeat steps 7-8 for each brand on MVU valve. 
10.  Remove syrup seperator and reinstall nozzle.
11.  Repeat steps 1-10 for second MVU valve.
12.  Re-install merchandiser, splash plate, and top cover.

Check/Adjust Flavor Shots - Crew Serve

1.  Press the Small and Extra Large cup buttons at the same 

time and hold for 5 seconds or until the Pour/Cancel button 

illuminates.

2.  Press the Shot button to activate the brands for shot          

adjustment, then press the appropriate Brand button to      

activate shot mode.


If brand is not enabled for shot mode, the LED light will 

blink twice and turn off.

NOTE

3.  Place a 50 ml graduated cylinder under the MVU nozzle.

4.  Press and hold the Extra Large cup button until the desired 

portion size is achieved.


Other size buttons are proportioned based on the 

amount poured in Extra Large portion size. 

NOTE

Содержание Bevariety ACIB Series

Страница 1: ...s not a toy Children should not be supervised not to play with appliance It should not be used by children or infirm persons without supervision This appliance is not intended for use by persons inclu...

Страница 2: ...local standards It is the responsibility of the installer to ensure compliance Water Notice Units are equipped with an automatic agitation system and will activate unexpectedly Do not place hands or f...

Страница 3: ...chilled products 30 only or two chilled and one ambient product on each MVU pad Capable of dispensing flavor shots Replaces the two center LEVs Provides additional carb or non carb beverage flexibili...

Страница 4: ...ack and side to side Place a level on the top of the rear edge of the dispenser The bubble must settle between the level lines Repeat this procedure for the remaining three sides Level unit if necessa...

Страница 5: ...the left side wall Dispenser Installation The installation and relocation if necessary must be carried out by qualified personnel with up to date knowledge and practical experience in accordance with...

Страница 6: ...ocation to the tee fitting at water line 3 Connect line from tee fitting at water line to the remote pump deck inlet regulator 4 Complete the carbonated water line connection installed in the previous...

Страница 7: ...aking connections Each dispenser must have a separate electrical circuit Do not use extension cords Do not connect multiple electrical devices on the same outlet WARNING A Regulator Adjustment Screw B...

Страница 8: ...ctivate valve to purge syrup until steady flow is achieved 8 Using a Lancer ratio cup activate the valve and capture a sample Verify that the syrup level is even with the water level Use a screwdriver...

Страница 9: ...press the Push button one time to change to a non carb beverage 3 Press the same brand button again to change to a carbonat ed beverage light will flash slowly 4 Press the button one more time to chan...

Страница 10: ...n to capture a sample Self Serve Crew Serve 8 Verify that the syrup level is even with the water level Use screwdriver to adjust appropriate LFCV if necessary 9 Repeat steps 7 8 for each brand on MVU...

Страница 11: ...save 60 seconds after all changes have been made NOTE 5 Repeat Steps 2 4 for each of the desired brands 6 Press the Pour Cancel button to save Cleaning Solution Mix a mild non abrasive detergent e g...

Страница 12: ...lush solution from the dispenser Cleaning and Sanitizing Syrup Lines Figal Tank 1 Disconnect syrup inlet from the figal syrup tank 2 Prepare cleaning solution and using a plastic bristle brush scrub b...

Страница 13: ...off power to the dispenser 2 Remove Merchandiser 3 Remove Ice Chute Lever then remove Splash Plate Assembly by lifting it up and out from the dispenser face 4 Remove the Ice Chute Assembly base by rem...

Страница 14: ...14 WIRING DIAGRAMS ACIB 22 30...

Страница 15: ...15 PLUMBING DIAGRAMS ACIB 22 30...

Страница 16: ...Lancer Corp 800 729 1500 Technical Support Warranty 800 729 1550 custserv lancercorp com lancercorp com...

Отзывы: