background image

Limited Warranty


New machines and accessories sold by Laguna Tools carry a one-year warranty 
effective from the date of shipping. Machines sold through dealers must be registered 
with Laguna Tools within 30 days of purchase to be covered by this warranty. Laguna 
Tools guarantees all new machines and accessories sold to be free of manufacturers’ 
defective workmanship, parts and materials. We will repair or replace, without charge, 
any parts determined by Laguna Tools, Inc. to be a manufacturer’s defect. We require 
that the defective item/part be returned to Laguna Tools with the complaint. Any 
machines returned to Laguna Tools must be returned with packaging in the same 
manner in which it was received. If a part or blade is being returned it must have 
adequate packaging to ensure no damage is received during shipping. In the event the 
item/part is determined to be damaged due to lack of maintenance, cleaning or 
misuse/abuse, the customer will be responsible for the cost to replace the item/part, 
plus all related shipping charges. This limited warranty does not apply to natural 
disasters, acts of terrorism, normal wear and tear, product failure due to lack of 
maintenance or cleaning, damage caused by accident, neglect, lack of or inadequate 
dust collection, misuse/abuse or damage caused where repair or alterations have been 
made or attempted by others.

Laguna Tools, Inc. is not responsible for additional tools or modifications sold or
performed (other than from/by Laguna Tools, Inc.) on any Laguna Tools, Inc. 
machine. Warranty maybe voided upon the addition of such described tools and/or 
modifications, determined on a case-by-case basis.

Software purchased through Laguna Tools Inc. is not covered under this warranty 
and all technical support must be managed through the software provider. Software is 
non-refundable.

Normal user alignment, adjustment, tuning and machine settings are not covered by
this warranty. It is the responsibility of the user to understand basic machinery 
operation, settings and procedures and to properly maintain the equipment in 
accordance with the standards provided by the manufacturer.

Parts, under warranty, are shipped at Laguna Tools, Inc.’s cost either by common
carrier, FEDEX ground service or a similar method. Technical support to install 
replacement parts is primarily provided by phone, fax, e-mail or Laguna Tools 
Customer Support Website. The labor required to install replacement parts is the 
responsibility of the user.

Laguna Tools is not responsible for damage or loss caused by a freight company or
other circumstances not in our control. All claims for loss or damaged goods must be
notified to Laguna Tools within twenty-four hours of delivery. Please contact our 
Customer Service Department for more information.

Only 

new

 machines sold to the original owner are covered by this warranty.

For warranty repair information, 

call 1-800-332-4094

.

Содержание MJOIN8012-0130

Страница 1: ...AL LAGUNA TOOLS 2072 Alton Parkway Irvine California 92606 Ph 800 234 1976 www lagunatools com 2018 Laguna Tools Inc LAGUNA and the LAGUNA Logo are the registered trademarks of Laguna Tools Inc All ri...

Страница 2: ......

Страница 3: ...heet 6 Receiving your jointer 6 Introduction to your jointer 6 What you receive with jointer 8 Parts of the jointer 9 Where to locate your jointer 10 Unpacking your jointer 11 Assembly and set up 12 R...

Страница 4: ...istributor Read carefully before operating the machine 1 Keep the working area clean and be sure adequate lighting is available 2 Do not wear loose clothing gloves bracelets necklaces or ornaments Wea...

Страница 5: ...empted by others Laguna Tools Inc is not responsible for additional tools or modifications sold or performed other than from by Laguna Tools Inc on any Laguna Tools Inc machine Warranty maybe voided u...

Страница 6: ...o do this prior to the driver leaving All damage must be noted on the delivery documents and signed by you and the delivery driver You must then contact the seller Laguna Tools within 24 hours Introdu...

Страница 7: ...4 Supporting the work Only make cuts if the work piece is stable and never attempt to cut unstable planks or injury may occur 6 Cutting depth Never exceed the maximum cutting depth as stated in the s...

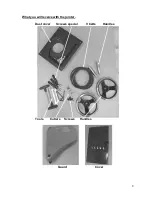
Страница 8: ...8 What you will receive with the jointer Dust cover Screws special V belts Handles Tools Cutters Screws Handles Guard Cover...

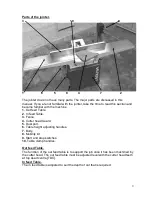
Страница 9: ...2 In feed Table 3 Fence 4 Cutter head Guard 5 Dust port 6 Table height adjusting handles 7 Body 8 Mobility kit 9 Start and stop switches 10 Table clamp handles Out feed Table The function of the out...

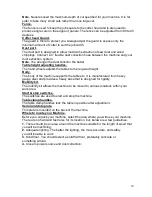
Страница 10: ...of the machine supports the table etc It is manufactured from heavy gauge steel and provides a heavy base that is designed for rigidity Mobility kit The mobility kit allows the machine to be moved to...

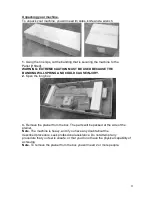
Страница 11: ...G WILL SPRING AND COULD CAUSE INJURY 2 Open the long box 3 Remove the plainer from the box The parts will be packed at the side of the plainer Note The machine is heavy and if you have any doubt about...

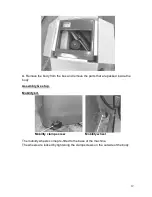
Страница 12: ...e parts that are packed inside the body Assembly set up Mobility kit Mobility clamp screw Mobility wheel The mobility wheels come pre fitted to the base of the machine The wheels are locked by tighten...

Страница 13: ...ed up with the slots Note The jointer is heavy and if you have any doubt about the described procedure seek professional assistance Do not attempt any procedure that you feel is unsafe or that you do...

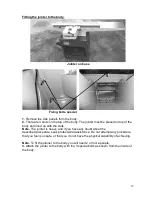
Страница 14: ...slots and clamp 3 Fit the belts over the motor and cutter pulleys 4 Loosen the motor adjusting bolts and lower the motor Tighten the bolts Note The belts should be tensioned so that with moderate pres...

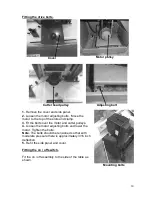
Страница 15: ...inuet capacity The stronger the dust collection the better as the machine is capable of producing a lot of waste Fitting the table adjusting handles Key Handle Assemble the two handles as shown Fit th...

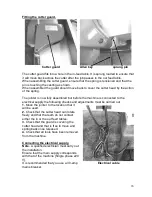
Страница 16: ...he machine is connected to the electrical supply the following checks and adjustments must be carried out 1 Move the jointer to the location that it will be used 2 Check that the cutter head can rotat...

Страница 17: ...e safety equipment 5 You have read and understood the instruction manual Note If any of the below functions fail to operate correctly the fault must be corrected prior to continuing to the next test A...

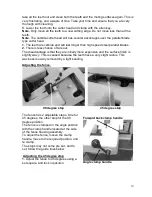
Страница 18: ...le 1 Place a straight edge so that it is equal on both the in feed and out feed tables 2 Bring the in feed table up so that the straight edge is even on both tables 3 Check that the table is lined up...

Страница 19: ...disadvantage is that they are initially more expensive and the surface finish is slightly wavy This is caused because the teeth have a very slight radius This waviness is easily removed by a light san...

Страница 20: ...90 degrees If the fence is not at 90 degrees readjust Maintenance As with any machine to ensure optimal performance you must conduct regular maintenance Daily checks 1 Clean the machine and lubricate...

Страница 21: ...they are not adjusted slippage may accrue and this will cause early belt failure There should be a 3 16 deflection when the belt is pressed with moderate finger pressure 7 Refit the side cover before...

Страница 22: ...tion circuit breaker in motor or replace motor 4 Open circuit in motor or loose connections 5 Replace or repair motor or loose connection Fuses or circuit breakers blow 1 Motor drawing excessive curre...

Страница 23: ...e tables and cutter head components Chipping or marks consistent pattern 1 Knots or conflicting grain direction in wood 1 Inspect job for knots and grain direction only use good material 2 Nicked chip...

Страница 24: ...ter jointing 1 Job not held with even pressure on in feed and out feed table during cut 1 Hold job with even pressure as it moves over the cutter head 2 Job started too uneven 2 Take small cuts to rem...

Страница 25: ...25 Electrical drawing...

Страница 26: ...26...

Страница 27: ...27...

Страница 28: ...28...

Страница 29: ...901 STUD PIVOT 2 14 009005 200 HEX NUT 5 16 18NC 5 15 000003 201 HEX SCREW 5 16 18NC 1 1 4 1 16 003602 101 FLAT HD SOC SCREW 5 16 18NC 1 1 2 1 17 172285 905 FLAT WASHER 13 35 5 0t 1 18 050094 000 SHAF...

Страница 30: ...42 009007 200 HEX NUT 3 8 24UNF 2 43 173004 000 BELT GUARD 1 44 230118 000 T NUT 1 45 051125 000 RIBBET CSA UL 1 46 380147 901 STUD PIVOT 1 47 017002 000 BALL 6 2 49 090020 000 CUTTERHEAD GUARD 1 50...

Страница 31: ...010 000 STUD PIVOT 1 61 002301 201 RIVET 2 5 2 62 003003 203 HEX SCREW 5 16 18NC 3 4 4 63 922846 000 STAND ASS Y 1 1 006001 091 FLAT WASHER 13 28 3 0t 4 2 003007 201 HEX SCREW 1 2 12NC 1 4 3 172985 00...

Страница 32: ...0201 000 OPEN WRENCH 8 10 1 87 040204 000 OPEN WRENCH 12 14 1 89 250052 615 DUST CHUTE 1 91 003301 201 PAN HD SCREW 1 4 20NC 1 2 4 92 006002 032 FLAT WASHER 6 6 13 1 0t 4 92 006002 032 FLAT WASHER 6 6...

Страница 33: ...33 125 003105 101 CAP SCREW 3 8 16NC 3 4 2 126 006306 100 LOCK WASHER 9 8 17 8 2 127 000002 104 HEX SCREW M6 1 0P 20 2 128 008005 100 HEX NUT M6 1 0P 10B 5H 2...

Страница 34: ...ations subject to change Machines may be shown with optional accessories 2018 Laguna Tools Inc LAGUNA and the LAGUNA Logo are the registered trademarks of Laguna Tools Inc All rights reserved 2072 Alt...

Отзывы: