background image


ADJUSTMENT TRANSMITTING ROLLER  

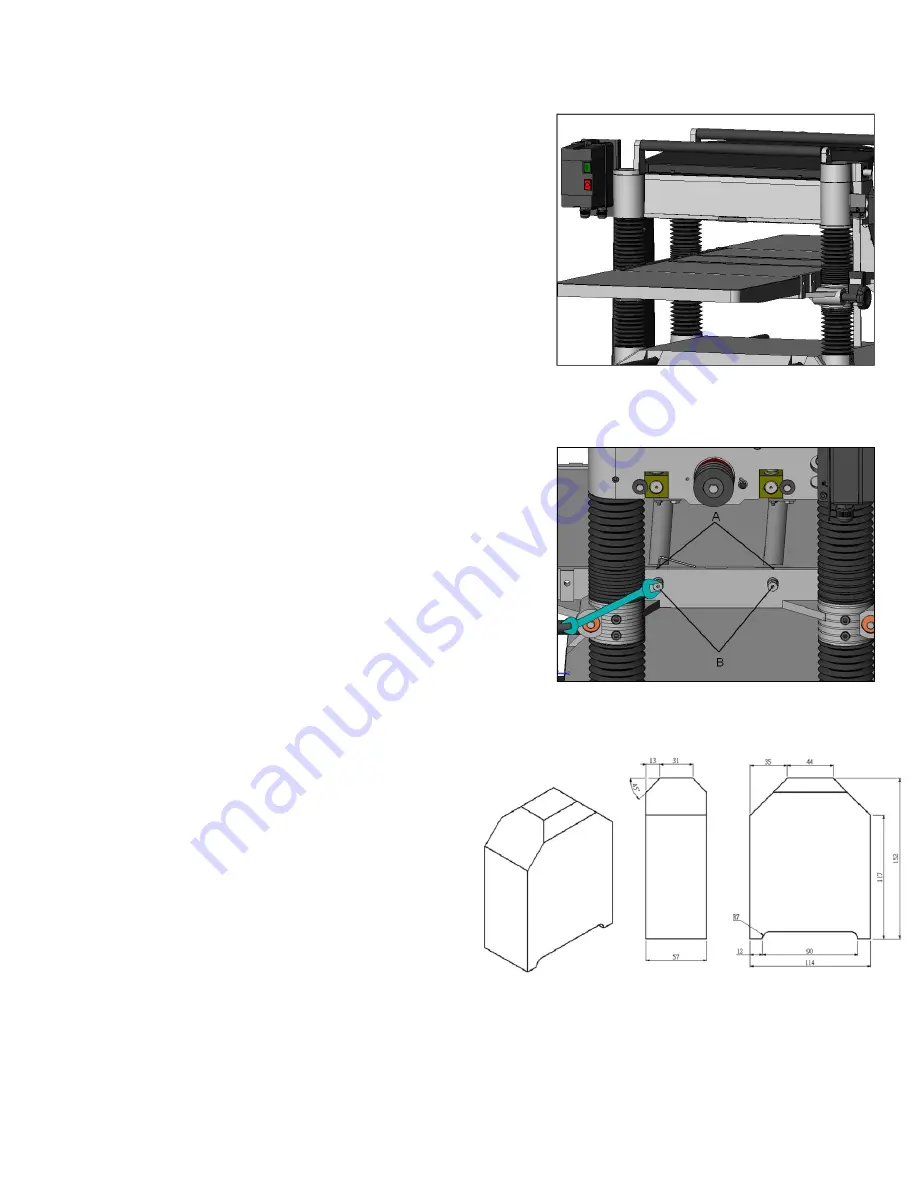
Verify that roller and table are both at the same 
height. (Fig.24) 


ADJUSTING TABLE ROLLER 

To reduce friction between stock and table, two 
table roller have been assembled on machine. 
Adjustments will be needed when planning with 
the different types of wood. 
 
- Roller must be adjusted high, when planning 

rough wood. 

- Roll must be adjusted low, when planning 

smooth wood. 


ADJUST ROLLER 

- Disconnect machine from power source. 
- Place a straight level on table roll, loosen screw 

(A) adjust your shaft (B) to the proper height and 
tighten back the screw to hold in position. (Fig.25) 

 
Always check to make sure that the front and back 
height are the same. There must be no slant 
between roller and table. 


CONSTRUCTING GAUGE BLOCK


- Before starting any adjustments, disconnect the 
machine from the power source. 
 
The manufacturer has adjusted all machines 
before delivery.   
Verify that the screws are properly tightened. 
The only time you will have to adjust your machine 
is when it has been functioning for a long time. 
The adjustment will have to be made to adjust the 
precision of the machine. 
 
Always check the adjustments before starting on a 
new project, this will save you time and money. To 
check you will need the following supplies. 
 
- Straight scale 
- Thickness gauge 
- Home made gauge block of hard wood, with the 

dimensions as shown in Fig.26 


Fig. 24 


Fig. 25 


Fig. 26 


Содержание MPLAN1200-0130

Страница 1: ...UNA TOOLS 2072 Alton Parkway Irvine California 92606 Ph 800 234 1976 www lagunatools com 2018 Laguna Tools Inc LAGUNA and the LAGUNA Logo are the registered trademarks of Laguna Tools Inc All rights r...

Страница 2: ...USE SAFETY GLASSES Also use face or dust mask if cutting operation is dusty Everyday eyeglasses only have impact resistant lenses they are NOT safety glasses 8 SECURE WORK Use clamps or a vise to hold...

Страница 3: ...uch as those dust masks that are specifically designed to filter out microscopic particles Familiarize yourself with the following safety notices used in this manual CAUTION This means that if precaut...

Страница 4: ...removing the contents of the shipping carton and compare with the contents list 2 Report damage if any to your local distributor 3 Clean all rust protected surfaces with a mild solvent or kerosene Do...

Страница 5: ...If they are not aligned loosen screws and adjust them until they are aligned then tighten all of screws WARNING Disconnect the machine from the power source DUST CHUTE ASSEMBLY Mount the dust chute to...

Страница 6: ...more knife inserts develops a nick rotate only those inserts that are affected Each knife insert has an etched reference mark so you can keep track of the rotations IMPORTANT When removing or rotating...

Страница 7: ...ins must be lubricated regularly Fig 11 After 30 hours or more of work the lubrication of bracket must be changed Fig 12 The machine comes equipped with four head screws it is important to always keep...

Страница 8: ...ig 15 CHECKING PULLEY To verify that motor pulley B is in line with the shaft pulley of A using the edge of a straight scale check to see if they are on line with each other Fig 16 ADJUSTING MOTOR MOU...

Страница 9: ...orkpieces This roll will save you lots of time and will speed up you re working rate Fig 21 CONNECTING DUST COLLECTOR Connect dust collector system to hood of machine located at the back of machine Th...

Страница 10: ...ion Fig 25 Always check to make sure that the front and back height are the same There must be no slant between roller and table CONSTRUCTING GAUGE BLOCK Before starting any adjustments disconnect the...

Страница 11: ...are required The only verification you should make is to check indirectly the parallel of the cutter head and table Proceed with the following 1 Disconnect machine from the power source 2 Place gauge...

Страница 12: ...Do not move the table or make any adjustments Fig 31 CHECKING INFEED ROLLER Place gauge block under the cutterhead there must be a thickness gauge of 0 1m m to get the correct position Fig 32 Adjustme...

Страница 13: ...other end CHECK HEIGHT OF PRESSURE BAR When adjusting pressure bar the correct position of wooden gauge and 0 2m m thickness gauge must be as shown in Fig 35 Adjustment 1 Loosen screw no 1 and nut no...

Страница 14: ...ut as shown in Fig 38 Adjustments 1 Place wooden gauge and thickness gauge as shown in Fig 37 2 Loosen screw no 1 and nut no 2 turn screw to the right to make chipbreaker move upward 3 Place gauge blo...

Страница 15: ...ld the SET button until the zero to the right of the decimal point starts to flash 6 Repeat steps 4 and 5 until the last digit in the 0 001 place is entered 7 Press and hold the SET button until the S...

Страница 16: ...15...

Страница 17: ...16...

Страница 18: ...17...

Страница 19: ...18 1...

Страница 20: ...000103 103 SOC HD CAP SCREW M6 1 0P 12 9 16 170494 000 DUST HOOD 1 17 006001 056 FLAT WASHER 8 5 23 2 0t 8 18 000103 106 SOC HD CAP SCREW M6 1 0P 16 9 19 240017 000 HAND WHEEL 1 20 230114 906 HANDLE 1...

Страница 21: ...42 10 021385 000 RELIEF BUSHING PGA13 5 11B 2 43 000205 101 SET SCREW M10 1 5P 12 16 44 000204 103 SET SCREW M8 1 25P 12 7 45 050293 000 HEAD CASTING 1 46 360385 901 SHAFT 2 47 002301 201 Round Head...

Страница 22: ...88 000 SHAFT 1 78 008009 200 HEX NUT M12 1 75P 19B 10H 2 79 360389 000 INFEED ROLLER 1 80 016308 002 CHAIN 06B 67P 1 81 000104 114 SOC HD CAP SCREW M8 1 25P 50 4 82 030109 000 BALL BEARING 6204 ZZ 1 8...

Страница 23: ...BUSHING 2 117 360390 000 SHAFT 2 118 000104 104 SOC HD CAP SCREW M8 1 25P 16 8 119 360391 000 ECCENTRIC SHAFT 4 120 130037 000 COLUMN LOCK BUSHING 2 121 230115 000 KNOB 2 122 000203 104 SET SCREW M6...

Страница 24: ...149 360395 000 COLUMN SHAFT 3 150 050296 000 COLUMN 3 151 050297 000 BASE CASTING 1 152 016004 000 CHAIN 40 166P 1 153 170413 901 CHAIN TENSIONER BRACKET 1 154 360362 902 SPROCKET SHAFT 1 155 150011 0...

Страница 25: ...W M6 1 0P 10 2 204 003005 206 HEX SCREW 3 8 16NC 2 1 2 4 205 250402 000 WHEEL 4 206 009102 200 HEX NUT 3 8 16NC 4 207 006002 077 FLAT WASHER 10 5 19 1 0t 8 208 921246 000 DIGITAL READ OUT 9 inch 1 208...

Страница 26: ...Q ty 222 000303 105 ROUND HD SCREW M5 0 8P 15 2 223 380168 901 WASHER 1 224 490124 000 TERMNAL COVER 1 225 003303 102 ROUND HD SCREW 3 16 24NC 1 4 1 226 000303 103 ROUND HD SCREW M5 0 8P 10 2 227 0065...

Страница 27: ...ations subject to change Machines may be shown with optional accessories 2018 Laguna Tools Inc LAGUNA and the LAGUNA Logo are the registered trademarks of Laguna Tools Inc All rights reserved 2072 Alt...

Отзывы: