background image

LaCie Professional Server 

RAID - Two Disks

Technical Brief: RAID 

page 43

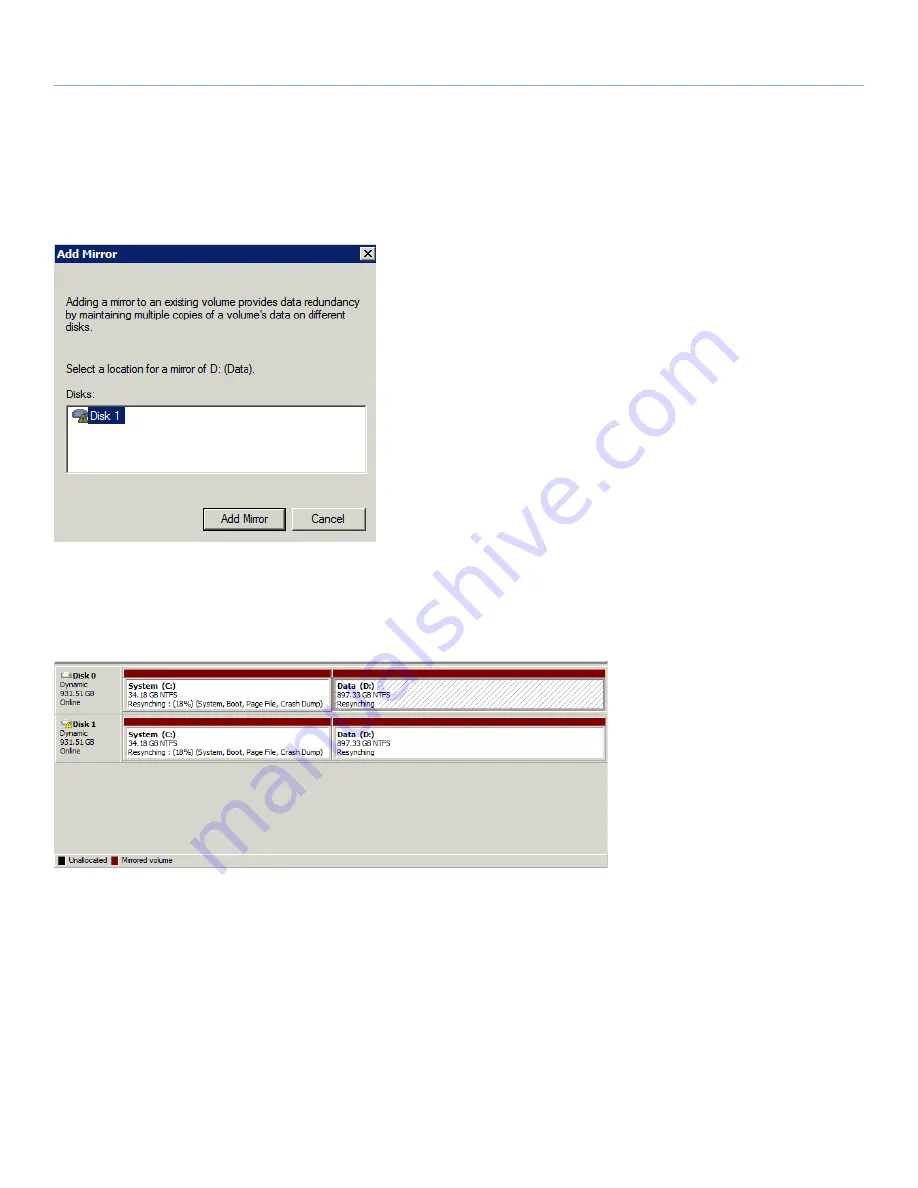
4.  A prompt will ask you to select the second disk for the mirror 

(

Fig. 53

). The only choice is Disk 1 since there are two drives 

within the 5big enclosure. Click on 

Disk 1

 then select 

Add Mir-

ror.

5.  The Data mirror will be created during the Resynching (

Fig. 51

).  

See 

5.6. Volume Activity During a Resynch

 for information on 

disk activity during a resynch.

continued on the next page>>

Fig. 53 

Fig. 54 

Содержание 5big - Network NAS Server

Страница 1: ...ng the Mirror After a Recovery 20 5 3 2 Creating the Mirror 22 5 4 Swap Volume RAID 5 24 5 4 1 Create the Swap Volume 25 5 4 2 Create the Swap File 29 5 5 Data Volume RAID 5 32 5 6 Volume Activity Dur...

Страница 2: ...64 8 5 Data Volume RAID 5 71 9 Repairing RAID Configurations 77 9 1 Reinserting a Healthy Disk 77 9 2 Repairing the System Mirror and RAID 5 After a Disk Failure 79 9 2 1 Removing the Missing Disk 86...

Страница 3: ...or from the use of the informa tion contained herein LaCie reserves the right to make changes or revisions in the product design or the product manual without reser vation and without obligation to n...

Страница 4: ...ailed White Paper IMPORTANT INFO This Technical Brief offers a description of Windows Storage Server 2008 RAID implementation on the 5big Storage Server The information regarding RAID does not apply t...

Страница 5: ...Please use caution when removing one or more drives from the enclosure Use care when inserting or removing more than one disk while the 5big Storage Server is powered on If disks are rapidly inserted...

Страница 6: ...ternal backup drives with capacities greater than 2TB using GPT IMPORTANT INFO LaCie cannot guarantee compatibility per formance or reliability when using non LaCie disks that have not been tested wit...

Страница 7: ...ive in the enclosure choose the second slot from the left Slot 2 for the next drive See 4 Disk Numbering for additional information on disk numbering 1 Use the included drive lock tool to unlock the d...

Страница 8: ...rive to the drive tray Only 3 5 SATA II drives may be used in the 5big enclosure Please visit the Support page at www lacie com for a list of drives that have been tested by LaCie LaCie cannot guaran...

Страница 9: ...rt afhankelijk van de gebruiksomgeving gewoonlijk 5 10 minder For optimal performance the drive must be connected to a USB 3 0 host port Calculations are based on approximately 15GB HD video 700MB MPE...

Страница 10: ...he replacement or new drive is securely fas tened to a drive tray See 3 5 Fastening a non LaCie Hard Disk to the 5big Enclosure Drive Tray if you are adding a non LaCie drive 8 Carefully insert the dr...

Страница 11: ...further information on the default RAID settings for a five disk 5big Storage Server Please note that each disk takes part in two RAID configurations For example approximately 35 GB of Disk 0 is part...

Страница 12: ...dows assigns drive numbers LaCie highly recommends troubleshooting and if necessary replacing a Missing disk before rebooting the 5big Storage Server See 9 Re pairing RAID Configurations for further i...

Страница 13: ...comes Disk 2 Disk 4 becomes Disk 3 The Missing disk will remain on the list until it is manually removed from Disk Management 9 2 1 Removing the Missing Disk Slight confusion could occur when a replac...

Страница 14: ...a problem that will impact the integrity of the data However it may become difficult to manage and troubleshoot due to the irregular order of the disks Consider that in this example Disk 0 will have...

Страница 15: ...not imperative to optimal operation you can easily recover the 5big Storage Server default drive order by restarting the device Please make certain that the 5big Storage Server is not being ac cessed...

Страница 16: ...ur 5big Storage Server Start LaCie Hardware Monitor The Hardware Monitor also numbers the system drives but they remain static based on the slot Fig 19 shows the numbers used by the Hardware Monitor S...

Страница 17: ...re contains all important financial documents from the year 2010 Data by default is a RAID 5 volume If an administrator decides to break up the Data volume in favor of creating mirrored volumes the Sh...

Страница 18: ...sed to create Shares and store data RAID 5 requires three or more disks RAID 5 offers improved storage capacity While mirroring has an overhead of 50 storage capacity due to file duplication RAID 5 pa...

Страница 19: ...figurations to suit the needs of a business or after a server system recovery Launch Disk Management to view or change RAID configurations in Windows Storage Server 1 Click twice on the desktop shortc...

Страница 20: ...rsions of a Windows operating system the user is prompted to select one as the device boots Since a monitor and keyboard are required to choose the boot disk your 5big Storage Server has turned off th...

Страница 21: ...ing to connect a monitor keyboard and mouse to the 5big Storage Server in order to choose Disk 1 as the boot disk To keep the 5big Storage Server boot order type or copy and paste the following comman...

Страница 22: ...al Brief RAID page 22 5 3 2 Creating the Mirror 1 Right click on the sole partition that lists System as one of its components Choose Add Mirror Fig 21 2 From the list of drives choose Disk 1 Click Ad...

Страница 23: ...t prompt in Fig 23 is standard for the 5big Storage Server 5 3 1 Boot Order and Creating the Mirror After a Recovery Click OK to continue 4 The new configuration will Resynch until the mirror is creat...

Страница 24: ...Note that the storage space used for the mirror on Disk 1 is identical to Disk 0 The remaining capacity for each disk is Unallocated for the moment 5 4 Swap Volume RAID 5 Create the Swap volume after...

Страница 25: ...nch Disk Management to make certain that the System vol ume has been mirrored Fig 26 If there is a question please confirm the color coding for volumes In this example Mirrored volume is color coded d...

Страница 26: ...Five Disks Technical Brief RAID page 26 3 The New RAID 5 volume wizard will launch Click Next Fig 28 4 Disk 2 is listed in the Selected column Choose Disk 3 and Disk 4 then click Add Fig 29 continued...

Страница 27: ...ault for the RAID 5 Swap volume matches the indi vidual disk capacity of the System volumes In Select the amount of space in MB type 35000 Click Next Fig 30 6 The default letter assignment for the Swa...

Страница 28: ...choose the settings below Fig 32 File System NTFS Allocation unit size Default Volume label type Swap For a faster format check Perform a quick format The process will take significantly more time if...

Страница 29: ...s replaced by Healthy The remaining capacity for each disk is Unallocated for the moment Before building the Data volume quit Disk Management to create the swap file on the Swap vol ume 5 4 2 Create t...

Страница 30: ...Brief RAID page 30 2 On the left of the window click once on Advanced system settings Fig 35 3 From the System Properties window select the Advanced tab In the first category Performance click Settin...

Страница 31: ...Options window click the Advanced tab and select Change 5 In the Virtual Memory window click once on S Swap Fig 37 6 Select Custom size to activate the fields Initial size MB and Maximum size MB Fig...

Страница 32: ...restarting the server Start Restart Create the RAID 5 Data volume after the server has restarted 5 5 Data Volume RAID 5 1 Launch Disk Management 5 2 Adjusting the RAID 2 Right click on the Disk 0 Una...

Страница 33: ...er RAID Five Disks Technical Brief RAID page 33 4 Add all the disks from Available to Selected Fig 40 Click Next 5 The default letter for the Data volume is D Select D and click Next continued on the...

Страница 34: ...selected and choose the settings below Fig 32 File System NTFS Allocation unit size Default Volume label type Data LaCie recommends checking Perform a quick format Choosing a longer format while conf...

Страница 35: ...rm the settings before clicking Finish Fig 43 9 The RAID 5 volume has finished building when Resynching is replaced by Healthy Please note that building the Data RAID 5 volume may take between 15 and...

Страница 36: ...ment will automatically start a new resynch at 0 once the 5big Storage Server has rebooted Due to the size of large volumes such as the 5big Storage Server Data RAID 5 rebooting during a resynch in pr...

Страница 37: ...nue to operate since the exact same system files are stored on its mirrored drive Windows Storage Server may run from a mirrored volume Data 2 Disks Mirror The Data volume should be used to create Sha...

Страница 38: ...the left of Storage 3 Click once on Disk Management 6 3 5big Storage Server Single Disk Default Configuration A single disk 5big Storage Server is shipped with two partitions Sys tem and Data Fig 45...

Страница 39: ...rcing any action from the user However this option will be lost if the user has performed a recovery reinstalling Windows Storage Server or is adding additional drives to a single disk 5big Storage Se...

Страница 40: ...alling Disks for fur ther information on installing disks into the 5big Storage Server 2 Before creating the System mirror make certain that you have entered the commands listed in 6 4 Boot Order and...

Страница 41: ...ct the second disk for the mirror Fig 48 The only choice is Disk 1 since there are two drives within the 5big enclosure Click on Disk 1 then select Add Mir ror 5 Two Windows prompts will appear Click...

Страница 42: ...s Resynching 6 6 Creating the Data Mirror 1 Please create the System mirror 6 5 Creating the System Mir ror before building the Data mirror If the System mirror has been created or it is Resynching mo...

Страница 43: ...mirror Fig 53 The only choice is Disk 1 since there are two drives within the 5big enclosure Click on Disk 1 then select Add Mir ror 5 The Data mirror will be created during the Resynching Fig 51 See...

Страница 44: ...LaCie Professional Server RAID Two Disks Technical Brief RAID page 44 6 All disks will be listed as Healthy once the Resynching is com plete Fig 55 Fig 55...

Страница 45: ...on the next page IMPORTANT INFO Mirroring and RAID 5 provide solid protection if one drive in their respective volumes should encounter problems However LaCie highly recommends backing up the data sto...

Страница 46: ...a non system volume acting as virtual memory See 5 4 2 Cre ate the Swap File Due to its size the Swap volume may be used for applications that are installed on the 5big Storage Server The Swap volume...

Страница 47: ...e sign to the left of Storage 3 Click once on Disk Management 7 3 5big Storage Server Single Disk Default Configuration A single disk 5big Storage Server is shipped with two partitions Sys tem and Dat...

Страница 48: ...any action from the user However this option will be lost if the user has performed a recovery and reinstalled Windows Storage Server or is adding additional drives to a single disk 5big Storage Serve...

Страница 49: ...ng Disks for further information on installing disks into the 5big enclosure 2 Before creating the System mirror make certain that you have entered the commands listed in 7 4 Boot Order and Creating t...

Страница 50: ...ge 50 4 A prompt will ask you to select the second disk for the System mirror Fig 59 Click on Disk 1 then select Add Mirror 5 Two Windows prompts will appear Click Yes Fig 60 and OK Fig 61 with each p...

Страница 51: ...has been mirrored In a three disk configuration one portion of Disk 2 is not included in a RAID array This volume may be used to store and backup files that do not require RAID protection It may also...

Страница 52: ...RAID Three Disks Technical Brief RAID page 52 2 Right click on the Disk 2 s Unallocated partition Select New Simple Volume Fig 63 3 The Simple Volume Wizard will open Click Next Fig 64 continued on th...

Страница 53: ...f the System volume type 35000 in Select the amount of space in MB Click Next Fig 65 5 The default letter for the LaCie 5big Storage Server Swap vol ume is S Fig 66 However you may choose any free let...

Страница 54: ...me with the following settings is selected and choose the settings below Fig 32 File System NTFS Allocation unit size Default Volume label type Swap For a faster format check Perform a quick format Th...

Страница 55: ...your settings and click Next if they are correct Fig 68 8 Fig 69 shows the System mirror and the Swap volume 9 Please see 5 4 2 Create the Swap File for details on moving the page file to the Swap vol...

Страница 56: ...Data D partition will be deleted before building the RAID 5 Since deleting the volume also removes the files stored on the Data D partition please back up all data before moving to the next step 2 Rig...

Страница 57: ...D Three Disks Technical Brief RAID page 57 4 Right click on the Disk 0 Unallocated partition and choose New RAID 5 Volume to launch the New RAID 5 Volume Wizard Fig 73 5 Click Next Fig 74 continued on...

Страница 58: ...essional Server RAID Three Disks Technical Brief RAID page 58 6 Click Disk 1 and Disk 2 from Available then click Add to move them to Selected Fig 75 7 Click Next Fig 76 continued on the next page Fig...

Страница 59: ...have chosen a letter 9 Make certain that Format this volume with the following settings is selected and choose the settings below Fig 78 File System NTFS Allocation unit size Default Volume label typ...

Страница 60: ...Brief RAID page 60 10 Confirm your settings before clicking Finish Fig 79 11 A Windows prompt may appear confirming that disks will be converted from basic to dynamic Fig 80 Click Yes to begin the RAI...

Страница 61: ...building when Resynching Fig 81 is replaced by Healthy Fig 82 Please note that building the Data RAID 5 volume may take between 15 and 40 hours depending upon the capacity of your 5big Storage Server...

Страница 62: ...sks or a RAID 0 array LaCie highly recommends mirroring and RAID 5 for optimal protection of your data RAID 0 can offer some speed advantages but data will not be protected across multiple volumes as...

Страница 63: ...o its size the Swap volume may be used for applications that are installed on the 5big Storage Server The Swap volume may also be used to create Shares and store data A Mirror requires two drives A Mi...

Страница 64: ...System Mirror to create the System mirror Once the System mirror is created return to section 8 4 Swap File and Data Mirror to build the Swap and Data mirror 8 4 Swap File and Data Mirror 1 Launch Di...

Страница 65: ...RAID page 65 2 Create a Swap partition before attempting to resynch the mirror Right click on the Disk 3 s Unallocated partition Select New Simple Volume Fig 84 3 The Simple Volume Wizard will open C...

Страница 66: ...f the System volume type 35000 in Select the amount of space in MB Click Next Fig 86 5 The default letter for the LaCie 5big Storage Server Swap vol ume is S Fig 87 However you may choose any free let...

Страница 67: ...e with the following settings is selected and choose the settings below Fig 88 File System NTFS Allocation unit size Default Volume label type Swap For a faster format check Perform a quick format The...

Страница 68: ...Four Disks Technical Brief RAID page 68 7 Confirm your settings and click Next if they are correct Fig 89 The simple volume has been created Fig 90 Move to the next step to create the mirror continued...

Страница 69: ...ssional Server RAID Four Disks Technical Brief RAID page 69 8 Right click on the Swap S partition to select Add Mirror Fig 91 9 Select Disk 3 to mirror the drives Fig 92 continued on the next page Fig...

Страница 70: ...hat you want to convert a basic disk to a dynamic disk Click Yes to create the mirror Fig 93 11 The mirror will start resynching Fig 94 Please see 5 4 2 Cre ate the Swap File for details on moving the...

Страница 71: ...de leted before building the RAID 5 Since deleting the volume will also remove the files stored on the Data D partition please back up all data before moving to the next step To delete the partition...

Страница 72: ...ID Four Disks Technical Brief RAID page 72 3 Right click on the Disk 0 Unallocated partition and choose New RAID 5 Volume to launch the New RAID 5 Volume Wizard Fig 96 4 Click Next Fig 97 continued on...

Страница 73: ...ional Server RAID Four Disks Technical Brief RAID page 73 5 Click Disk 1 Disk 2 and Disk 3 from Available then click Add to move them to Selected Fig 98 6 Click Next Fig 99 continued on the next page...

Страница 74: ...Technical Brief RAID page 74 7 The default letter for the LaCie 5big Storage Server Data volume is D Fig 100 However you may choose any free letter for the volume Click Next after you have chosen a l...

Страница 75: ...ettings below Fig 101 File System NTFS Allocation unit size Default Volume label type Data LaCie recommends checking Perform a quick format Choosing a longer format while configuring large RAID 5 ar r...

Страница 76: ...s to begin the RAID 5 resynch 11 The RAID 5 volume has finished building when Resynching Fig 103 is replaced by Healthy Fig 104 Please note that building the Data RAID 5 volume may take between 15 and...

Страница 77: ...st reactivate and resynch the RAID s For example if Disk 1 is not causing errors but has been removed the System mirror and Data RAID 5 are no longer Healthy In Fig 105 the disk that has been removed...

Страница 78: ...on the 5big Storage Server 3 Removing and Installing Disks 2 Disk Management will recognize the reinserted disk but the Failed Redundancy persists until the RAIDs are reactivated Fig 106 3 Right clic...

Страница 79: ...rom LaCie IMPORTANT INFO In the event that an individual hard disk fails in the LaCie 5big Storage Server contact your LaCie reseller or LaCie Customer Support for technical assistance If the problem...

Страница 80: ...and that a replacement from LaCie is avail able to repair the RAIDs 2 Note that Disk 1 is Missing and that both the System mirror and Data RAID 5 have Failed Redundancy Fig 109 The Swap volume is Hea...

Страница 81: ...eplacement disk is recognized by Disk Management but the capacity is Unallocated Fig 110 5 The mirror must be broken before recreating it with the replace ment disk Right click on the System volume an...

Страница 82: ...nical Brief RAID page 82 6 In the Remove Mirror pop up window click on Missing Fig 112 Click Remove Mirror 7 Click Yes at the Disk Management prompt 8 The mirror has been successfully removed Fig 113...

Страница 83: ...ical Brief RAID page 83 9 Right click on the System disk and select Add Mirror Fig 114 10 From the Add Mirror pop up window select your replacement disk in this example Disk 1 Fig 115 Click Add Mirror...

Страница 84: ...s at the Disk Management pop up window 12 Click OK at the Disk Management pop up window 13 Disk Management will begin Resynching the System mirror Fig 116 To save time you may resynch the Data RAID 5...

Страница 85: ...ng disk Choose Repair Volume Fig 117 15 In the Repair RAID 5 Volume window choose the disk to aid in the repair of the Data volume in our example Disk 1 Click OK Fig 118 The Data volume will start Res...

Страница 86: ...of drives 1 If you have not closed Disk Management after following the steps to repair the System mirror and or Data RAID 5 the Miss ing disk will be listed as a member of the Data volume Fig 119 2 G...

Страница 87: ...rief RAID page 87 3 The Missing disk will remain in the list of Disk Management disks Fig 120 However it should no longer be a part of the Data volume 4 Right click on Missing and select Remove Disk F...

Страница 88: ...LaCie Professional Server RAID Repair Technical Brief RAID page 88 5 The Missing disk should now be removed from the Disk Man agement list Fig 122 Fig 122...

Страница 89: ...the first logical drive If the System mirror resynch is interrupted and the 5big Storage Serv er hangs unplug Disk 0 from the back of the unit With Disk 0 briefly disassociated from the 5big Storage...

Страница 90: ...Ireland http www lacie com ie contact LaCie Italy http www lacie com it contact Japan Elecom CO LTD http www lacie jp LaCie Korea http www lacie com kr contact LaCie Latin America http www lacie com l...

Отзывы: