


6-41
Sending > WSD Scan
WSD Scan
WSD Scan saves images of originals scanned on this machine as files on a WSD-compatible computer.
Installing Driver Software (for Windows 7)
1
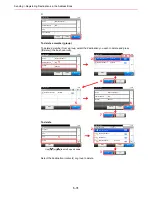
Display the window.
From the Start menu, select
Network
.
In Windows 8, select the Desktop in the Start screen and click
Explorer
on the task bar, and
then
Network
.
2
Install the driver.
Right-click the machine’s icon and then click
Install
.
During the installation, double-click the icon shown on the task bar to display the
Driver
Software Installation
screen. When
Your devices are ready to use
is displayed on the
screen, the installation is completed.
Using WSD
1
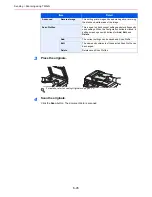
Press the Send key.
2
Place the originals.
For details, refer to
Loading Originals on page 3-10
.
NOTE
To use WSD Scan, confirm that the computer used for WSD scanning and the machine is network-connected, and
WSD Scan
(page
9-21
) is set to [On] in the network settings.
For information on operating the computer, refer to the computer’s help or the operation guide of your software.
NOTE
If the
User Account Control
window appears, click
Continue
.
If the
Found New Hardware
window appears, click
Cancel
.
Содержание TASKalfa 265ci
Страница 1: ...TASKalfa 265ci Operation Guide ...
Страница 4: ......
Страница 10: ...vi ...
Страница 38: ...1 14 Preface About this Operation Guide ...
Страница 64: ...2 26 Preparation before Use COMMAND CENTER Settings for E mail ...
Страница 120: ...3 56 Common Operations Using Various Functions ...
Страница 148: ...5 12 Printing Printing Data Saved on the Printer ...
Страница 159: ...6 11 Sending Preparation for Sending a Document to a PC 2 3 4 5 1 2 ...
Страница 194: ...6 46 Sending Scanning using TWAIN ...
Страница 346: ...11 26 Appendix Glossary ...
Страница 352: ...Index 6 ...
Страница 353: ......
Страница 355: ...First Edition 2013 03 2PAKMEN000 ...