


39
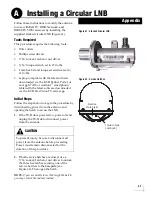
Installing a Stacked Circular LNB
Follow the steps below to install the stacked circular
LNB in your antenna system (see Figure 66).
1.
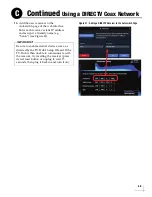
Insert the new LNB fully into the choke feed
and orient the LNB as shown.
2.
If necessary, replace any of the M4 set screws
with new screws (
supplied in kit
). Then use a
torque screwdriver with a 2 mm hex bit to
tighten the screws to 11 in.-lbs of torque.
3.
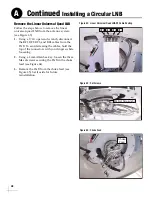
Connect the RF1 cable to the LNB, routing the
cable as shown. Tighten to 15 in.-lbs of torque.
4.
Use two tie-wraps (
supplied in kit
) to secure
the RF2, RF3, and RF4 cables to the LNB.
5.
Slowly rotate the skew assembly to ensure
the RF cables do not restrict movement. If
necessary, adjust the cable routing.
6.
Inspect the inside of the antenna to make sure
you have not left any tools or debris inside.
Then close the hatch and lock its three hex
latches.
7.
If you have not already done so, connect the
receivers as explained in the section
8.
Reconnect power to the TV-Hub.
Important!
Maintain a minimum bend radius of 1/2" (1.3 cm)
when routing the RF cables to the LNB. Sharp
bends or kinks in the cables can degrade antenna
performance.
Figure 66: Stacked Circular LNB RF Cable Routing
RF1
Tie-wrap
RF2, RF3
and RF4
Tie-wrap
Continued
Installing a Circular LNB
A
Содержание TracVision TV10
Страница 1: ...TracVision TV10 Installation Guide ...
Страница 53: ......


