background image

3

Troubleshooting

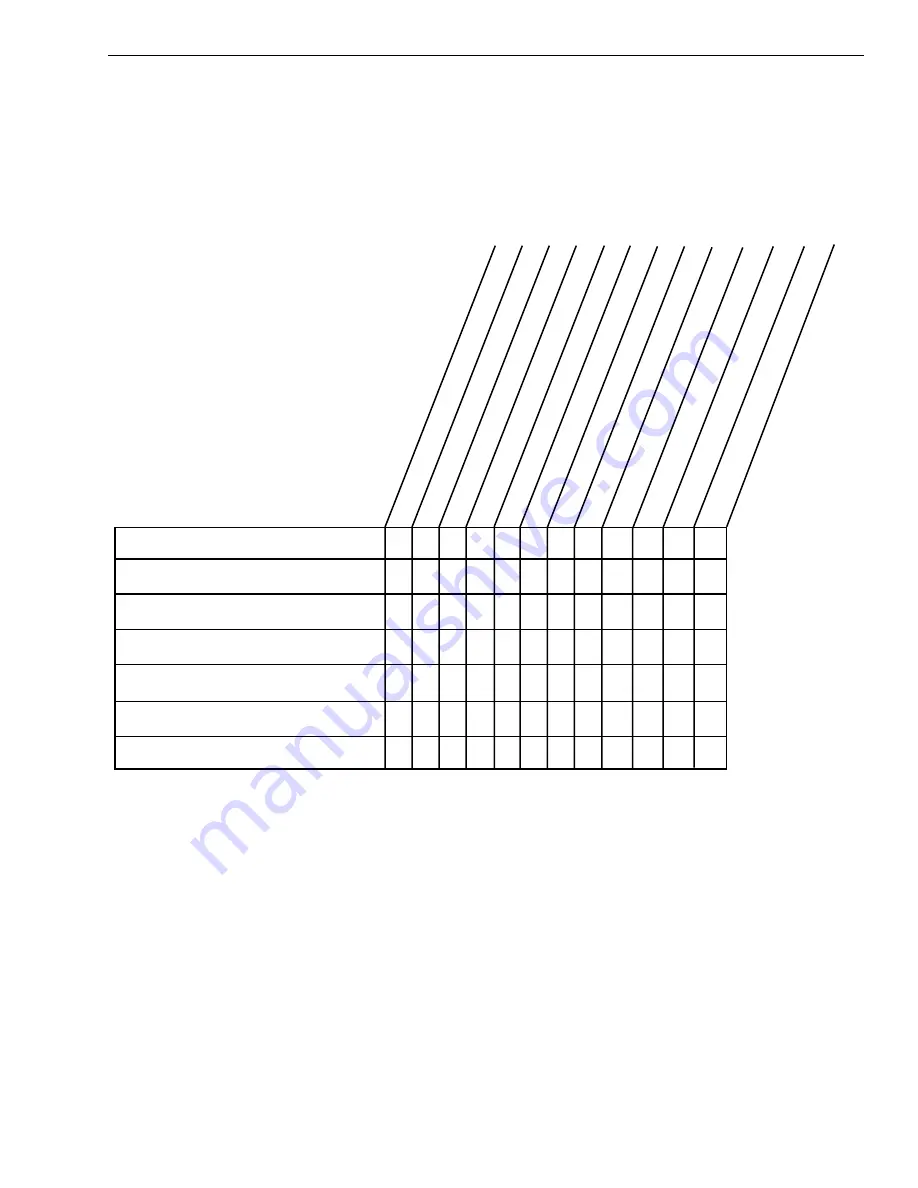
The troubleshooting matrix shown in Figure 3-1 identifies some
trouble symptoms, their possible causes, and reference to
troubleshooting solutions.

3.1

Causes and Remedies for
Common Operational Issues

There are a number of common issues that can affect the signal
reception quality or the operation of the TracVision 6. The
following sections address these issues and potential solutions.

3-1

Troubleshooting

54-0166 Rev. B

Figure 3-1

Troubleshooting Matrix

Antenna non-functional

X

Antenna not switching channels/satellites

X

X

X

No picture on TV set

X

X

X

X

X

X

X

Intermittent picture for short intervals

X

X

X

X

X

X

X

X

System works at dock but not on the move

X

X

System will not find satellite

X

X

X

X

X

X

X

X

Snowy or pixelating television picture

X

X

X

X

Outside satellite coverage zone (Section 3.1.5)

Antenna gyro faulty (Section 3.3)

LNB assembly faulty (Section 3.3)

Satellite signal blocked (Section 3.1.4)Incorrect or loose RF connectors (Section 3.1.7)

Radar interference (Section 3.1.6)

POSSIBLE CA

USE (AND SOLUTION)

SYMPTOM

Blown fuse or wiring (Section 3.1.1)

V

essel turning during startup (Section 3.1.2)

Passive multiswitch used (Section 3.1.9)

Incorrect satellite configuration (Section 3.1.3)

IRD faulty or improperly configured (Section 3.2)

Multiswitch interference (Section 3.1.8)

Содержание TracVision 6

Страница 1: ...Satellite Television KVH TracVision 6 technical manual Installation Configuration Maintenance A Guide to TracVision 6 ...

Страница 2: ...of these fuses has blown or been broken the Antenna Unit will not operate Refer to Section 4 4 PCB Removal and Replacement for details on the fuse locations and how to access the CPU Board 4 3 TracVision 6 Field Replaceable Units Table 4 1 has been updated to show the new part number for the 3 15 amp fuses and the new part numbers for the RF Detector PCB and European LNB The azimuth limit switch h...

Страница 3: ...the main power fuses and the PCB assemblies discussed below Refer to Figure 4 2 remove 3 nuts and washers from the bottom flange and 3 screws and washers from the upper flange Remove the cover and set aside with the fasteners The CPU PCB has been changed from an L shaped design to a simpler straight design Figure 4 3 has been updated to show the new CPU PCB From Cable Wrap From Azimuth Limit Switc...

Страница 4: ...eplacement 1 Rotate the antenna assembly by hand clockwise until it stops 2 Remove the printed circuit board PCB cover illustrated in Figure 4 2 using a 2 Phillips screwdriver and a 3 8 nut driver socket 3 At the CPU s Molex connector cut the black and white wires from the azimuth limit switch see Figure 4 3 Leave about one inch 25 mm of the wires still connected for later reference 4 At the azimu...

Страница 5: ...onnector After noting the position of the old black and white wires remove the old wires from the Molex connector Attach the new wires in their place 9 Before re installing the azimuth limit switch to the antenna assembly orient the switch s plastic cam as shown in Figure 4 8 With the cam in the proper position reinstall the switch to the antenna assembly using the three 6 retaining screws and fla...

Страница 6: ...CPU Board If either of these fuses has blown or been broken the Antenna Unit will not operate Refer to Section 4 4 PCB Removal and Replacement for details on the fuse locations and how to access the CPU Board 4 3 TracVision 6 Field Replaceable Units Table 4 1 has been updated to show the new part number for the 3 15 amp fuses and the new part number for the RF Detector PCB The azimuth limit switch...

Страница 7: ...protected by a cover fastened to the antenna support frame The cover must be removed to gain access to the main power fuses and the PCB assemblies discussed below Refer to Figure 4 2 remove 3 nuts and washers from the bottom flange and 3 screws and washers from the upper flange Remove the cover and set aside with the fasteners The CPU PCB has been changed from an L shaped design to a simpler strai...

Страница 8: ...ps 2 Remove the printed circuit board PCB cover illustrated in Figure 4 2 using a 2 Phillips screwdriver and a 3 8 nut driver socket 3 At the CPU s Molex connector cut the black and white wires from the azimuth limit switch see Figure 4 3 Leave about one inch 25 mm of the wires still connected for later reference 3 TracVision 6 Installation and Technical Manual ADDENDUM 54 0166 Addendum to Rev B F...

Страница 9: ...d cable clamp 8 Route the new limit switch wires through the cover and cable clamp to the CPU s Molex connector After noting the position of the old black and white wires remove the old wires from the Molex connector Attach the new wires in their place 9 Before re installing the azimuth limit switch to the antenna assembly orient the switch s plastic cam as shown in Figure 4 8 on the following pag...

Страница 10: ... cover s wire access hole to protect the wires from chafing 5 TracVision 6 Installation and Technical Manual ADDENDUM 54 0166 Addendum to Rev B Plastic Cam Black and White Wires to CPU s Molex Connector Figure 4 8 Azimuth Limit Switch Orientation ...

Страница 11: ... Unit Part Qty 3 8 16 x 3 hex screws 4 3 8 flat washers 8 3 8 16 hex nuts 4 3 8 lock washers 4 3 8 fiber shoulder washers 4 10 32 x 5 8 flat head screws 6 RG 11 type F connector 1 Plastic screw covers 6 Antenna base seal gasket 1 Tie wraps 2 Core clamp 1 Flash kit cable and adapter 1 Antenna Unit Mounting Procedure 9 Place a flat washer from the kitpack on a bolt and insert the bolt into its hole ...

Страница 12: ...been changed from an L shaped design to a simpler straight design Figure 4 3 has been updated to show the new CPU PCB 4 4 1 CPU Board The new CPU Board is secured to the antenna frame using nine screws rather than eleven 2 Remove nine 6 32 machine screws from the PCB From Cable Wrap From Azimuth Limit Switch RFU PCB From LNB From Cable Wrap RFU to CPU From Antenna Sensor From Elevation Limit Switc...

Страница 13: ...mit switch has been added to the list of field replaceable units FRU Part Number Radome 02 1047 01 CPU 02 0992 RF Detector PCB 02 1017 02 Antenna Gyro Sensor 02 1035 Antenna Gyro Gasket 24 0139 Elevation Drive Belt 24 0105 83 Elevation Motor 02 1050 Azimuth Limit Switch Assembly 02 0957 01 European LNB Assembly 02 0932 U S style LNB Assembly 02 0870 Latin American LNB Assembly 02 0870 01 Data Cabl...

Страница 14: ...emove the printed circuit board PCB cover illustrated in Figure 4 2 using a 2 Phillips screwdriver and a 3 8 nut driver socket 3 At the CPU s Molex connector cut the black and white wires from the azimuth limit switch see Figure 4 3 Leave about an inch of the wires still connected for later reference 4 At the azimuth limit switch cover remove the hot melt keeping the black and white wires in place...

Страница 15: ...and white wires remove the old wires from the Molex connector Attach the new wires in their place 9 Before re installing the azimuth limit switch to the antenna assembly orient the switch s plastic cam as shown in Figure 4 8 on the following page With the cam in the proper position reinstall the switch to the antenna assembly using the three 6 retaining screws and flat washers Ensure the cam finge...

Страница 16: ...4 Plastic Cam Black and White Wires to CPU s Molex Connector Figure 4 8 Azimuth Limit Switch Orientation ...

Страница 17: ...k tel 1 401 847 3327 tel 45 45 16 01 80 fax 1 401 849 0045 fax 45 45 86 70 77 e mail info kvh com e mail info kvh dk internet http www kvh com internet http www kvh com A helpful tip that either directs you to a related area within the manual or offers suggestions on getting the highest quality out of your system An alert to important information regarding procedures product specifications or prod...

Страница 18: ...hes Electronics DISH Network is an official trademark of EchoStar Communications Corporation ExpressVu is a property of Bell ExpressVu a wholly owned subsidiary of Bell Satellite Services Cetrek is a trademark of Cetrek USA Furuno is a registered trademark of Furuno USA Inc B G and Halcyon are trademarks of Brooks and Gatehouse Inc ...

Страница 19: ... Cable 2 9 2 3 5 Installing the Switchplate 2 10 2 3 6 Connecting an Antenna RF Signal Cable to the IRD 2 10 2 3 6 1 Connecting the Antenna RF Signal Cables to a Multiswitch Latin and North American Systems Only 2 11 2 4 Commissioning the IRD 2 13 2 5 Selecting the Active Satellite 2 14 2 5 1 Installing Your Selected Satellites 2 15 2 5 2 Programming User defined Satellites 2 17 2 6 Checking Out t...

Страница 20: ...racVision 6 Field Replaceable Units 4 2 4 4 PCB Removal and Replacement 4 4 4 4 1 CPU Board 4 5 4 4 2 RF Detector Board 4 5 4 5 Antenna Gyro Assembly 4 6 4 6 Elevation Motor and Belt Replacement 4 8 4 6 1 Drive Belt Removal and Replacement 4 9 4 6 2 Elevation Drive Motor Removal and Replacement 4 10 4 7 Antenna LNB Replacement 4 10 4 7 1 European LNB Removal 4 11 4 7 2 U S and Latin American style...

Страница 21: ...ensions 2 4 Figure 2 2 Baseplate Foam Seal Orientation Bottom View 2 4 Figure 2 3 Baseplate Connector Assignments 2 5 Figure 2 4 Bolting the Antenna Unit to the Deck Side View 2 5 Figure 2 5 Adjusting the European LNB Skew Angle 2 6 Figure 2 6 Skew Angle Labels 2 6 Figure 2 7 Switchplate Panel Cutout Dimensions 2 7 Figure 2 8 Correctly Securing Wires within the Switchplate Connectors 2 7 Figure 2 ...

Страница 22: ...gure 4 8 European LNB Removal 4 11 Figure 4 9 U S style LNB Removal 4 11 Figure 4 10 Elevation Shipping Restraint Placement 4 12 Figure 4 11 Azimuth Shipping Restraints Placement 4 12 List of Tables Table 1 1 TracVision 6 Packing List 1 2 Table 2 1 Installation Process 2 1 Table 2 2 Lengths of Provided Below decks Cables 2 2 Table 2 3 Antenna Unit Kitpack Contents 2 3 Table 2 4 Key IRD Settings 2 ...

Страница 23: ...Specifications A 1 Table A 3 TracVision 6 Performance Specifications A 1 Table F 1 System Commands F 1 Table F 2 Manual Positioning Commands F 2 Table F 3 Operational Commands F 3 Table F 4 Tracking and Conical Scan Commands F 4 Table F 5 RF Board Commands F 5 Table F 6 Installation Commands F 7 Table F 7 Debug Commands F 8 v 54 0166 Rev B ...

Страница 24: ......

Страница 25: ...op computer is used to configure the system for satellite selection and conduct diagnostics System specifications are provided in Appendix A Introduction 1 1 54 0166 Rev B Satellite Receiver 2 Satellite Receiver 1 Options Purchased Separately TracVision 6 Antenna Power RF TV 1 TV 2 RF Data 11 16 Volts DC 3 4 Amps Vessel Power PC Maintenance Port Figure 1 1 TracVision 6 System Configuration Dual LN...

Страница 26: ... Cable 32 0619 100 PC Cable 32 0628 06 RF Cable 32 0566 100 Power Cable 32 0510 100 Ground Cable 32 0583 50 Switchplate 02 1023 TracVision 6 Technical Manual 54 0166 TracVision 6 User s Guide 54 0166 01 North American TracVision 6 system European TracVision 6 system DIRECTV Latin America TracVision 6 system formerly called Galaxy Latin America 1 2 TracVision 6 Installation and Technical Manual Tab...

Страница 27: ...le for extra RF signal cables as needed Crimp tool LRC L3011B or equivalent Light hammer center punch tape scriber pencil Terminal lug crimping tool wire strippers A PC with terminal emulation software such as PROCOMM Windows Terminal or Windows 95 98 Hyperterminal 2 1 Installation 54 0166 Rev B Plan the entire installation before proceeding Take into account antenna unit placement running cable d...

Страница 28: ...ith nearby radars as their energy levels may overload the antenna s front end circuits If necessary position the Antenna Unit so it is at least four feet 1 3 meters above or below the level of the radar Make sure that the mounting surface is rigid so that it cannot flex when the vessel vibrates If necessary add a strength member to the mounting site to stiffen it 2 2 Installing the Antenna Unit Sp...

Страница 29: ...tly on the vessel s fore and aft axis but its centerline reference MUST be parallel to it Be sure to account for the radome height and the base dimensions illustrated in Figure 2 1 on the following page Antenna Unit Mounting Procedure 1 Using the base dimensions presented in Figure 2 1 on the following page or the baseplate as a template lay out the four mounting bolt holes Check the layout to mak...

Страница 30: ... mounting surface with the hole centered over the cable access cutout and the paper backing on the bottom as shown in Figure 2 2 Do not remove the paper backing at this time Scribe a line all around the seal 2 4 TracVision 6 Installation and Technical Manual FWD 27 36 695 mm Compression Seal 4x 50 4x 13 mm 26 2 665 mm 12 0 305 mm 6 0 152 mm 6 0 152 mm 12 0 305 mm Figure 2 1 Antenna Unit Dimensions...

Страница 31: ...muth mechanism plate to expose all four mounting holes When rotating the azimuth mechanism by hand go slowly Hitting the stops with excessive force will damage the azimuth limit switch 9 Place a flat washer from the kitpack on a bolt and insert the bolt into its hole from above as shown in Figure 2 4 10 Apply a flat washer and lock nut from underneath as shown in Figure 2 4 11 Tighten securely unt...

Страница 32: ...er to the Antenna Unit 2 Remove the radome and set it aside 3 Loosen the two wing screws securing the LNB within the choke feed as illustrated in Figure 2 5 4 Refer to the LNB skew angle labels on the end of the LNB and on the LNB choke feed pictured in Figure 2 6 and adjust the LNB as necessary to match as closely as possible the skew angle provided by your service provider 5 Retighten the wing s...

Страница 33: ...the switchplate connectors and ship s power Tips for Safe and Successful Wiring When attaching cables to the TracVision 6 switchplate connectors make sure the insulation is stripped back approximately 3 16 5 mm Twist the wires gently to help achieve a good connection Do not pinch insulation inside the connector After attaching the power and data cables to the appropriate terminal connector strips ...

Страница 34: ...na Unit Power Cable Find the TracVision 6 power cable where it comes through the panel cutout made earlier Wire the antenna unit power cable to the switchplate connectors as indicated in Figure 2 10 on the following page After wiring the power cable connect the power indicator lamp also as noted in Figure 2 10 After both the power cable and lamp are properly wired carefully insert the lamp into it...

Страница 35: ...rounding wire to any suitable screw on the rear panel of the IRD with a good contact with the IRD chassis The other end should be connected to a suitable ground ideally the Ground connector on the switchplate see Figure 2 11 12 Vdc Red 12 Vdc Lamp Ground Black Ground Lamp Lamp Socket Figure 2 10 Wiring the Antenna Unit Power Cable and Indicator Lamp 12 Vdc Ship s Power Ground IRD Ground Wire to IR...

Страница 36: ...with F type connectors One end should be connected to the plug labeled RF1 on the base of the TracVision 6 system The other connector should be connected to the IRD plug labeled LNB or ANT SAT If a second IRD is to be hooked up to the TracVision 6 antenna unit the RF cable for the second IRD should be connected to the plug labeled RF2 while the other end is connected to the IRD plug labeled LNB or...

Страница 37: ... unit in accordance with the manufacturer s instruction sheet 1 Connect the RF cable tagged RF1 to the multiswitch input labeled LNB RHCP 13V 2 Connect a second RF cable to the antenna unit s RF2 plug and to the multiswitch input labeled LNB LHCP 18V 3 Connect the multiswitch outputs to individual IRD inputs Use RG 6 cable terminated with F type connectors for all RF connections Terminate all unus...

Страница 38: ...8v Out 1 Out 2 Out 3 Out 4 DC Power IRD 1 IRD 2 IRD 4 IRD 3 RF Splitters Power Dividers TracVision 6 Antenna Baseplate Bottom View Figure 2 13 Single Multiswitch Installation Latin and North American systems only Figure 2 14 Multiple Multiswitch Installation Latin and North American systems only Due to the signal polarization in European satellites the use of a multiswitch active or otherwise with...

Страница 39: ...stalled satellite settings as follows Antenna Alternative 1 Satellite A Antenna Alternative 2 Satellite B Section 2 5 Selecting the Active Satellite provides details on the satellite installation process Programming DSS Plus IRDs If you are using multiple DSS Plus IRDs and intend to shift from one satellite to another only one of the IRDs can be configured as a two satellite receiver All other IRD...

Страница 40: ... satellites may be selected to reside in the system s active memory as Satellites A and B 2 14 TracVision 6 Installation and Technical Manual Astra 1 ü ü ü ü Astra 2N ü ü Astra 2S ü ü Hispasat Hotbird WB ü ü ü ü Sirius ü ü ü Thor ü Astra 1 Astra 2N Astra 2S Hispasat Hotbird WB Sirius Thor DSS_101 ü DSS_119 ü Echo_61 ü ü ü Echo_110 ü ü ü ü Echo_119 ü ü ü ü Echo_148 ü ü ü Expressvu ü ü ü ü DSS_101 D...

Страница 41: ...actory default satellite assignments Europe Astra 1 Sat A and Hotbird WB Sat B N America DSS_101 Sat A and DSS_119 Sat B L America Galaxy West and None Should you wish to track a different satellite either from the satellite library or a user defined satellite you must instruct the antenna which satellites will be in the active satellite pair Connecting to the TracVision 6 Maintenance Port To do s...

Страница 42: ...mand SATINSTALL sat_a_name sat_b_name cr Where sat_a_name the name of your choice for Satellite A sat_b_name the name of your choice for Satellite B Tables 2 5 and 2 6 list the assigned names for satellites that are in the preprogrammed European and North American satellite libraries If you do not wish to assign a pair of satellites enter None as the name of Satellite B After you have assigned sat...

Страница 43: ...ping HALT and then information about the satellite must be provided including Satellite name Satellite position longitude Transponder information for each of the following polarizations frequencies vertical high vertical low horizontal high horizontal low Transponder information includes frequency symbol rate FEC code and network ID in hexidecimal format Decoder type This information can be obtain...

Страница 44: ...tering the SATCONFIG command you must turn on the DEBUG mode by typing DEBUGON Following the entry of the SATCONFIG and DEBUGON commands enter the satellite transponder information via PC as follows Command SATCONFIG X N F S C ID P B D cr Where SATCONFIG directs data to the RF Board X satellite location A or B N satellite table 98 99 are slots for user configured satellites F frequency in MHz eith...

Страница 45: ...fter entering this information it is necessary to save these settings To do so type SAVE A or SAVE B if this data is for Satellite 2 DEBUGOFF After completing this process restart the system by either cycling power or typing ZAP in the maintenance screen One of your user defined satellite options has now been added to the TracVision 6 satellite library This option will now be available the next ti...

Страница 46: ... Horizontal Low No Data Listed Based on this information the data entered via the PC would look like this assuming that YOURSAT 101 would be Satellite A SATCONFIG USER1 7 W 3 L DEBUGON SATCONFIG A 98 11966 27500 34 0x0800 H H 3 SATCONFIG A 98 11823 27500 34 0x0800 V H 3 SATCONFIG A 98 00000 27500 34 0x0000 V L 3 SATCONFIG A 98 00000 27500 34 0x0000 H L 3 SAVE A DEBUGOFF ZAP 2 20 TracVision 6 Insta...

Страница 47: ...to identify any system problems detected If no data is seen recheck your connections and the terminal software setup 4 After completing the review of the startup and operational routines turn on the IRD and television and check the channels on the selected satellites For European systems view both horizontally and vertically polarized channels if possible 5 When all checks are completed shut down ...

Страница 48: ......

Страница 49: ...e X X X X X X X X Snowy or pixelating television picture X X X X O u t s i d e s a t e l l i t e c o v e r a g e z o n e S e c t i o n 3 1 5 A n t e n n a g y r o f a u l t y S e c t i o n 3 3 L N B a s s e m b l y f a u l t y S e c t i o n 3 3 S a t e l l i t e s i g n a l b l o c k e d S e c t i o n 3 1 4 I n c o r r e c t o r l o o s e R F c o n n e c t o r s S e c t i o n 3 1 7 R a d a r i n t...

Страница 50: ...ing on the power to the TracVision 6 unit the antenna gyro will record that variable motion as standing still This may cause the antenna to track improperly To solve this problem turn TracVision 6 off for at least 10 seconds Turn the system back on making certain that the vessel is either motionless or travelling in a straight line for the 60 seconds immediately following power up 3 1 3 Incorrect ...

Страница 51: ...www satcodx com to check the viable coverage area for a 24 60 cm antenna 3 1 6 Radar Interference The energy levels radiated by radar units can overload the antenna front end circuits Refer to Section 2 1 Choosing the Best Location and Getting the Best Reception to make certain that the TracVision 6 unit is in the optimal location with regard to your radar unit 3 1 7 Incorrect or Loose RF Connecto...

Страница 52: ...However please refer to Section 3 1 7 Multiswitch Interference for an explanation of a potential issue with the use of any type of multiswitch 3 2 IRD Troubleshooting The IRD that was provided with your satellite television service may also be the cause of less than ideal operation First check the IRD s configuration to ensure it is set up for the desired programming In the case of a faulty IRD re...

Страница 53: ...nnector on the front of the switchplate Connect the other end to the serial port on the PC a 9 pin 25 pin connector adapter may be needed for some PCs 2 Open the terminal emulation software and establish the following settings 9600 baud no parity 8 data bits 1 start bit 1 stop bit no flow control 3 Apply power to the TracVision 6 system and allow the system to complete full initialization Data sho...

Страница 54: ......

Страница 55: ...not be verified the warranty period will begin 30 days after the date of manufacture of the original product purchased For additional information on KVH warranty repair and liability policies please refer to the complete warranty statement provided at the conclusion of this manual 4 2 Preventive Maintenance TracVision 6 requires minimal preventive maintenance The following routine housekeeping cho...

Страница 56: ... facsimile or e mail listings inside the front cover Replacement part numbers for field replaceable units FRUs that can be serviced in the field are listed in Table 4 1 These parts may be obtained from any KVH authorized dealer installer or may be ordered directly from KVH FRU Part Number Radome 02 1047 01 CPU 02 0992 RF Detector PCB 02 1017 02 Antenna Gyro Sensor 02 1035 Antenna Gyro Gasket 24 01...

Страница 57: ...wing are step by step procedures for removing and replacing those components that may be serviced Figure 4 1 depicts the location of a number of components within the TracVision 6 Antenna Unit 4 3 Maintenance 54 0166 Rev B U S Galaxy style LNB European LNB Elevation Motor and Drive Assembly Azimuth Motor Antenna Gyro PCB Cover and PCBs Figure 4 1 TracVision 6 Antenna Unit Baseplate Cut Away Table ...

Страница 58: ...s the PCB arrangement connector locations and functions while Figure 4 4 on the next page shows how the printed circuit boards are mounted to the support frame 4 4 TracVision 6 Installation and Technical Manual Figure 4 2 PCB Cover Plate Removal PCB Cover Screws Washers Nuts Washers From Elevation Motor From Azimuth Motor From RFU to CPU Cable From Cable Wrap CPU PCB From Elevation Limit Switch Fr...

Страница 59: ...ted in Section 2 5 Selecting the Active Satellite 4 4 2 RF Detector Board The RF Detector receives operating voltages from both the CPU board and the IRD via the RF cable Ensure that all power including the IRD is turned off before proceeding 1 Unplug the Data and RF Flash cables from the RF Board 2 Observe which RF cable is attached to the top RF connector Add a piece of tape or some identifying ...

Страница 60: ...ables making certain that the RF cable originally attached to the top RF connector on the old RF Board is connected to the top RF connector on the new RF Board 9 Attach the Data and RF Flash cables to the RF Board 4 5 Antenna Gyro Assembly 1 Remove the printed circuit board PCB cover illustrated in Figure 4 2 using a 2 Phillips screwdriver and a 3 8 nut driver socket 2 Use the screwdriver to remov...

Страница 61: ...ts range of motion to ensure that the cable moves freely between the elevation mechanism and the lower assembly Adjust the Antenna Gyro cable as necessary to ensure proper motion Antenna Gyro Calibration 1 With the PC connected to the maintenance port apply power to the antenna unit 2 Type HALT cr while the system is performing the limit switch initialization routine The system will complete the i...

Страница 62: ...nd longitude of the vessel location to the nearest degree 11 Type GPS AA B CCC D cr where AA Latitude in degrees B N or S CCC Longitude in degrees D E or W 12 Verify that the response has the correct parameters 13 Type ZAP to restart reinitialize the system 4 6 Elevation Motor and Belt Replacement The elevation motor is mounted to the inside of the elevation drive assembly support frame Machine sc...

Страница 63: ...he inside of the belt Feed the belt over the motor hub Once the belt is in place work it back and forth to ensure that the belt is aligned and the teeth are engaged with the motor pulley 4 Loosen the nuts and gently press downward on the motor hub until the drive belt is at proper tension Adjust the belt tension for a maximum of 1 8 3 mm deflection with moderate finger pressure between the motor a...

Страница 64: ...but do not tighten 5 Raise the motor and work the toothed drive belt over the outer lip of the hub Press down gently on the motor body while rotating the antenna reflector up and down to ensure free movement 6 Adjust the belt tension for a maximum of 1 8 3 mm deflection with moderate finger pressure between the hub and gear Some readjustment may be necessary if the belt tension results in excessiv...

Страница 65: ...6 Reconnect the RF connectors 4 7 2 U S and Latin American Style LNB Replacement 1 Disconnect both RF coaxial connectors at the LNB Loosen 2 wing screws on the throat of the choke feed until the LNB is free to slide out Withdraw the LNB as pictured in Figure 4 9 2 Insert the replacement LNB as far as it will go Be sure that it bottoms in the feedhorn Be careful not to puncture or dislodge the plas...

Страница 66: ...estraints between the edge of the baseplate and the rotating plate along the side of the antenna frame as pictured in Figure 4 11 5 Pack the TracVision 6 unit in its original package 6 As detailed in the warranty accompanying this product and printed on the last page of this manual a Return Material Authorization RMA number is required prior to the return of the TracVision 6 system to KVH Contact ...

Страница 67: ...nna System Performance Minimum EIRP 47 dBW Elevation range 10 80 Azimuth range 720 Pitch roll range 15 Pitch roll rate 30 second Turn rate 45 second Yaw 90 in 10 seconds Tracking rate 30 per second Position repeatability 0 1 Surge sway heave 0 2 G Shock 20 G 11 msec Vibration 0 9 G rms over 5 33 Hz A 1 System Specifications 54 0166 Rev B Table A 1 TracVision 6 Antenna Physical Specifications Table...

Страница 68: ......

Страница 69: ...Appendix B Switchplate Template B 1 Switchplate Template 54 0166 Rev B 3 82 97 mm 32 8 mm 2 36 60 mm 16 4 mm 3 19 81 mm 2 05 52 mm Panel Cutout 3 32 3 mm dia ...

Страница 70: ......

Страница 71: ...prehensive TracVision 6 wiring diagram is unavailable in PDF format If you require a copy of this wiring diagram please contact KVH Technical Support at 1 401 847 3327 or via email at techs kvh com A copy of the diagram can be mailed or faxed to you upon request ...

Страница 72: ......

Страница 73: ...0 34 0x0000 H L 3 Astra 2S 11817 27500 23 0x0020 V H 3 00000 27500 34 0x0000 V L 3 11798 27500 23 0x0020 H H 3 00000 27500 34 0x0000 H L 3 Hispasat 12152 27500 34 0x0031 V H 3 11660 27500 34 0x0031 V L 3 12154 27500 34 0x0031 H H 3 11522 27500 34 0x0031 H L 3 Hotbird WB 12673 27500 34 0x013E V H 3 11464 27500 34 0x013E V L 3 12654 27500 34 0x013E H H 3 11642 27500 34 0x013E H L 3 Sirius 12130 2750...

Страница 74: ...004 H U 3 Echostar 148 00000 20000 34 0X1004 V H 3 00000 20000 34 0X1004 V U 3 00000 20000 34 0X1004 H H 3 00000 20000 34 0X1004 H U 3 DIRECTV 101 12368 20000 67 0X0000 V U 2 12368 20000 67 0X0000 V U 2 12238 20000 67 0X0000 H U 2 12238 20000 67 0X0000 H U 2 DIRECTV 119 12374 20000 34 0X1004 V U 3 12374 20000 34 0X1004 V U 3 12381 20000 34 0X1004 H U 3 12381 20000 34 0X1004 H U 3 Latin American Sa...

Страница 75: ...G loaded for acquisition RF F A 12368 20000 67 0X0000 V U 2 Satellite configuration data Satellite A RF F A 12368 20000 67 0X0000 V U 2 RF F A 12238 20000 67 0X0000 H U 2 RF F A 12238 20000 67 0X0000 H U 2 RF F B 00000 27500 34 0X0000 V H 3 Satellite configuration data Satellite B RF F B 00000 27500 34 0X0000 V L 3 RF F B 00000 27500 34 0X0000 H H 3 RF F B 00000 27500 34 0X0000 H L 3 RF RF PCB Ver...

Страница 76: ...2060 52 El 2058 07 Expected range is 1700 2300 Gyro Uncertainty Az 3 00 El 3 00 RATE BIAS PASS PASS is expected Entering Tracking POS 62 7 34 0 2353 POS 63 1 33 6 2418 POS 63 1 33 6 2392 POS 63 0 33 5 2442 Network ID Check Comparing the tracked satellite s network ID to POS 63 2 33 5 2472 the selected satellite s network ID POS 63 6 34 1 2454 POS 63 2 33 4 2492 RF Y 0X0000 Indicates positive satel...

Страница 77: ...ommand is responded to with an echo that is if you type ZAP for example and press ENTER the response will be the command you have entered For other commands the response is specific for each command such as VERSION STATUS or HELP F 1 System Commands Software Version Function reports software version and system type Command VERSION Argument none Response KVH TV6 Version XX XX System Status Report F...

Страница 78: ...h Angle Function commands a manual azimuth angle that the mechanism moves to Command AZ xxxx range is 0000 3599 Argument desired azimuth angle of the mechanism relative to external magnetic reference or baseplate fwd 000 359 9 Response echoes the command mechanism moves at a fixed velocity Elevation Angle Function commands a manual elevation angle that the mechanism moves to Command EL xxx range i...

Страница 79: ... Function commands a 0 1 deg UP manual step in elevation angle Command 8 Argument none Response echoes the command Elevation DOWN Step Function commands a 0 1 deg DOWN manual step in elevation angle Command 2 Argument none Response echoes the command F 3 Operational Commands Tracking Mode Function starts active tracking of the satellite Command TRACK Argument none Response echoes the command F 3 M...

Страница 80: ...ponse Wrap Angle xxxx F 4 Tracking and Conical Scan Commands Target Location Function reports the target location in antenna frame Data format is E for elevation in degrees 000 900 and A for azimuth in degrees 0000 3599 with implied decimals Command TGTLOCATION Argument none Response Target Location A E A B E A Analog Signal Strength Report Function reports signal strength from RF detector circuit...

Страница 81: ...l be set to invalid when the frequency is set to 00000 to indicate that there is not a frequency to track for the LNB tone and voltage setting Report RF Tracking Parameters Function reports all RF tracking parameters for primary secondary satellites Command SATCONFIG Response F x fffff S C ID P B D cr Where x Satellite a Primary b Secondary fffff Frequency in MHz 00000 and 10700 to 12700 S Symbol ...

Страница 82: ...llite transponder symbol rate in Mbit second 01000 29999 C the FEC code e g 12 23 34 56 67 78 ID the satellite network ID in hexidecimal format 0x P the LNB polarization v vertical h horizontal B the LNB down conversion frequency l low h high g Latin America u USA D decoding type 0 test 1 DSS A 2 DSS B 3 DVB ID Match Decoded Network ID Function report ID match and decoded network ID Command CHECKI...

Страница 83: ...es Function report names for all configured satellites Command SATLISTA Response SATLISTA sat_name1 sat_nameX Report Valid Satellite B Selections Function report names for all valid satellite B selections for a given satellite A selection Command SATLISTB sat_a_name Response SATLISTB sat_a_name sat_b_name1 sat_b_nameX Install Satellite Pair Function installs satellites A and B as the satellite pai...

Страница 84: ...rts system offset angles Command OFFSETS OFFSETS XXXXX YYYY Response Offsets XXXXX X XXXXX X Where X new azimuth offset 1800 1800 Y new elevation angle 450 450 Apply Default Values to Default Satellites Function updates the default satellites to the default values Command SATPAIR X Response displays numerous frequency commands and reports Satellite Installation Complete Where X 0 satellites defaul...

Страница 85: ...racked or updates the last tracked satellite to the value input if it is different from the current value Command LASTSAT LASTSAT X Response Last sat_name Where X A updates to satellite A or X B updates to satellite B F 9 Owner s Manual and Installation Service Guide 54 0166 Rev B ...

Страница 86: ......

Страница 87: ... Department at 1 401 847 3327 or send an e mail to techs kvh com to obtain the RMA number Write the number in large clear characters on the outside of the box To avoid confusion and misunderstandings shipments without an RMA number clearly visible on the outside box will be refused and returned to you at your expense If possible use the original box and packing material to protect the equipment fr...

Страница 88: ...Fax 401 849 0045 E Mail info kvh com Internet http www kvh com KVH Europe A S Ved Klaedebo 12 2970 Hoersholm Denmark Phone 45 45 160 180 Fax 45 45 867 077 E Mail info kvh dk Internet http www kvh com KVH and TracVision are registered trademarks of KVH Industries Inc TV6 T M Cover 10 00 ...

Отзывы: