33
•
The Information of Page Layout
⎯
On the top side, it shows the front panel of the switch. In the front panel, the
linked ports will display green; as to the ports, which are link off, they will be
dark. For the optional modules, the slot will show only a cover plate if no
module exists and will show a module if a module is present. The image of
module depends on the one you inserted. The same, if disconnected, the port
will show just dark, if linked, green.
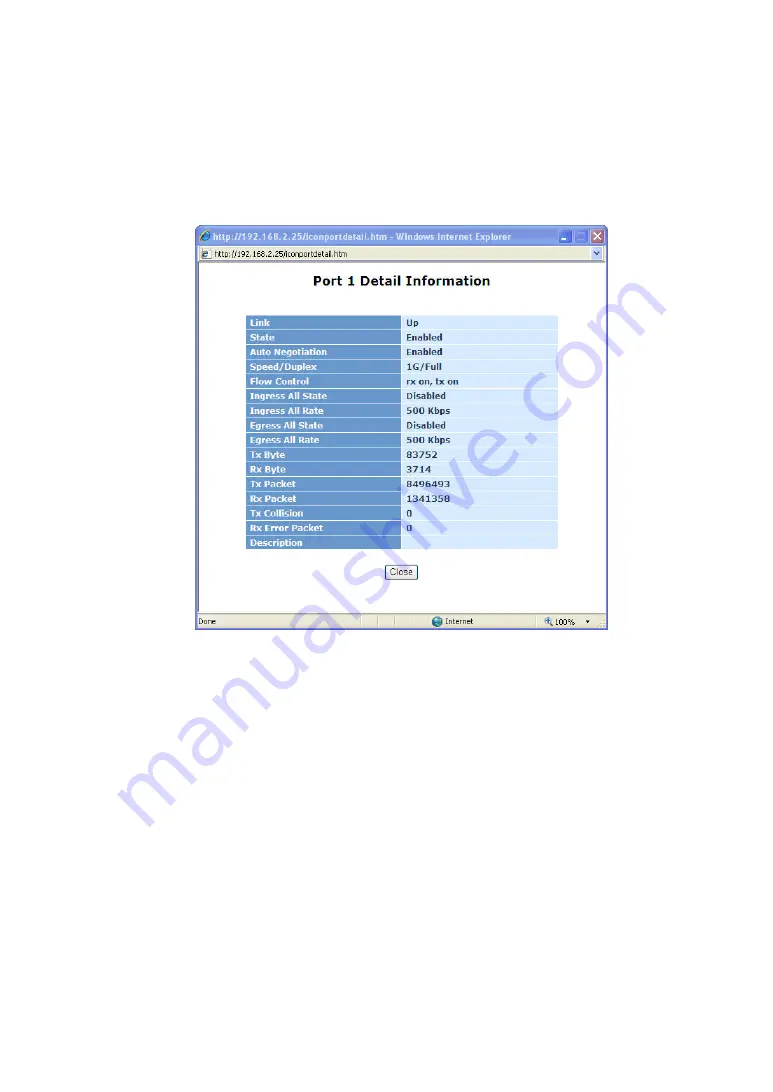
(See Fig. 3-3)
Fig. 3-3 port detail information
In
Fig. 3-3
, it shows the basic information of the clicked port. With this, you’ll
see the information about the port status, traffic status and bandwidth rating for
egress and ingress respectively.
⎯
On the left-top corner, there is a pull-down list for Auto Logout. For the sake of
security, we provide auto-logout function to protect you from illegal user as you
are leaving. If you do not choose any selection in Auto Logout list, it means
you turn on the Auto Logout function and the system will be logged out
automatically when no action on the device 3 minutes later. If OFF is chosen,
the screen will keep as it is. Default is ON.
⎯
On the left side, the main menu tree for web is listed in the page. They are
hierarchical menu. Open the function folder, a sub-menu will be shown. The
functions of each folder are described in its corresponded section respectively.
When clicking it, the function is performed. The following list is the full function
tree for web user interface.
Содержание KGS-2416
Страница 2: ......
Страница 4: ......
Страница 34: ...30 Fig 2 15 Office Network Connection Fig 2 14 Peer to peer Network Connection ...
Страница 93: ...89 Fig 3 39 Fig 3 40 Fig 3 41 ...
Страница 105: ...101 Fig 3 54 Set up Typical Network Application Rules Finish Fig 3 55 Set up Typical Network Application Rules Finish ...
Страница 109: ...105 Fig 3 62 Set up VLAN Tag Priority Mapping Finish ...
Страница 116: ...112 Fig 3 67 Ingress Port Fig 3 68 ...
Страница 118: ...114 Fig 3 71 Fig 3 72 Fig 3 73 ARP ...
Страница 119: ...115 Fig 3 74 ARP Fig 3 75 ARP Fig 3 76 ARP Fig 3 77 ARP ...
Страница 120: ...116 Fig 3 78 ARP Fig 3 79 ARP Fig 3 80 ARP Fig 3 81 ARP ...
Страница 121: ...117 Fig 3 82 ARP Fig 3 83 ARP Fig 3 84 ARP Fig 3 85 ARP Fig 3 86 ARP ...
Страница 122: ...118 Fig 3 87 IPv4 Fig 3 88 IPv4 Fig 3 89 IPv4 ...
Страница 123: ...119 Fig 3 90 IPv4 Fig 3 91 IPv4 Fig 3 92 IPv4 Fig 3 93 IPv4 Fig 3 94 IPv4 ...
Страница 124: ...120 Fig 3 95 IPv4 Fig 3 96 IPv4 Fig 3 97 IPv4 Fig 3 98 IPv4 Fig 3 99 IPv4 ...
Страница 125: ...121 Fig 3 100 IPv4 Fig 3 101 IPv4 Fig 3 102 IPv4 ...
Страница 126: ...122 Fig 3 103 IPv4 Fig 3 104 IPv4 Fig 3 105 IPv4 ...
Страница 127: ...123 Fig 3 106 IPv4 Fig 3 107 IPv4 Fig 3 108 IPv4 ...
Страница 128: ...124 Fig 3 109 IPv4 Fig 3 110 IPv4 Fig 3 111 IPv4 ...
Страница 129: ...125 Fig 3 112 IPv4 Fig 3 113 IPv4 Fig 3 114 IPv4 ...
Страница 130: ...126 Fig 3 115 IPv4 Fig 3 116 IPv4 Fig 3 117 Action ...
Страница 131: ...127 Fig 3 118 Rate Limiter Fig 3 119 Port Copy ...
Страница 132: ...128 Fig 3 120 DMAC Filter Fig 3 121 VLAN ID Filter Fig 3 122 VLAN ID Filter ...
Страница 144: ...140 Fig 3 124 Wizard Fig 3 125 Set up Policy Rules Fig 3 126 Set up Policy Rules ...
Страница 145: ...141 Fig 3 127 Set up Policy Rules Fig 3 128 Set up Policy Rules Finish Fig 3 129 Set up Port Policies ...
Страница 146: ...142 Fig 3 130 Set up Port Policies Fig 3 131 Set up Port Policies ...
Страница 147: ...143 Fig 3 132 Set up Port Policies Finish Fig 3 133 Set up Typical Network Application Rules ...
Страница 148: ...144 Fig 3 134 Set up Typical Network Application Rules Fig 3 135 Set up Typical Network Application Rules ...
Страница 151: ...147 Fig 3 140 Set up Source MAC and Source IP Binding Fig 3 141 Set up Source MAC and Source IP Binding Finish ...
Страница 190: ...186 Restricted Role Same as mentioned in Port Config Restricted Tcn Same as mentioned in Port Config ...
Страница 222: ...218 Fig 4 1 Fig 4 2 ...


