background image

8

EN  Application sheet

KITCHEN HOODS

The model name and important technical charac-

teristics of the kitchen hood are specified inside 

the case.


Security measures

The kitchen hood is connected to the power net-

work with the voltage of 220/240 V – 50 Hz, using 

a wall outlet with earthing only.  The kitchen hood 

has 1 electrocution protection class.

Use the light bulbs with the voltage no higher 

than specified in the Instructions.

It is forbidden to operate the kitchen hood with-

out an aluminum grease filter.

The air from the kitchen hood should be removed 

to the air shaft only (its removal to the chimney is 

strictly forbidden).

SAFETY OF CHILDREN

Children often do not understand the danger of 

electrical appliances. While the kitchen hood is 

functioning, watch your children and do not al-

low them to work with it. Packaging materials 

(such as polyethylene film) may cause suffoca-

tion. Keep them out of reach of children

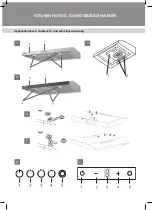
COOKER HOOD DESCRIPTION

The hood exterior consists of the following compo-

nents (Fig. 1;2)

1.  The operation mode switch of the kitchen hood 

can be made in two versions:

A) Push button panel  

B) Electronic panel 

2.  Hood case.

3.  Aluminum grease filter.

4.  Protective glass of backlight lamps.

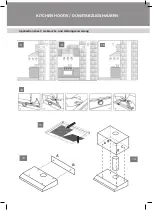
Inside the kitchen hood (after removing the alumi-

num grease filters) (see Fig. 3).

1.   Motor box, which houses the motor, impeller and 

installation pad.

2.   Backlight lamps.

Attention!

To switch the machine to recirculation mode it is 

necessary to install cover on machine outlet (Fig. 

5), included into the kit, while to switch to exhaust 

mode the plug has to be replaced with adapter with 

non-return valve (Fig. 4). 

COOKER HOOD OPERATION

Your kitchen hood has 3 ventilation rates. Depend-

ing on how much damp forms during cooking and 

frying, you may choose the best ventilation rate. 

To make the air completely clear, switch on the 

stove and the hood at the same time. This will im-

prove ventilation efficiency. After you have finished 

cooking, let the kitchen hood operate for a while. 

This will enable to eliminate damps and unwished 

odors in the kitchen. 
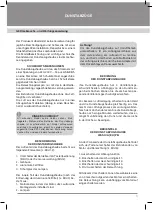
Control panel

JESSICA (EU) PB

On the front panel of the kitchen hood there is a 

mode selection switch of the motor and lighting

lamps (Fig. 6):

1. Kitchen hood power on/off.

2. Rate 1 on.

3. Rate 2 on.

4. Rate 3 on.

5. Backlight lamps on / off.

By means of the mode selection switch, you can 

randomly choose one of the three motor speeds.

Backlighting lamps can be switched on indepen-

dently from the motor operation.

Control panel  

JESSICA (EU) S

On the front panel of the kitchen hood there is a 

touch mode switch to operate the motor and back-

light (Fig. 7). Its elements have the following func-

tions:

1.  Kitchen hood power on / off.

2.   Reducing the speed of the motor.

3.   Display with speed indicator.

4.   Increase the speed of the motor.

5.   Backlight on / off.

The kitchen hood switch on/off operates by touch-

ing the icon 1 for 2-3 seconds. Speed is changed by 

touching  icons "–" or "+".

Содержание JESSICA

Страница 1: ...STABZUGSHAUBEN KITCHEN HOODS HOTTES DE CUISINE CAMPANAS DE COCINA DE Gebrauchs und Wartungsanweisung EN Application sheet FR Guide de l utilisateur SP Guía del usuario www krona steel com JESSICA EU 600 inox PB JESSICA EU 600 inox black glass S ...

Страница 2: ...Application sheet Gebrauchs und Wartungsanweisung KITCHEN HOODS DUNSTABZUGSHAUBEN 1 3 5 4 6 7 2 ...

Страница 3: ...Application sheet Gebrauchs und Wartungsanweisung KITCHEN HOODS DUNSTABZUGSHAUBEN 9 14 13 11 10 12 8 ...

Страница 4: ...sses auf Umwelt und Menschen vorbeugen Das Symbol auf dem Erzeugnis bzw auf Begleitpa pieren weist darauf hin dass man es bei der Entsorgung nicht wie einen normalen Haushaltsmüll behandeln darf Statt dessen ist es an eine entsprechende Annah mestelle für elektrische und elektronische Geräte für eine weitere Entsorgung abzugeben Die Müllentsorgung soll nach örtlichen Vorschriften für Müllentsorgun...

Страница 5: ...waltung Bild 2 2 Gehäuse 3 Aluminium Fettfilter 4 Schutzglas der Lampen Der innere Teil der Dunstabzugshaube nach der Entfernung der Aluminium Fettfilter s Bild 3 be steht aus 1 Motorkasten in dem der Motor das Laufrad die Montageleiste installiert sind 2 Lampen Achtung Um die Dunstabzugshaube auf Umluftbetrieb umzuschalten ist ein Lüftungsverschluss aus dem Lieferumfang am Luftaustritt zu montie ...

Страница 6: ...ngsschacht siehe Bild 8 9 wird die Dunstab zugshaube mittels eines Ringwellenschlauches bzw eines Lüftungskanals an den Lüftungsschacht angeschlossen So gehen alle Küchendünste Brandgeruch und Rauch durch wiederverwendbare Alu Fettfangfilter durch und werden außerhalb des Raumes abge führt Bei diesem Modus der Dunstabzugshaube ist es nicht nötig Akryl Kohlegeruchsfilter einzu bauen Der Modus Luftr...

Страница 7: ...usch der Aufhellungslampe Abb 12 den Dunstabzug spannungslos schalten und den Leiter der durchgebrannten Lampe finden den richtigen Leiter am Anschlusssockel ab klemmen 2 Leuchtenkörper Lamellen drücken und die durchgebrannte Lampe herausnehmen anstatt der durchgebrannten Aufhellungslampe eine neue einsetzen den Leiter der neuen Lampe am Anschlussso ckel neu einklemmen den Dunstabzug wieder ans St...

Страница 8: ...hört dem Lieferumfang nicht Der Rückschlagventil verhindert den Luftzutritt aus dem Lüftungskanal in die Küche 3 Befestigen Sie die Haube mit 4 mitgelieferten Schneideschrauben an dem Wandschränk chen vorläufig durch das Wandschränkchen den flexiblen Luftschlach verlegt Zur Redu zierung von Vibration und Lärm wäre es wün schenswert ein schalldämpfendes Material zwischen der Haube und dem Wandschrä...

Страница 9: ... Operating instructions 1 5 Charcoal lfilter 2 The sets can be changed by manufacture without notice TECHNICAL DATA MODEL JESSICA EU PB JESSICA EU S Overall dimensions mm Width 600 600 Length depth 480 Height min max 82 Outlet opening diameter mm 120 Electric line voltage Frequency 220 240 V 50 Hz Power consumption W Motor 80 Lighting lamps 2 x 1 5 LED Number of ventilation rates 3 Timer no yes 1 ...

Страница 10: ...pad 2 Backlight lamps Attention To switch the machine to recirculation mode it is necessary to install cover on machine outlet Fig 5 included into the kit while to switch to exhaust mode the plug has to be replaced with adapter with non return valve Fig 4 COOKER HOOD OPERATION Your kitchen hood has 3 ventilation rates Depend ing on how much damp forms during cooking and frying you may choose the b...

Страница 11: ...the set and are bought separately The use of the kitchen hood in the recirculation mode reduces its productivity We recommend using the kitchen hood in the mode of air extraction to the air shaft MAINTENANCE AND SERVICE OF THE KITCHEN HOOD Disconnect the power supply before you start any operation related to cleaning or re pair of the kitchen hood Use the cloth damped in warm water with a neutral ...

Страница 12: ... the mains and check its function Check that in all modes and if it functions properly you may begin the hood mounting If not contact the sales agency where you have purchased the hood or warranty workshop It is recommended to remove the protection film on the hoods made of stainless steel only upon completion of the installation procedure Let us remind you that the hood mounting height above an e...

Страница 13: ...he higher the output and the less noise and vibration at the hood If the hood operates in recirculation mode then the markings for the opening for the flexible duct should not be made Install the coal filter on the hood set the damper to the recirculation position and attach the hood to the drawer CONNECTION TO POWER SUPPLY The kitchen hood is connected to the power net work with the voltage of 22...

Страница 14: ...semble fourni comprend 1 Capot de l échappement 1 2 Bride avec un clapet antiretour de 120 mm 1 3 Emballage avec un kit de fixation de l échappement 1 4 Guide d utilisation 1 5 Le filtre de charbon 2 la composition peut être changée sans préavis CARACTÉRISTIQUES TECHNIQUES Modèle JESSICA EU PB JESSICA EU S Dimensions mm Largeur du produit 600 600 Profondeur du produit 480 Hauteur du produit min ma...

Страница 15: ...tte 3 Filtre de récupération de graisse en alumi nium 4 Verre de protection des lampes d éclairage À l intérieur de la hotte après le démontage des filtres en aluminium voir il y en a ce que suit 1 Le capot du moteur dans lequel se trouvent le moteur le moulinet la plaquette de montage 2 Lampes d éclairage Attention Pour mettre la hotte en mode de recirculation vous devez aussi installer le boucho...

Страница 16: ...on est choisi Ainsi les vapeurs les odeurs les brûlés et les fumées qui passent par les filtres à graisse sont envoyés hors de la cuisine Ce mode ne nécessite pas l installation de filtre à charbon anti odeurs Le mode d extraction est le mode le plus efficace car la hotte envoie toutes les odeurs hors de la cuisine dans le puits Le mode de recyclage regardez l image 10 ne pré voit pas de liaison d...

Страница 17: ...appement au réseau électrique Il est défendu de commencer l installation de l échappement et retirer le film de protection de l échappement en acier inoxydable jusqu à ce que vous vous assurez de l état technique de l échap pement en la connectant au réseau électrique et en vérifiant toutes ses fonctions À cette fin il faut placer le corps de l échappement figure 1 position 2 de manière à ce que l...

Страница 18: ...pénétration de l air du puits d aérage dans la cuisine 3 Fixez l échappement avec les quatre vis auto de forage fournies à l armoire suspendue ayant préalablement passés à travers lui la gaine flexible Pour réduire les vibrations et le bruit il est souhaitable de poser du matériau isolant entre l échappement et l armoire 4 Connectez l autre extrémité de la gaine flexible à la bouche de ventilation...

Страница 19: ...Al asegurar una eliminación correcta de este producto Usted ayudará a evitar posi bles consecuencias negativas para el medio ambiente y la salud humana El símbolo en el producto o en la documentación de apoyo especifica que no se puede tratar este producto como un residuo doméstico común durante la elimina ción Por el contrario debe ser tomado a la estación co rrespondiente de los residuos de apar...

Страница 20: ...tro anti grasa de aluminio 4 Vidrio protector de las lámpara de iluminación de fondo En el interior de la campana al quitar los filtros anti grasa de aluminio ver Figura 3 1 La caja del motor con el motor el aspa la zapata de montaje dentro 2 Lámparas de iluminación Atención Para cambiar la campana al modo de recircula ción también debe instalar el tapón en la boca de salida de la campana del kit ...

Страница 21: ...e aire en el eje de venti lación Fig 8 9 la campana de cocina se conecta al eje de ventilación con la ayuda de una manguera corrugada o de tubo plástico El modo de extrac ción es el más eficiente ya que la campana elimi na todas las evaporaciones de la cocina al eje de ventilación En el modo de recirculación Fig 10 la campana no está conectada al eje de ventilación y por lo tanto el aire simplemen...

Страница 22: ...na de la corriente y verifique el funcionamiento de la lámpara de iluminación de fondo La sustitución de las bombillas y los filtros no está incluido en el servicio de garantía INSTRUCCIONES DE INSTALACIÓN DE LA CAMPANA Sólo un especialista tiene el derecho de insta lar y conectar la campana a la red eléctrica No comienza el montaje y no retira la plícula pro tectora de las campanas de acero inoxi...

Страница 23: ...a válvula antirretorno evita que el aire entre del pozo de ventilación en la cocina 3 Fije la campana con los cuatro tornillos sumi nistrados al armario colgante pasando pre liminarmente el conducto flexible dentro del armario Para reducir la vibración y el ruido es deseable colocar material aislante entre la campana y el armario 4 Conecte el otro extremo del conducto flexible al orificio de venti...

Страница 24: ...ei der Diagnostik durch den Spezialisten des Servicezentrums das Erzeugnis intakt sein wird behält sich das Servicezentrum vor von dem Verbraucher die Ent geltung der unnötigen Anfahrt zu verlangen die nach Tarif bewertet wird Der Hersteller ist für keinerlei Schaden verantwortlich der seinem Verbraucher oder seinem Besitz angerichtet wird führt auch keine kostenlose Reparatur in den folgenden Fäl...

Страница 25: ...e trade or ganization and seller s signature including tear off cou pons model and serial number of the product Before calling a service center specialist read the in struction manual of the product carefully If a specialist of the service center correctly diagnoses the product the service center will have the right to demand payment of a false call from the consumer according to the price list Th...

Страница 26: ...alement marqués sur le bon de garantie Avant d appeler le technicien de SAV nous vous deman dons de lire attentivement l instruction d exploitation Si lors du diagnostic le technicien trouve que le ptoduit est operationnel le SAV se réserve le droit de demander au client de payer les frais de fausse alarme selon liste de prix Nous ne serons en aucun cas tenus responsable pour tout dommage spécial ...

Страница 27: ...delo y el número de serie del producto Antes de llamar al especialista del centro de servicio léa con atención el manual de operación del producto Si durante el diagnóstico con el especialista del centro de servicio el producto resulta que funciona correctamente entonces el centro de servicio está en el derecho de exigir al usuario el pago de la flasa llamada de acuerdo con la lista de precios El ...

Страница 28: ...www krona steel com ...

Отзывы: