-10-
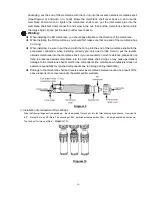
packaging, put the end of the membrane with the O-ring into the reverse osmosis membrane shell
(See Diagram 9) and push it in, finally screw the membrane shell cover back on, and use the
membrane shell wrench to tighten the membrane shell cover, put the inlet water pipe into the
membrane shell inlet water connector and screw in the nut, then put the membrane shell card into
the large single clip and put the water purifier cover back on.
Warning:
◆
When installing the RO membrane, you should pay attention to the direction of the membrane;
◆
When installing the RO membrane, you should first make sure that one end of the membrane has
an O-ring;
◆
When installing, be sure to put the end with the O-ring into the end of the membrane shell with the
pure water connection, when installing correctly you only need a little force to put the reverse
osmosis membrane into the membrane shell, if you encounter too much resistance, please do not
force the reverse osmosis membrane into the membrane shell, doing so may cause permanent
damage to the membrane shell or membrane components (the membrane manufacturer does not
assume responsibility for returned components due to damage during installation);
◆
Damage to the membrane shell and reverse osmosis membrane element caused as a result of the
above reasons is not covered under the water purifier warranty.
Diagram 9
⑥
Installation of pretreatment filter cartridge
Take the filter cartridge out from package, tear the packing film and put into the filter housing by sequence , from right to
left
:
first put 5 micron PP filters; The second put 85 C particles activated carbon filter,
(
rubber gasket side direction up
;
The third put1 micron pp filters
(
diagram 10
)
Diagram 10


