background image

Recording your performance

21

Performance Mode

Recording your performance

You can record your playing along with the auto-accompani-
ment as MIDI data (user song). You can also easily connect a 
USB flash drive to record your performance as audio data (WAV 
format).

Recording as MIDI data

A maximum of 999 songs can be recorded on the i3.

1. 

Select the sound set and style you wish to record in Per-
formance mode, and make changes to the parts, tempo 
and other settings as need be.

The settings for the keyboard parts and accompaniment 
parts are recorded in the user songs.

Note: 

Parts that are muted will not be recorded. Make 

sure that muting is canceled for the part to record (see 
page 13, 19).

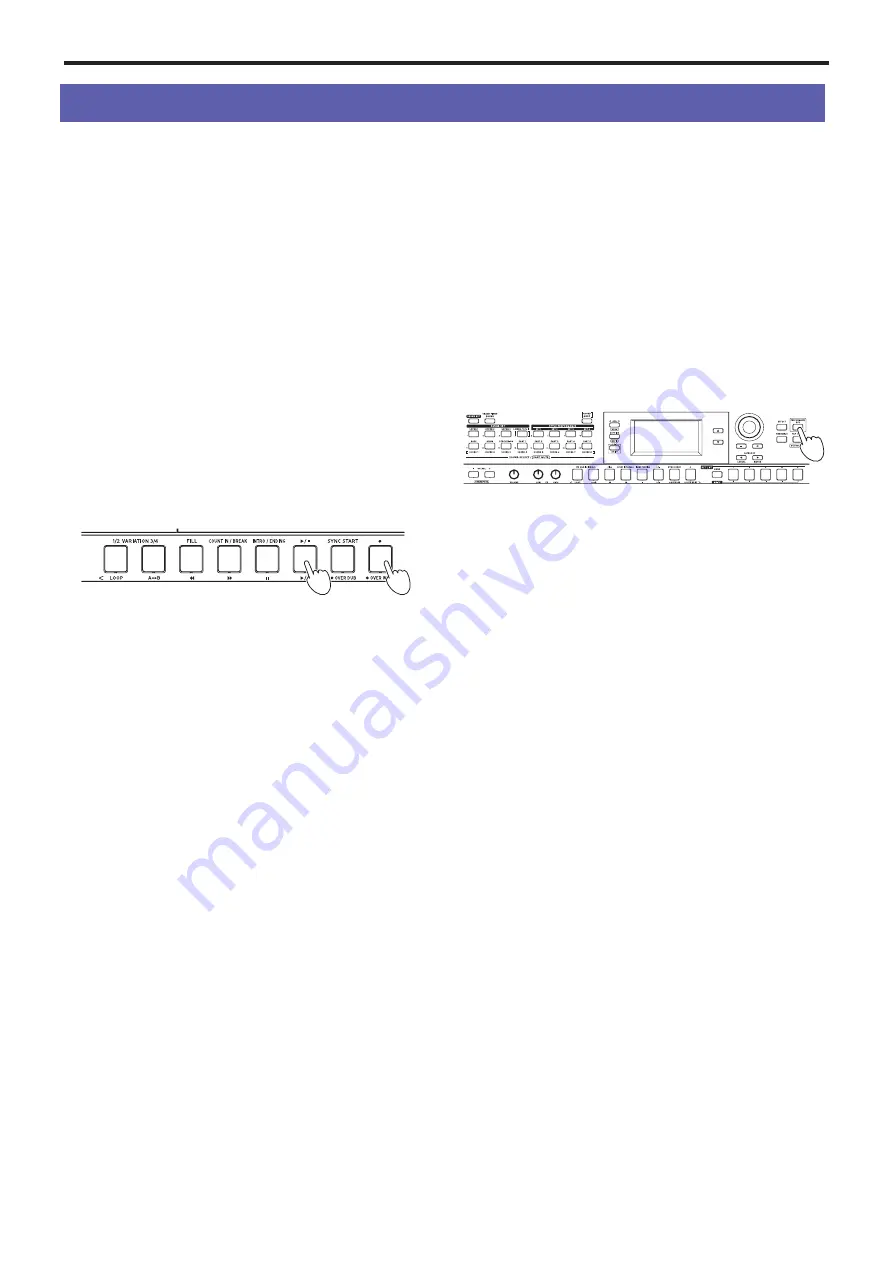
2. 

Press the 

˜

  button to put the i3 in record standby mode 

(the button will light red).

The 

u

/

„

 button blinks.

3,4

2

3. 

Press the 

u

/

„

 button to make it light up. Recording will 

begin.

Play a melody in your right hand while playing chords with 
your left hand. Add a fill or break to the accompaniment 
pattern (page 18).

4. 

Press the 

u

/

„

 button to stop recording. The button will 

go dark.

The contents that you recorded will automatically be saved 
as a user song.

Tip: 

User songs are saved with the name “UserSong,” and 

a sequential number corresponding to the number of the 
recording is added to the end.

Tip: 

User songs can be converted to SMF (Standard MIDI 

File) format. See “UserSong Convert” (page 29) in Media 
mode for details.

Tip: 

To delete user songs you have recorded, see “Deleting 

a user song” (page 24).

Tip: 

To play back your recorded performance, see “Playing 

Back and Editing Songs” (page 22). You can also easily 
edit the user songs.

Recording as audio data 

(performance recording)

You can record your performance on the i3 at any time as au-
dio data (a WAV file), regardless of what mode the i3 is in.

Note: 

You will need to connect a USB flash drive to the i3 in 

order to record audio.

Tip: 

When recording as audio data, you can also record sounds 

at the same time that are inputted from the AUDIO IN jack on 
the rear panel.

1. 

Connect a USB flash drive (page 8).

2. 

Press the PERFORMANCE REC button to begin recording 
(lights up red), and start playing.

2,3

3. 

Press the PERFORMANCE REC button to stop recording. 
The button will go dark.

The audio data that you recorded will be saved with the 
name “AudioSong” on the USB flash drive.

Note: 

Recording will automatically stop after one hour af-

ter you start recording.

Note: 

Note that you may not be able to correctly record 

the data when using certain USB flash drives. For details, 
see the Korg website.

Содержание i3 HD

Страница 1: ...E 1 ...

Страница 2: ... harmony to a melody ensemble 15 Using the set lists 16 Recalling a set list 16 Saving the set list WRITE 16 Playing along with auto accompaniment styles 17 Playing with a style you choose 17 Changing the accompaniment pattern 18 Changing the Style Settings 19 Turning the accompaniment part on off changing the volume and sounds 19 Selecting effects for the accompaniment parts 19 Adjusting the volu...

Страница 3: ... sounds The i3 features a large number of sounds from many different instruments and rhythm pat terns in a variety of genres page 12 Ready to play with a single touch set list function The set list function lets you record and recre ate the custom settings you like for your own use convenient when playing live page 16 Playing along with a style auto accompaniment You can select from different genr...

Страница 4: ...r panel 1 2 3 4 5 6 7 8 9 1 Cord hook page 7 2 DC 12V jack page 7 3 Power button page 10 4 USB TO DEVICE port USB TO HOST port page 8 5 MIDI OUT connector page 9 6 FOOT CONTROLLER jack page 8 7 OUTPUT L MONO R jacks page 7 8 AUDIO IN jack page 9 9 Headphones jack page 8 10 Battery compartment page 7 Bottom side 10 ...

Страница 5: ...he desired button a SHIFT function See List of shortcuts page 33 for details 8 p button q button page 11 9 Dial page 11 10 and buttons page 11 11 CATEGORY t and u CANCEL ENTER buttons page 11 12 EFFECT button page 14 19 13 PERFORMANCE REC button page 21 14 TAP TEMPO button page 11 17 15 ENSEMBLE button page 15 16 SET LIST section page 16 BANK WRITE button SET LIST 1 5 buttons 17 Transport section ...

Страница 6: ...ds the input page 9 7 USB icon Displays when a USB flash drive is plugged into the USB TO DEVICE port page 8 8 Battery indication Displays the remaining amount of battery power when run ning on batteries page 7 9 Item to set number Displays the name and number of the setting shown in the display 10 Sound set name or sound name Shows the name of the currently selected sound set or sound The menu na...

Страница 7: ...ht cause the batteries to leak or burst 4 Close the battery cover Note To make sure the correct battery level is displayed configure the setting on the i3 for the type of battery you are using see Setting the battery type on page 25 Replacing the batteries A battery indicator is shown at the upper right hand corner of the display Note This indicator will not be displayed when the i3 is con nected ...

Страница 8: ...ble USB flash drive turn off the power on the i3 and plug the flash drive into the USB TO DE VICE port on the rear panel The USB icon will be shown in the top right of the display when you turn the power back on USB flash drive USB icon Display Note When removing or plugging in the USB flash drive be sure to turn off the power on the i3 first Note Make sure that the USB flash drive is facing the r...

Страница 9: ...our audio equipment and the i3 before you connect anything Leaving the power on when you make connections may cause damage to other connected devices or cause a malfunction When turning on the power first turn your audio equip ment on and then turn on the i3 When turning off the power stop playback on the audio device turn off the i3 and then turn off your audio equipment Using a MIDI tone generat...

Страница 10: ...s of the i3 using the key board or use the styles auto accompaniment function to per form The i3 normally operates in performance mode To return to Performance mode after using a different mode press the EXIT SHIFT button and then press the SEQ SETTING and EXIT SHIFT buttons to turn those buttons off Sequencer mode page 22 Use this mode to play back your recorded performance or oth er music data i...

Страница 11: ...te The pitch may not change for some sounds y y Move the joystick up and down to change the sound of the keyboard part Tip How much the sounds will change when you move the joystick depends on the sound set you have selected Adjusting the tonal character equalizer You can use the equalizer to adjust the tonal character of the i3 s sound as you like The HIGH knob affects the high frequen cy range a...

Страница 12: ...uted page 13 The status of each part will change depending on the sound set you select y y Upper parts These parts are played in the high note range of the key board There are three upper parts UPPER 1 3 When all three parts are turned on you can stack three sounds to gether y y Lower part This part is played in the low note range of the keyboard When the lower part is turned off the split functio...

Страница 13: ...Changing sounds 1 Press the button for the part whose sound you want to change the button will blink The sound name for the part will appear on the display 1 3 2 2 Use the dial button and CATEGORY t u buttons to select the sound set you want to play Press the CATEGORY t u buttons to switch the sound between different categories 3 Press the EXIT SHIFT button to return to the sound set select screen...

Страница 14: ... OCTAVE or OCTAVE button to change the octave 3 Press the EXIT SHIFT button to return to the sound set select screen Changing the key transpose You can play in different keys on the keyboard by changing the key The setting value will be displayed while you make the setting y y Lowering the key hold down the EXIT SHIFT button and press the OCTAVE button y y Raising the key hold down the EXIT SHIFT ...

Страница 15: ...t be too noticeable 3 Press the EXIT SHIFT button to return to the sound set or sound select screen Adding harmony to a melody ensemble This adds a harmony to the melody you are playing ensemble function The harmony will vary depending on the style that is selected Tip The harmony can be heard even when the lower part is set for specifying chords only split hold is turned on 1 Press the ENSEMBLE b...

Страница 16: ...o their default state once you turn off the power If you have changed any settings for a sound set or style to match your preferences we recommend that you save your settings as a set list 1 Change the settings of the i3 as you like 2 Press the BANK WRITE button to select the bank where the set list will be saved If you save to banks A C the set lists already saved there will be overwritten y y Ba...

Страница 17: ...ft side Chord recognition range y y When the LOWER SPLIT button lights up green The left side of the keyboard lower part can be used for both playing notes and recognizing chords To enable chord recognition over the entire keyboard range hold down the EXIT SHIFT button and press the LOWER SPLIT button The button will go dark y y To change chords without sounding the lower part While holding down t...

Страница 18: ...ents 1 VARIATION 1 2 Lights green Simple 2 Lights red Slightly complex 3 VARIATION 3 4 Lights green Complex 4 Lights red Advanced complex The arrangement will become progressively more complex with higher variation numbers 3 Press the INTRO ENDING button to select the intro Each press of the button will switch between intro 1 and 2 Intro or ending Button state Contents 1 Lights green Includes chor...

Страница 19: ...utton to return to the sound set select screen Selecting effects for the accompaniment parts The accompaniment parts can use two effects effect 3 4 at the same time These effects are preset in each style You can change the effect types and how they will be applied to match your tastes Changing the effect type This shows how you can change the effect types that are set for effects 3 and 4 1 Press t...

Страница 20: ...ment parts You can adjust the volume balance between the keyboard and accompaniment parts as you like y y To make the keyboard part softer Turn the dial to the left while holding down the SOUND SET button y y To make the accompaniment part softer Turn the dial to the right while holding down the SOUND SET button ...

Страница 21: ...re saved with the name UserSong and a sequential number corresponding to the number of the recording is added to the end Tip User songs can be converted to SMF Standard MIDI File format See UserSong Convert page 29 in Media mode for details Tip To delete user songs you have recorded see Deleting a user song page 24 Tip To play back your recorded performance see Playing Back and Editing Songs page ...

Страница 22: ...t to play back directly into the i3 folder When you enter Sequencer mode with the USB flash drive plugged in the files in the i3 folder can be selected as songs Playing a song You can play the keyboard while a song is playing back Try playing back different songs and playing along 1 To play back songs stored on a USB flash drive first con nect the USB flash drive that contains the data Tip Refer t...

Страница 23: ...k in an A B loop B A 1 Press the u button to play back the song 1 2 3 4 2 Press the A1 B button at the start of where you want to begin the loop the button will blink 3 Press the A1 B button again at the end of where you want to end the loop the button will light Loop playback will begin 4 To cancel the loop playback press the A1 B button The button will go dark and normal playback will resume Edi...

Страница 24: ...rt will not be recorded in the user song 6 Press the OVER DUB button when you are finished overdubbing the button will go dark Note To overdub again press the u button to stop play back and follow the steps from step 3 on 7 Press the u button to check what you overdubbed Overdubbing example sound set Song Play Over DUB Stop Upper 1 Track 1 Upper 2 Track 2 Upper 3 Track 3 Lower Track 4 Bass Track 9...

Страница 25: ...de Changing the pedal function Follow the steps below to change the function of the pedal connected to the FOOT CONTROLLER jack 1 Connect the pedal to the FOOT CONTROLLER jack 2 In SETTING mode use the dial or the buttons to select Pedal Function 3 Press the q button to move the cursor to the value 4 Turn the dial to select the pedal function No Assign Select this when you are not using a pedal Da...

Страница 26: ...ureMajor PureMinor Arabic Pythagorean Werckmeister Kirnberger Slendro Pelog Stretch User 09 Upper Scale Type sets the scale for the upper part 10 Style Scale Type sets the scale used for the style accompaniment part and the lower part SoundSet This is the scale set for each style Equal equal temperament tuning This is a widely used scale in general use where the difference in pitch between each se...

Страница 27: ...tor and to the USB TO HOST port Off Notes that you play on the keyboard will send MIDI data to the USB TO HOST port but the internal sound generator will not sound Turn this setting to Off when the i3 is connected to a computer that is set to echo back and when you want to use the i3 as a sound generator in order to prevent notes from sounding in duplicate 15 Metronome Level 0 100 127 Sets the met...

Страница 28: ... the Korg website Copy the user styles files with an STY extension and the user programs files with a PCG extension to a USB flash drive and then load them into the i3 Note Specifications vary by product so the sounds may sound different from the instrument where the original data was cre ated when played back on the i3 1 On your computer create a folder named i3 on the root directory of your USB ...

Страница 29: ...ge 8 for details 7 System Update Updates the system firmware File and folder structure When saving data to a USB flash drive from the i3 or when formatting a USB flash drive a folder named i3 will automat ically be created on the media When using the SetListBackUp and Song Convert functions in Media mode the files shown below will be saved to the i3 folder SetList A folder named SetList will be cr...

Страница 30: ... will appear on the display 4 Bring the pedal all the way down towards you and take your foot off The value will appear on the display 5 Press the u button Measuring Max will appear on the display 6 Press the pedal fully upward and away from you and take your foot off The value will appear on the display 7 Press the u button When the calibration is done the word Completed will be shown on the disp...

Страница 31: ... t work as intended The functions or polarity for the pedal might not be set correctly Set the pedal function Pedal Function and polarity Pedal Polarity in Setting mode page 25 Is the variable range for the expression pedal set correctly Follow the instructions shown in Calibrating the expression pedal page 30 I can t record a user song A maximum of 999 user songs can be recorded You will need to ...

Страница 32: ...note T T Major 6th 3 note T 4 note T T Major 7th 2 note T 3 note T T Sus 2 note 3 note Sus 2 3 note T T T T 2 note T T T 4 note T T T T T Dominant 7th 4 note T T Dominant 7th Sus 4 3 note T T 3 note Flat 5th 4 note T T Major 7th Sus 4 T 4 note Major 7th 5 T T T T 4 note Dominant 7th 5 T 4 note T T Minor 7th 3 note T 4 note T T Minor Major 7th 3 note T 3 note T T Diminished 4 note Diminished 7th 4 ...

Страница 33: ...ortcuts that use the dial Hold down a button shown below and turn the dial to access the supported functions The functions that can be operated will vary with the mode of the i3 Button Mode Function Page reference 1 SOUND SET button Performance mode Adjusts the volume balance of the keyboard and accompaniment parts Adjusting the volume balance between the keyboard and accompaniment parts page 20 S...

Страница 34: ...NSEMBLE button buttons for SET LIST section buttons for transpose section EQ knobs LOW HIGH VOLUME knob OCTAVE buttons Set lists 5 buttons x10 banks Tempo 30 240 Transpose 12 to 0 to 12 in semitones Tuning 427 5 Hz 452 9 Hz Function i3 Connectors FOOT CONTROLLER jack 6 3 mm phone jack half damper not supported AUDIO IN jack 3 5 mm stereo mini phone jack OUTPUT L MONO R jacks 6 3 mm TS phone jack u...

Страница 35: ...O 0 127 0 127 0 32 1 2 64 6 7 11 10 91 93 71 72 73 74 75 76 77 78 98 99 100 101 120 121 1 X 1 X 0 127 0 127 O 9n V 1 127 O 8n V 0 127 O 9n V 1 127 X 0 127 3 X X Date 2019 11 7 Version 1 00 X X O O X O O O O O O O O O O O O O O O O O O O O O O O O O O O O O X X X X X O X X X X X X O X X O 123 127 X X 4 1 i3 will transmits Sequencer data 2 Includes setting of inquiry and master volume 3 When the MID...

Страница 36: ... 2019 KORG INC www korg com Published 01 2020 ...

Отзывы: