Print Media
42
Wet (or damp)
"
Keep media between 35% and 85% relative humidity. Toner does
not adhere well to moist or wet media.
Layered
Adhesive
Folded, creased, curled, embossed, warped, or wrinkled
Perforated, three-hole punched, or torn
Too slick, too coarse, or too textured
Different in texture (roughness) on the front and back
Too thin or too thick
Stuck together with static electricity
Composed of foil or gilt; too luminous
Heat sensitive or cannot withstand the fusing temperature (180°C
[356°F])
Irregularly shaped (not rectangular or not cut at right angles)
Attached with glue, tape, paper clips, staples, ribbons, hooks, or buttons
Acidic
Any other media that is not approved
Thick Stock
Paper thicker than 90 g/m
2
(24 lb bond) is referred to as thick stock. Test all
thick stock to ensure acceptable performance and to ensure that the image
does not shift.
You can print continuously with thick stock. However, this could affect the
media feed, depending on the media quality and printing environment. If
problems occur, stop the continuous printing and print one sheet at a time.
"
43 lb bond is also referred to as 90 lb index stock.
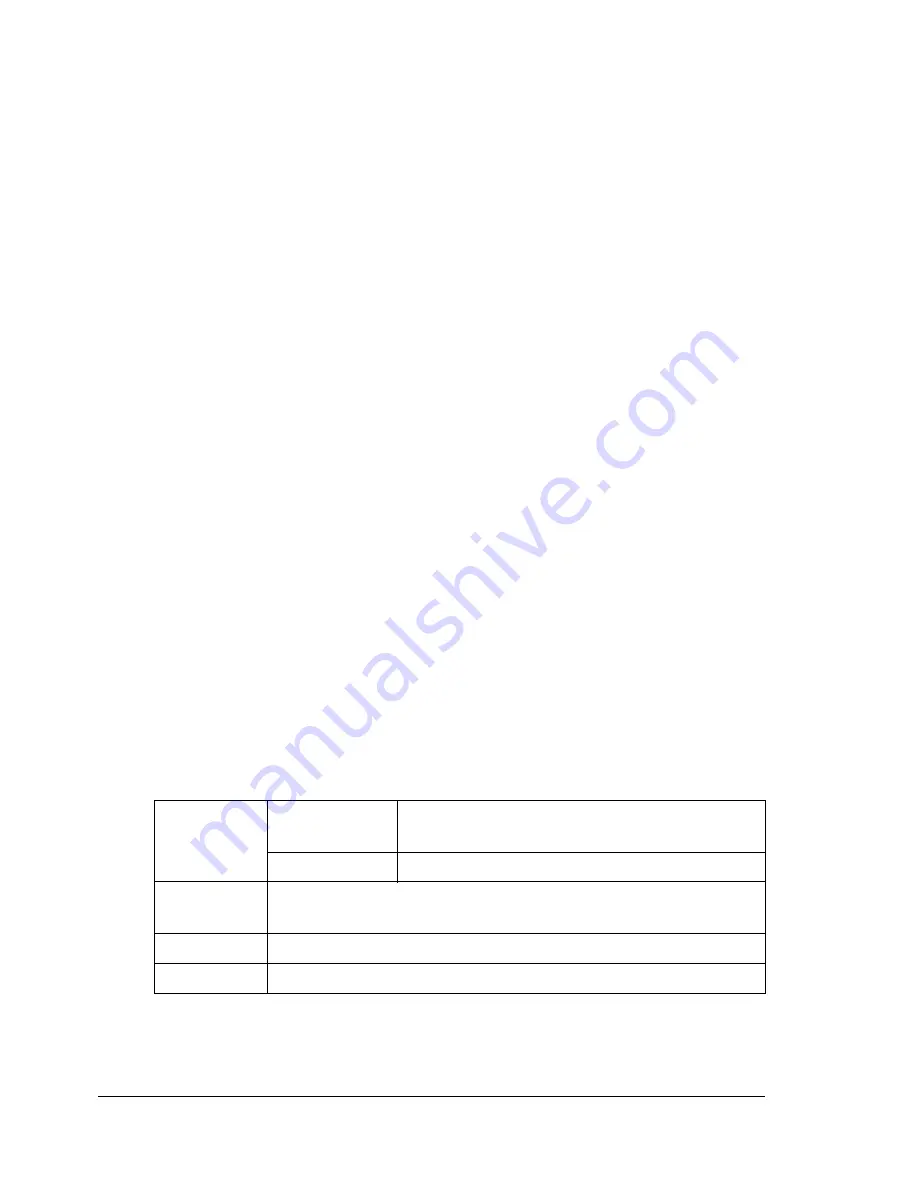
Capacity
Tray 1
Up to 50 sheets, depending on their thick-
ness
Tray 2
Not supported
Driver
Media Type
Thick Stock
Weight
91 to 163 g/m² (25 to 43 lb bond)
Duplexing
Not supported
Содержание Magicolor 2590
Страница 1: ...magicolor 2590MF Printer Copier Scanner User s Guide 4556 9602 01A 1800835 001B...
Страница 14: ...Contents viii...
Страница 15: ...1 Introduction...
Страница 24: ...Getting Acquainted with Your Machine 10...
Страница 25: ...2 Control Panel and Configuration Menu...
Страница 52: ...Configuration Menu Overview 38...
Страница 53: ...3 Media Handling...
Страница 71: ...Loading Media 57 10 Carefully close the engine cover...
Страница 77: ...Loading Media 63 6 Reattach the lid to Tray 2 7 Reinsert Tray 2 into the machine...
Страница 87: ...4 Using the Printer Driver...
Страница 96: ...Printer Driver Settings 82...
Страница 97: ...5 Using Direct Print...
Страница 100: ...Camera Direct Photo Printing 86...
Страница 101: ...6 Using the Copier...
Страница 112: ...Making Advanced Copies 98...
Страница 113: ...7 Using the Scanner...
Страница 138: ...Basic Scan to PC Operation 124...
Страница 139: ...8 Replacing Consumables...
Страница 155: ...9 Maintenance...
Страница 164: ...Cleaning the machine 150 8 Carefully close the engine cover 9 Carefully close the scanner unit...
Страница 170: ...Storing the machine 156...
Страница 171: ...10 10 Troubleshooting...
Страница 181: ...Clearing Media Misfeeds 167 8 Reinstall the drum cartridge 9 Carefully close the engine cover...
Страница 182: ...Clearing Media Misfeeds 168 10 Carefully close the scanner unit 11 Remove the lid from Tray 1 12 Remove any misfed paper...
Страница 185: ...Clearing Media Misfeeds 171 20 Reinsert Tray 2...
Страница 188: ...Clearing Media Misfeeds 174 4 Remove any misfed media 5 Close the ADF cover 6 Close the ADF feed cover...
Страница 214: ...Status Error and Service Messages 200...
Страница 215: ...11 11 Installing Accessories...
Страница 223: ...A Appendix...
Страница 236: ...222...


