


Manual EDU 2AE/TOP/MITO
Page 7
21) Compens
–
Compensation:
This function allows an increase or decrease of the displayed torque
after calibration. The available range is from 0 to ±9.99 Nm. For example: after calibration (see Torque
calibration) you make a screwing cycle on your assembly and compare the value you see on the main screen
display with the value you see on a torque tester (for example a mini-K or a K model). Let's say you notice
that the torque displayed in the unit EDU 2AE/TOP/MITO is +0.2 Nm higher than the value indicated on
the tester (which is the right one). In this case you change this value by setting -0.2 Nm so that the value on
the screen will be the same as the value on the tester.
If it’s lower than 0.3
Nm, you need to set +0.3 Nm and
so on.
22) Unit:
You can choose between the following units of measurements: Nm and in.lbs.
23) Torq min
–
Minimum torque:
The minimum torque and maximum torque options allow the user to
set the acceptable torque range for each single application. When the reached torque is inside this range,
“tightening OK” will be displayed on the status bar and the green led will light up.
If the reached torque is
outside this range the messages “error minimum torque” or “error maximum torque” will be displayed. You
can set the torque range from 0 to 40 Nm in steps of 0.01 Nm.
The minimum torque option allows to set the lowest value of the torque range
and it’s on if calibration is
ON. If calibration is OFF, the minimum torque value automatically sets on 0 Nm.
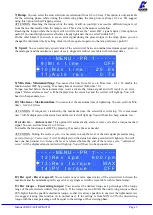
- - - - - M E N U - - P R : 1 - - - - -
2 4 ) T o r q
m a x :
1 . 5 0 N m
2 5 ) I n s .
b a r c o d e
2 6 ) F u n c
T & A :
O F F
24) Torq max
–
Maximum Torque:
The minimum torque and maximum torque options allow the user
to set the acceptable torque range for the single application. When the reached torque is inside this range,
“right screwing” will be displayed on the status bar and the green led will light up. The messages “below
mi
nimum torque” or “over maximum torque” will be displayed if the reached torque is outside this range.
You can set the torque range from 0 to 40 Nm at intervals of 0.01 Nm.
The maximum torque option allows to set the highest value of the torque range and it
’s on if the calibration
is ON. If the calibration is OFF the maximum torque value automatically sets on 40 Nm.
25) Ins. barcode:
to scan a barcode and recall the desired program. To be used in combination with option
4. of the Sequence Menu.
THE FOLLOWING MENU IS AVAILABLE ON TA VERSION ONLY
26) Func T&A
–
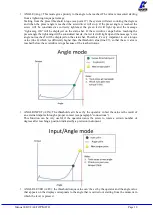
T&A function mode:
You can activate the Torque & Angle function. Set OFF if you
don’t need
this function. If you set ON you can choose among six working conditions (see T&A specific
instructions).
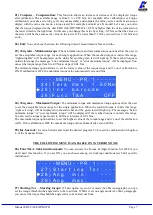
- - - - - M E N U - - P R : 1 - - - - -
2 7 ) S t a r t i n g
T o r : - - -
2 8 ) A n g .
m i n :
- - -
2 9 ) A n g .
m a x :
- - -
27) Starting Tor
–
Starting torque:
If T&A option is set on Tor mode (See T&A paragraph), you can
set the torque threshold the angle starts to be read from. If T&A is set on angle mode (see T&A paragraph),
you can set the torque threshold the angle starts to be carried out from.
Содержание EDU 2AE/TOP/MITO
Страница 22: ...Manual EDU 2AE TOP MITO Page 22 EXPLODED VIEW...


