Kolver EDU 2AE/TOP/MITO Скачать руководство пользователя страница 2

Manual EDU 2AE/TOP/MITO

Page 2

EDU 2AE/TOP/MITO power supply and control units are an innovative system for controlling the torque of
any MITO electric screwdriver either inline, pistol, with angle head or for automation.

EDU 2AE/TOP/MITO delivers all the advantages of precision torque control electric tools at a fraction of
the price of transdurized tools.
The  state-of-the-art  electronic  control  circuit  cuts  the  power  supply  to  the  motor  calculating  the  correct
torque in response to 3 parameters; voltage, frequency and current, according to the selected options.

Model

Torque (Nm)

Speed

Min

Max

MITO 15H

0,05-1,5

100

850

MITO 15L

0,05-0,5

100

850

IMPORTANT: EDU 2AE/TOP/MITO is a highly accurate unit but it is critically important to select
the correct options to ensure that proper torque is being applied. Read the menu description carefully
and in case you are unsure please contact Kolver for support information.

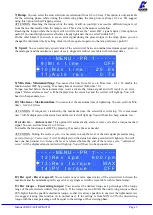
Turn the unit on through the on/off switch on the back panel. The unit will carry a general system check and
the words

waiting connection

” will appear

on the last line of the display. If the connection with the motor

control board is successful the following screen will be displayed:

K o l v e r

S . R . L .

E D U

2 A E

T O P

M I T O

V e r s i o n

1 . 0

l o a d i n g . . .

Press any key on the front panel to enter the main screen (see following picture).
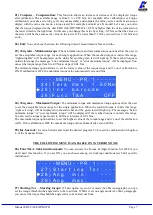
M I T O 1 5

1 0 : 0 0

P R : 1

S :

0 / 0 1

T :

A :

w a i t i n g

1- Reached torque level in Nm or in.lbs
2- Program number or sequence
3- Screwdriver model
4- Clock
5- Screw count: done screws/total screws
6- Angle value in degrees (only model EDU 2AE/TOP/MITO/TA)
7- Status bar (ready,

errors, etc…)

2

1

3

4

5

6

7

Содержание EDU 2AE/TOP/MITO

Страница 1: ...V DC 200 VA FUSE 3 15 A DIMENSIONS 190 x 205 x h120 mm PESO 4 Kg DECLARATION OF CONFORMITY KOLVER S r l declares that the new tool here described control unit model EDU 2AE TOP MITO is in conformity...

Страница 2: ...important to select the correct options to ensure that proper torque is being applied Read the menu description carefully and in case you are unsure please contact Kolver for support information Turn...

Страница 3: ...n this screen MAIN MENU MA I N ME NU OK c h a n g e E S C q u i t P r o g r a m s e t t i n g S e q u e n c e s e t t i n g Program setting It indicates the menu section where you can set or modify th...

Страница 4: ...astic or sheet metal or a metric machine screw on a material subject to strain for example gasket o ring etc A hard joint is typically a fastener joining metal with metal If you select the option SOFT...

Страница 5: ...sounds too 10 Max time Maximum time You can select the maximum time of tightening You can set from Min time 0 1s to 20 0 sec ATTENTION If torque isn t reached by the maximum time the screwdriver will...

Страница 6: ...beep sounds too ME NU P R 1 1 5 R o t a t i o n r i g h t 1 6 R e s e t a u t ON 1 7 P r e s s E S C O F F 15 Rotation You can choose between right tightening standard screws or left tightening left t...

Страница 7: ...ange and it s on if calibration is ON If calibration is OFF the minimum torque value automatically sets on 0 Nm ME NU P R 1 2 4 T o r q m a x 1 5 0 Nm 2 5 I n s b a r c o d e 2 6 F u n c T A O F F 24...

Страница 8: ...a r c O F F 5 R e s a u t s e q O F F 3 Ext box It allows to enable or disable the external switch box ON switch box enabled OFF switch box disabled 4 Barc mode Barcode mode It allows to choose the b...

Страница 9: ...enabled O P T I ON S ME N U 5 R e s e t P RG 6 S e t t i m e d a t e 7 C y c l e s 0 0 0 0 0 0 0 6 Set time date to set time and date on the control unit 7 Cycles Total number of cycles It shows the...

Страница 10: ...displayed If you choose ON calibration will continue and the following screen will be displayed 4 Set the first torque level percentage by pressing o then press OK 5 Complete a fastening cycle 6 If y...

Страница 11: ...d as incorrectly tightened In this case the red led will light up and the message Error Max Min Angle or Error Max Min Torque will be displayed TORQUE INPUT T IN It corresponds to Torque mode except f...

Страница 12: ...message error angle not reached will be displayed on the status bar Therefore it s very important to set a torque value line 4 which is sufficiently higher than the threshold value line 27 so that the...

Страница 13: ...the control unit utters a 0 5 sec beep as confirmation On the other hand torque reached under min time during the Ramp time or under the Brake time see error signals on the display will cause the con...

Страница 14: ...activates every time the torque is reached and it resets when the lever or remote start is released Signal is 24VDC INPUT 6 T A INPUT External input for making the control unit start to count the ang...

Страница 15: ...on to reser remote errors 5 RESET EXT If enabled see point 4 OK ESC commands in the option menu it resets program or sequence according to the preset function see point 5 Reset in the option menu 6 IN...

Страница 16: ...nal works in parallel with the yellow led on the front panel 4 SEQUENCE END It indicates the end of a sequence if enabled 5 NOK T A It activates if any angle error occurs 6 PR OK It activates at the e...

Страница 17: ...UTPUT 3 It indicates you re using program 3 4 OUTPUT 4 It indicates you re using program 4 5 OUTPUT 5 It indicates you re using program 5 6 OUTPUT 6 It indicates you re using program 6 7 OUTPUT 7 It i...

Страница 18: ...ion 15 ESC EXT If enabled see point 4 OK ESC in the option menu ESC key function to reset remote errors 16 RESET EXT If enabled see point 4 OK ESC in the option menu it resets program or sequence acco...

Страница 19: ...OTING ERROR PROBLEM SOLUTION 0 waiting connection doesn t turn into system ready after it s been switched on Check flat connector inside the unit 1 tightened screw is displayed on the status bar the t...

Страница 20: ...he status bar The lever has been released while tightening Such error can be enabled or disabled through PROGRAM MENU see point 18 on the program menu 16 Error loosen torque is displayed on the status...

Страница 21: ...ns with BC and it s followed by the code of the scanned product Result screwing result correct or incorrect OK the torque has been correctly reached all the selected parameters are satisfied and the c...

Страница 22: ...Manual EDU 2AE TOP MITO Page 22 EXPLODED VIEW...

Страница 23: ...ort 4 800016 B 14 Bottom panel 819001 15 Flat amp 10vie 10cm 872438 T 16 Flat amp 20vie 24cm 819007 17 Spacer 15mm dest4 8mm 4 890004 T 18 Connector M12 5 pin nut Connector M12 8 pin nut 201666 R1 201...

Страница 24: ...replace free of charge such items 3 This guarantee does not cover repair or replacement required as a consequence of products which have been abused misused or modified or which have been repaired usi...

Отзывы: